


hygro sensor, but direct rain must be avoided.
DETAILED SETUP GUIDE
I. BATTERY INSTALLATION (When one
thermo-hygro sensor is being used)
1. First, insert the batteries to the thermo-hygro
sensor (see “A. thermo-hygro sensor”
below).
2. Within 2 minutes of powering up the sensor,
insert the batteries to the Wireless Weather
Station (see “B. Wireless Weather Station”
below). Once the batteries are in place, all
segments of the LCD will light up briefly.
Following the indoor temperature and the
time as 12:00 will be displayed. If they are
not shown in LCD after 60 seconds, remove
the batteries and wait for at least 60 seconds
before reinserting them. Once the indoor
data is displayed user may proceed to the
next step.
3. After the batteries are inserted, the Weather
Station will start receiving data signal from
the sensor. The outdoor temperature and
humidity should then be displayed on the
Weather Station. If this does not happen after
2 minutes, the batteries will need to be
removed from both units and reset from step
1 and the signal reception icon is no longer
shown.
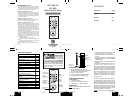
SIZE AA LR6
SIZE AA LR6
Battery
Compartment
Battery Cover
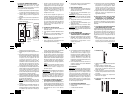
A. THERMO-HYGRO SENSOR
1. Remove the Battery Cover.
2. Observing the correct polarity, install 2 “AA”
Alkaline Batteries-make sure they do not
spring free, or start-up problems may occur.
Replace the Battery Cover.
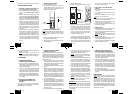
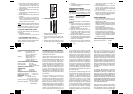
B. WIRELESS WEATHER STATION
Note:
After the batteries are installed, DO NOT
press any buttons. This may interfere with the
signals, causing temperatures to register
incorrectly.
1. Remove the Battery Cover on the back of
the Wireless Weather Station.
2. Observing the correct polarity, install 2 “AAA”
Alkaline Batteries.
3. Replace Battery Cover.
4. Wait 15 minutes before pressing any buttons.
* When the signal is successfully received by
the Weather Station, the icon will be switched
on. (If not successful, the icon will not be
shown in LCD) So the user can easily see
whether the last reception was successful
(icon on) or not (icon off). On the other hand,
the short blinking of the icon shows that a
reception is being done now.
• If the signal reception is not successful on
the first frequency (915MHz) for 45 seconds,
the frequency is changed to 920MHz and
the learning is tried another 45 seconds. If
still not successful the reception is tried for
Battery
Compartment
Battery Cover
Sensor signal
reception icon*
45 seconds on 910MHz. This will also be
done for re-synchronization.
C. SELECTING 12 OR 24 HOUR TIME
DISPLAY
1. Press and hold the SET/CH button for about
5 seconds.
2. “12h” will begin to flash in the TIME section
of the LCD
3. Press the MIN/MAX/+ button to toggle
between “12h” and “24h” time.
Note:
• Selecting 12 hour time will automatically
select ˚F as your temperature unit.
• Selecting 24 hour time will automatically
select ˚C as your temperature unit.
4. Press and release the SET/CH button again
to enter Time Setting.
D. TIME SETTING
1. After exiting the 12/24 Hour Setting, the hour
will begin flashing in the time display.
2. Press and release the MIN/MAX/+ button to
select the desired hour.
Note:
PM will appear to the left of the time
display for PM hours. For AM hours, that
area will remain blank.
3. Press and release the SET/CH button again,
and the minutes will begin to flash.
4. Press and release the MIN/MAX/+ button to
select the desired minutes.
5. Press and release the SET/CH button to exit
the SET UP mode.
Note:
If no buttons are pressed for 10
seconds, the Wireless Weather Station will
automatically return to the normal display.
II. FEATURES
A. MINIMUM AND MAXIMUM
TEMPERATURES AND HUMIDITY
1. Press and release the MIN/MAX button,
“MIN” appears at the bottom of the LCD and
the recorded minimum temperatures and
humidity are displayed.
2. Press and release the MIN/MAX button
again to view maximum recorded
temperatures and humidity. “MAX” appears
at the bottom of the LCD and the maximum
temperatures and humidity are displayed.
3. Press and release the MIN/MAX button once
more to return to the current temperatures
and humidity.
B. RESETTING THE MINIMUM AND
MAXIMUM TEMPERATURES AND
HUMIDITY
To reset both the minimum and maximum
temperatures and humidity-press and hold the
MIN/MAX button for 5 seconds.
C. ADDING ADDITIONAL REMOTE
SENSORS (OPTIONAL)
The WS-7220U-IT is able to receive signals from
2 additional thermo-hygro sensors. The following
are instructions for the set-up of thermo-hygro
sensor units with the WS-7220U-IT. These extra
sensors can be purchased through the same
dealer as this unit.
1. Remove all the batteries from the receiver
and sensor(s) and wait 60 seconds. During
these 60 seconds, press any button 20 times
to discharge any excess power.
2. Insert the batteries to the first thermo-hygro
sensor.
3. Within 2 minutes of powering up the first
sensor, insert the batteries to the Weather
Station. Once the batteries are in place, all
segments of the LCD will light up briefly.
Following the indoor temperature and the
time as 12:00 will be displayed. If they are
not shown in LCD after 60 seconds, remove
the batteries and wait for at least 60 seconds
before reinserting them.
4. The outdoor temperature and humidity from
the first sensor (channel 1) should then be
displayed on the Weather Station. If this does
not happen and the signal reception icon is
not shown, after 2 minutes, the batteries will
need to be removed from both units and
reset from step 1.
5. Insert the batteries to the second sensor as
soon as the outdoor temperature and
humidity readings from the first sensor are
displayed on the Weather Station.
NOTE:
You must insert the batteries into
the second sensor within 30 seconds of
reception of the first sensor.
6. The outdoor temperature and humidity from
the second sensor and the “channel 2” icon
should then be displayed on the Weather
Station. If this does not happen after 2
minute, the batteries will need to be removed
from all the units and reset from step 1.
7. Insert the batteries to the third sensor as
soon as the “channel 2” icon and outdoor
data are displayed on the Weather Station.
Then within 2 minutes, the channel 3 outdoor
data from the third sensor will be displayed
and the channel icon will shift back to “1”
once the third transmitter is successfully
received. If this is not happen, user shall
restart the setting up from step 1.
NOTE:
You must insert the batteries into
the third sensor within 30 seconds of
reception of the second sensor.
IMPORTANT:
Tr ansmission problems will arise
if the setting for multiple sensors is not followed
as described above. Should transmission
problems occur, it is necessary to remove the
batteries from all units and start again the set-
up from step 1.
D. VIEWING AND OPERATING WITH
MULTIPLE REMOTE SENSOR UNITS
1. To view the temperature of a different thermo-
hygro sensor unit, press and release the SET/
CH button. A shift from one “boxed” number
to the next should be observed on the right
side of the OUTDOOR LCD.
2. To view the Minimum/Maximum temperature
& humidity: first select from which thermo-
hygro sensor to read data (indicated by the
“boxed” number). Pressing and releasing the
MIN/MAX button will toggle through the
minimum and maximum indoor temperature,
and the minimum and maximum outdoor
temperature and humidity.
3. To reset the Minimum/Maximum readings,
press and hold the MIN/MAX button for 5
seconds.
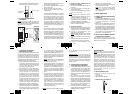
III.MOUNTING
Note:
To achieve a true temperature reading,
avoid mounting in direct sunlight. We recommend
that you mount the thermo-hygro sensor on an
outside North-facing wall (under the eve of a
house is ideal). The sending range is 330 feet;
obstacles such as walls, stucco walls, concrete,
and large metal objects will reduce the range.
Place the Wireless Weather Station and thermo-
hygro sensor in their desired locations before
permanently mounting.
GB
P.6
GB
P.7
GB
P.8
GB
P.9
GB
P.10
GB
P.11
GB
P.12
GB
P.13