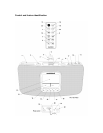
15: MEM/CLOCK SET. Used when setting radio “pre-sets” and manually setting
the clock.
16: SLEEP button – Sets 120, 90, 60, 30, or 15 minute delay until the KC-120ST
enters a silent state allowing the user to go to sleep to music. After activating
SLEEP mode, adjust the volume to the volume that you wish to wake to. This
setting is retained in memory so long as AAA batteries are installed.
17: WAKE TO button – Dual function button. When either alarm display is
flashing (in set mode) this button selects iPod, radio, or buzz as the wake up
sound. At other times, it cycles the projected time display through On Bright, On
Dim, and Off.
18: ALARM 2 CONTROL. See description for ALARM 1 (14).
19: AM antenna connector.
20: FM wire antenna
21: AUX INPUT. Connect an external MP3 player, TV set, computer, game,
personal tape or CD player here to use the KC-120ST as an amplified speaker
system. Any device with a standard headphone output can play back through
the KC-120ST by way of this connector.
22: Power adapter connector – 9 Volts DC 1500 mA center positive
23: Station preset button (Remote control only feature). Used to program quick
access to 10 favorite FM and 10 favorite AM stations. Explained in more detail
later.
24: Mute – quiets the KC-120ST, press a second time to un-mute.
“Atomic Clock” – Connect the 9V 1500 mA power adapter to the
KC-120ST. The display (12) should light. Do not press the
ON/STANDBY button (11) yet. Press the ZONE (9) button to
select your time zone. The Illustration to the right shows
Mountain Time Zone setting. From left to right, the blocks represent West,
Mountain, Central, and East.
Examine the upper left corner of the main display window (12). If the
radio tower icon is visible and showing 2 or 3 strength marks, the
built-in clock should synchronize itself to the government Atomic
Clock broadcast within an hour. If the time standard signal is weak,
auto-setting may take up to 24 hours. If the clock does not auto-set
after 24 hours reposition the radio for better signal strength or set the clock
manually as described below.


