


E-10
the unit for at least 10 minutes. After 10 minutes, reinsert the batteries, plug the unit back in
and press the RESET button again.
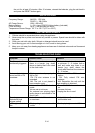
SPECIFICATIONS
Frequency Range: AM 530 - 1720 kHz
FM 87.5 – 108.5 MHz
AC Power Source: 120V~ 60Hz 5W
Backup Battery: 1 x 3V type CR2032 Lithium battery (included)
Clock Accuracy: up to +/- 60 seconds per month
Temperature Sensor Range: 32 °F to 122 °F (0°C to +50°C)
CARE AND MAINTENANCE
1. Children should be supervised when using this appliance.
2. Never wrap the ac power cord around any animal or person. Special care should be taken with
long wire.
3. Clean your unit with a dry cloth. Solvent or detergent should never be used.
4. Avoid leaving your unit in direct sunlight or in hot, humid or dusty places.
5. Keep your unit away from heating appliances and sources of electrical noise such as fluorescent
lamps or motors.
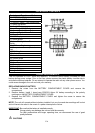
TROUBLESHOOTING GUIDE
Symptom Possible Cause Solution
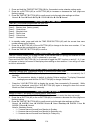
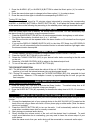
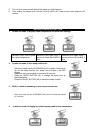
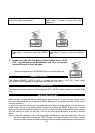
The Sensor has been
accidentally triggered
The unit is too close to a wall or
there is a barrier (e.g. shelf)
above or behind that is too close
to the clock radio.
Relocate the clock radio to keep it
a minimum 3 – 6 inches from a
wall and make sure there is no
barrier (e.g. shelf) above the
clock radio less than the minimum
9 - 12 inches.
Noise or distorted
sound on AM or FM
broadcast
- Station not tuned properly for
AM or FM.
- FM: FM wire antenna is not
extended.
- AM: The unit is not placed in
best reception point.
- Retune the AM or FM broadcast
station.
- FM: Fully extend FM wire
antenna.
- AM: Reposition the unit until the
best reception is obtained.
AM or FM no sound - Unit not in “RADIO” function
mode.
- Volume set at minimum
- An external non playing digital
audio player is connected to the
Aux In jack
- Press On/Off Button until radio is
on.
- Increase Volume.
- Unplug the Aux In cord
Sound appears
distorted at high
volume setting
- Volume control of this unit is set
to maximum.
- Adjust Volume Control to a lower
comfortable level.
LCD brightness is too
dim
- Display brightness set to dim
mode
- Set display brightness to HIGH.