


9
DV354
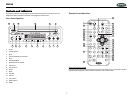
Basic Operation
Turning the Unit On/Off
Press the POWER button (1) on the front panel or remote control to turn the unit on/off.
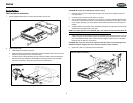
Inserting a Disc
Insert a disc, label side up, into the disc slot (12). The player will start playback automatically.
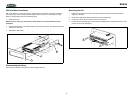
Ejecting a Disc
Press the EJECT button (3) to eject the disc from the slot. The unit does not have to be on to eject
a disc.
NOTE: Do not drive with an ejected disc in the slot.
Audio Control
Volume
Press the VOL button (8) to increase the volume, or the VOL button (9) to decrease the
volume.
Mute
Press the MUTE button (6) to silence the audio. Press MUTE again to resume audio.
Press the SEL button (10) on the front panel or remote control to select the desired audio
adjustment mode. The adjustment mode will change in the following order:
Setting the Clock
Press and hold the DISPLAY button (17) on the remote until the clock display flashes, then
release. Next, press (29) or (7) to adjust the hour and (29) or (4) to adjust the minutes.
Continue changing the hour to move between AM and PM.
Mode
Press the MODE button (11) on the front panel or remote control to switch between disc (DVD/
CVCD/CD/MP3) mode, AV IN1, and AV IN2 mode.
Equalization
Press the EQ button (33) on the remote control to activate the equalization function. Continue
pressing the EQ button to choose between the three equalizer modes (Clas, Pop and Rock) or to
turn the equalizer function off.
Reset
The RESET button (16) is located on the front of the unit. You should engage the RESET button
only in the following situations:
• After initial installation when all wiring is complete
• If all function buttons become inoperable
• If an error symbol appears on the display
To reset the unit, use a ballpoint pen or a thin metal object to depress the RESET button.
AV In Operation
You can connect another audio/video system to the unit through the AV IN terminals on the back
(AV1 INPUT) or front panel (AV2 INPUT) of the unit. Once the device is connected, press the
MODE button (11) on the front panel or remote control to select “AV IN1” or “AV IN2” mode.
Disc Operation
Stopping Play
• Press the stop button (5) on the front panel or remote control to stop disc play. Press the
button (6) to resume normal playback.
• Press the stop button (5) on the front panel or remote control twice to stop the playback and
return to the initial chapter.
Moving Through Chapters/Tracks
Press the button (4) on the unit or remote control to advance to the next chapter/track.
Press the button (7) on the unit or remote control to move to the previous chapter/track.
Fast Forward/Fast Reverse
Press the button (35) or button (29) on the remote control to fast forward. Keep pressing and
releasing the button to increase the rate from “2X” to “4X”, “8X” and “20X”. Press the button (6)
to return to regular play. Press and hold to fast-forward to a specific location, then release to begin
playback from that point.
Press the button (34) or button (29) on the remote control to fast reverse. Keep pressing and
releasing the button to increase the rate from “2X” to “4X”, “8X”, and “20X”. Press the button (6)
to return to regular play. Press and hold to fast-reverse to a specific location, then release to begin
playback from that point.
Slow Motion Play
Press the SLOW button (39) on the remote control during play to activate slow motion playback.
Each time the button is pressed, the speed changes as follows.
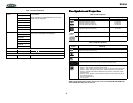
Bass Press SEL until “BAS” appears in the display. Press the volume buttons to adjust the Bass from +06 to -06.
Treble Press SEL until “TRE” appears in the display. Press the volume buttons to adjust the Treble from +06 to -06.
Balance Press SEL until “BAL” appears in the display. Press the volume buttons to adjust the Balance from 12L to 12R.