


8
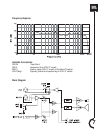
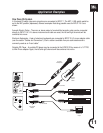
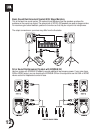
1. Refer to the “Basic Sound Reinforcement System with Stage Monitors” diagram on page 12
2. Turn the INPUT 1 and INPUT 2 & 3 controls fully counter clockwise.
3. Set the MIC/LINE switch.
• If a microphone will be connected directly to INPUT 1, set the MIC/LINE switch to the MIC position (depressed).
The MIC LED will illuminate when power is turned on.
• If a mixer, CD player, cassette tape, or electronic musical instrument (the “source”) will be connected directly to
INPUT 1, set the MIC/LINE switch to the LINE position (disengaged). The MIC LED will not illuminate when power
is turned on.
4. Plug the power cable into a properly grounded 3-wire AC power.
5. Plug the XLR cable from the mixer or microphone into the INPUT 1 connector.
6. Connect unbalanced sources (if used) to the INPUT 2 & 3 connector.
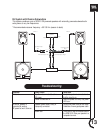
7. POWER UP PROCEDURE
First, switch on the power to the mixer, audio sources, or musical instruments that are feeding your EON10 G2.
• Next, turn on the power switch (the front panel power indicator will illuminate).
• Reverse this process when shutting down your system. This will avoid disturbing thumps from the speaker as
sources power on/off.
8. SET VOLUME
• If you are using an audio-mixing console, refer to the manufacturer’s instructions to properly set gain structure
(see the “Gain Structure” section on page 16).
• Turn up your sources to the level that will be used in performance and talk, sing or play into the system.
• Bring the INPUT 1 control up (clockwise) until the desired volume has been reached. If you are using a micphone,
turn the INPUT 1 control up slowly to avoid feedback.
• If you are using the INPUT 2 & 3 inputs, bring the INPUT 2 & 3 controls up to the desired volume.
9. CHECK THE PEAK LED - The PEAK indicator flashes when the loudspeaker’s on-board amplifiers are approaching
maximum output. Occasional flashes are normal for very loud operation. However, if the PEAK LED stays
illuminated, the sound will be distorted and it is an indication that more speakers or a lower performance volume
may be required for your specific application.
CONTROLS AND CONNECTIONS
The audio section of the EON10 G2 includes powerful features that enhance the flexibility of your speakers.
Controls
INPUT 1
Adjusts the level of INPUT 1. Use this control to match the input sensitivity of the EON10 G2 to the
output level of the mixer, microphone, or instrument connected to INPUT 1. It is a common miscon-
ception that this control changes the power of a system.Your EON10 G2 will produce its rated output
power no matter where this control is set. The INPUT 1 control determines how much signal is
required at the input in order to drive the system to full output.
INPUT 2 & 3
This control adjusts the level of the inputs connected to INPUT 2 & 3.
Quick Start
LINE
MIC
O
U
T
P
U
T
1
I
N
P
U
T
LOOPMIX
R-PEAK
G-SIGNAL
1
2 & 3
2 & 3
2
3