


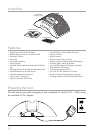


Control Denitions
9
13
12
9
14
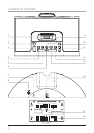
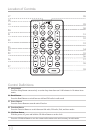
1 Dock for iPod
Use the Dock for iPod to connect an iPod to the unit.
2 Standby/Al Off Button
Press the Standby/AL Off Button to turn the unit off and on.
Press the Standby/AL Off Button to turn the unit’s alarm off after it sounds.
3 Volume Buttons
Press the Volume Buttons to adjust the volume of audio output from the unit.
4 AL 1/M+ Button
With the power off, press and hold the AL 1/M+ Button to set alarm 1.
Press the AL 1/M+ Button to cycle through saved radio stations.
5 Function/Band Button
Press the Function/Band Button to switch between AM radio, FM radio, iPod, and Aux modes.
6 Snooze Button
Press the Snooze Button to delay the alarm for an additional 6 minutes after it sounds.
7 FM Wire Antenna
Adjust the FM Wire Antenna to adjust the reception of the FM radio.
8 Auxiliary Input
Use the Auxiliary Input to connect an MP3 player or other audio device to the unit.
9 Clock/iPod Menu/Display Button
With the power off, press and hold the Clock/iPod Menu/Display Button to set the unit’s time.
Press the Clock/iPod Menu/Display Button to move backwards through the iPod’s menus in iPod mode.
Press the Clock/iPod Menu/Display Button to view the time when in radio mode.
10 Play/Pause Button
Press the Play/Pause Button to play or pause a docked iPod.
11 Skip/Search/Tuning/Time Button
Press the Skip/Search/Tuning/Time Button to skip between tracks on a docked iPod.
Press and hold the Skip/Search/Tuning/Time Button to search through an individual track on a docked iPod.
Press the Skip/Search/Tuning/Time Button to tune the AM and FM radio.
Press the Skip/Search/Tuning/Time Button to adjust the time when setting the clock and alarms.
12 AL 2/M- Button
With the power off, press and hold the AL 2/M- Button to set alarm 2.
Press the AL 2/M- Button to cycle through saved radio stations.
13 Enter/Memory Button
Press the Enter/Memory Button to make selections on a docked iPod.
Press the Enter/Memory Button to save the current AM or FM radio station to the unit’s memory.
14 DC Power Input
Use the DC Power Input to connect the unit to a power source such as a standard AC outlet (120V~60Hz).
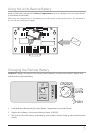
15 Backup Battery Compartment (9-Volt Battery Required, Not Included)
16 Reset Button
Press the Reset Button using a paperclip or like object to restore the unit to its original manufacturers settings.