


4
Page 7
The Time Sync feature allows you to sync the time setting on the unit to the time from your iPhone or recent model iPod (iPod touch,
iPod nano and iPod Classic; older iPod models such as iPod mini do not support this feature). By default, the unit will attempt to
Auto Sync whenever an iPhone or iPod is docked. You can turn off auto sync if you prefer to manually sync the time at any time
using the steps below.
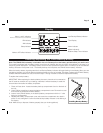
1. Press and hold the Time Sync/Set Button on top of the unit until “SET Auto” flashes. Press the << or >> Button to select
“Set manual”. Auto Sync is disabled, and syncing must now be done manually. (To reset for Auto Sync, select “SET Auto”).
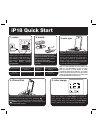
2. Gently dock your iPhone or iPod.
3. Press and release the Time Sync/Set Button. “SYNC” flashes in the display, indicating sync attempt. If sync is successful, the
time will update and you will hear two beeps and the display will show “SYNCED”.
4. If sync does not work, a long beep will sound and “FAIL” will appear on the display. If this happens,
try using a different
iPhone/iPod to attempt syncing again or set time manually (see below).
NOTE: The iPhone is constantly updated to current time via cell phone towers. The time on your iPod is only accurate to the last
time it was synced to a computer. It’s possible to have up to 59 seconds difference between the unit and synced iPhone/iPod.
Setting the Time Using Time Sync
Setting the Time Manually
1. Press and hold the Time Sync/Set Button until “SET Auto” flashes. Press the << or >> Button to select “Set manual”.
2. Press and release the Time Sync/Set Button. The time will flash. Press the
<< or >> Button to set the correct hour (press
and hold for rapid setting). Remember to set the correct AM or PM time. The AM and PM Indicators are located to the left of
the time digits.
3. Press either the or Button at any time during clock setting to toggle the display between 24 hour (military) and 12 hour
(standard) display mode. The PM indicator will not appear when display is in 24 hour mode.
4. Press the Time Sync/Set Button again. The year will flash. Press the
<< or >> Button to set the correct year.
5. Press the Time Sync/Set Button again. The date will flash. Press the
<< or >> Button to set the correct date (press and
hold for rapid setting).
6. Press the Time Sync/Set Button again (or no button press within 10 seconds) to exit the clock setting mode. 2 beeps will
confirm clock setting is complete.
This unit has a dual alarm system so you can set two separate alarms to different alarm times.
Setting the Alarms
Note: Alarm 1 and Alarm 2 are set the same way; Alarm Button below means the button ( or ) for whichever alarm
you are setting.
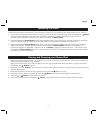
1. Press and hold the or Button until the alarm time flashes on the lower part of the display. Press and release the <<
or >>
Button to set the alarm time (press and hold for faster setting). Remember to set the correct AM or PM time.
2. Press and release the Alarm Button again to confirm the set alarm time. If the unit does not detect an iPhone or iPod at
the set alarm time, the unit will default to buzzer alarm.
The alarm cycle lasts for one hour; make sure you have enough
music on your iPhone or iPod to last that long.
3. Press and release the Alarm Button again, then press and release the << or >>
Button to set the color LED wake cycle:
Dawn (amber fade leading up to alarm time), Flash (flashing red while alarm sounds), Glow (glowing color sequence while
alarm sounds) or None (no wakeup LED effect).
4. Press and release the Alarm Button again
(or no button within 10 seconds) to exit the alarm setting mode. The alarm will
be armed once set and the corresponding alarm icon will light up. The lower part of the display will show the earliest set
alarm time.
Setting the Alarms