


1413
16
15
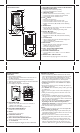
• Remove the batteries from the main unit and reinstall
them in the same manner.
• On the main unit select the same channel number using
CHANNEL button as set on the remote sensor. The
remote temperature appeared on the main unit’s display
will show that transmission is being received successfully.
TRANSMISSION COLLISION
Signals from the other household devices such as wireless
doorbells, home security systems, and entry control, may
interfere with this product or cause temporary reception
interruption. This is normal and will not affect the general
performance of the product. The transmission and
reception of the temperature and humidity readings will
resume once the interference subsides.
WWVB RADIO CONTROLLED TIME
The NIST (National Institute of Standards and Technology)
radio station (WWVB) is located in Ft. Collins, Colorado.
It transmits an exact time signal continuously throughout
the most of the continental United States at 60 KHz frequency.
The Long-Range Weather Forecaster can receive this
WWVB signal through the internal antenna from up to
2,000 miles away. Due to the nature of the Earth’s ionosphere,
reception can be limited during the daylight hours. The radio
controlled clock will search for an alternate station that
receives the atomic time signal from the NIST Atomic clock
in Boulder, Colorado.
The WWVB tower icon on the unit’s display will flash
indicating a radio signal reception from the WWVB
station. If the tower icon is not fully lit, or if the time and
date are not set automatically, please consider the
following:
• During night-time hours, atmospheric disturbances are
typically less severe and radio signal reception may
improve. A single daily reception is sufficient enough to
keep the clock accuracy within 1 second.
• Make sure the unit is positioned at 8 feet (2 meters)
distance from any interference source such as a TV,
computer monitor, microwave, etc.
• Within concrete wall rooms such as basements or office
buildings, the received signal may be weakened. Always
place the Weather Forecaster near the window for better
reception.
ATOMIC CLOCK
Immediately after establishing communication between the
main unit and remote sensor, the atomic time signal receiver
will open and start to search for the atomic time signal.
The search usually takes between 5-8 minutes.
NOTE: Do not press any buttons on the main unit during
auto search as it may interrupt product’s operation,
and you will need to start set up procedure again.
Once the atomic time signal is received, the date and time
will be set automatically, and the [ ] icon will appear.
NOTE: It is necessary to set your Time Zone, having in
mind that the default zone is a US Pacific Standard
Time (PST). (Refer to MANUAL SETTINGS section)
If the time signal has not been received in 8 minutes, you
may use the MODE button to set the time and date
manually. (Refer to the MANUAL SETTINGS section).
After the clock is set manually, place the Weather
Forecaster by the window for the better reception. The
atomic clock receiver is programmed that it will continue
to search for the atomic time signal daily for every hour
between 1:00 am and 4:30 am.
Once the time signal has been successfully received, the
time and date will be updated automatically.
TIME AND CALENDAR DISPLAY MODES
The Long-Range Weather Forecaster displays current time
in two display modes – in hour-minutes-seconds format
and in hour-minutes-day.
The date is displayed in month-date format.
MANUAL SETTINGS
It is necessary to set the desired US TIME ZONE.
TIME ZONE
• Press MODE button once so that the Day of the Week
abbreviation is displayed to the right of the time; for
example: pm 2:37tu
• Select the Time Zone by pressing and holding UP ( )
button for 3 seconds
• Keep holding UP ( ) button until the desired US Time
Zone (Pacific, Mountain, Central or Eastern) is highlighted
on the display’s US map, located to the right of the time
display and above the day of the week
• Release the UP ( ) button. The Time Zone is set
CLOCK
• Press and hold MODE button for 3 seconds: the year
will flash. Press UP ( ) or DOWN ( ) to change
flashing digits.
• After the year is set, press MODE button to confirm and
move to the next parameter (month)
• Continue setting month, date, hour, minutes, language
for the day of the week and temperature in Fahrenheit or
Celsius
• Press MODE for the last time to return to the time of day
with seconds, after the last parameter is set
CLOCK ALARMS
The Long-Range Weather Forecaster has two time alarms –
Weekday alarm (W) and Single day alarm(S) - and one Ice
Warning Alarm (PRE-AL).
• If Weekday (W) alarm is activated, it will sound at the
set time and the alarm icon will flash Mondays through
Fridays
• If Single (S) day alarm is activated, it will sound at the
set time and the alarm icon will flash only for this
specific day and will not activate on subsequent days
• If Ice Warning Alarm (PRE-AL) is activated, in will
sound at the set time and alarm icon will flash once the
remote temperature for Channel One (1) will reach
32°F(0°C) and below
NOTE: Ice Warning Alarm can be set only if one or
both - Weekday or Single alarm - are programmed.
SETTING THE WEEKDAY (W) AND SINGLE DAY (S)
ALARMS
• Press ALARM button once to enter into the alarms setting
mode. The default alarm is a Weekday alarm (W). The
abbreviation “OFF” with a letter “W” next to it will be
displayed, if the alarm has not been set previously
• Press and hold ALARM button for two seconds. The hour
digit will flash
• Adjust the hour using UP ( ) or DOWN ( ) buttons
• Press ALARM button again. The minute digits will flash
• Adjust the minutes using UP ( ) or DOWN ( ) buttons
• Press ALARM button again to confirm and the weekday
alarm time will be set
• Set Single (S) day alarm if desired in the same manner
SETTING THE ICE WARNING ALARM (PRE-AL)
If Weekday (W) or Single day (S) alarm is set, the Ice
Warning Alarm (Pre-AL) can be programmed.
• Press ALARM button once to enter into the Ice Warning
Alarm setting mode. The abbreviation OFF with a PRE-AL
next to it will be displayed.
• Press and hold ALARM button for two seconds. The
number 30 will flash, meaning that if selected, the alarm
will sound 30 minutes earlier than the Weekday or Single
alarm.
• Select the desired Ice Warning Alarm interval in 15 minutes
increments between 15 and 90 minutes, using UP ( ) or
DOWN ( )buttons
• Press ALARM button to confirm and exit from the alarm
setting mode.
ACTIVATING THE ALARM
• Press ALARM button to enter into the desired alarm
mode.
• Press UP ( ) to activate or DOWN ( ) to deactivate
desired alarm. When alarms are activated, the corresponding
icons W, S or PRE-AL will be displayed.