Site requirements
Select an installation site that meets the following requirements:
•
Space • Temperature
• Power • Rack
• Grounding • Airflow
Detailed installation site requirements for this product are
described in the HP StorageWorks 70 Modular Smart Array
Enclosure user guide located on the Documentation CD.
Rack planning resources
The rack resource kit ships with all HP branded or Compaq
branded 9000, 10000, and H9 series racks. For more
information on the content of each resource, see the rack
resource kit documentation.
If you intend to deploy and configure multiple servers in a single
rack, see the white paper on high-density deployment at the HP
website: http://www.hp.com/products/servers/platforms
.
Rack warnings
WARNING! To reduce the risk of personal injury or
damage to the equipment, be sure that:
• The leveling jacks are extended to the floor.
• The full weight of the rack rests on the
leveling jacks.
• The stabilizing feet are attached to the rack
if it is a single-rack installation.
• The racks are coupled together in multiple-
rack installations.
• Only one component is extended at a time.
A rack may become unstable if more than
one component is extended for any reason.
WARNING! To reduce the risk of personal injury or
equipment damage when unloading a rack:
• At least two people are needed to safely
unload the rack from the pallet. An empty
42U rack can weigh as much as 115 kg
(253 lb), can stand more than 2.1 m (7 ft)
tall, and may become unstable when being
moved on its casters.
• Never stand in front of the rack when it is
rolling down the ramp from the pallet.
Always handle the rack from both sides.
Contents
• MSA70 Enclosure
• Rack mounting hardware kit
• Power cords (2)
• SAS cable
• Documentation kit
Installing options
Install any hard drives and hardware options before powering
up the enclosure. For complete information on installing hard
drives and options, see the user guide.
Installing enclosure into a rack
NOTE: When installing servers, HP recommends installing
all enclosures at the bottom of the rack. To optimize
cabling access, avoid interleaving the enclosure and server
products.
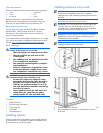
1. Secure the front end of the rails to the rack.
IMPORTANT: Do not remove the pins from the ends of the
rack rails unless you are converting the rails for use in
round-hole racks. These load-bearing pins are designed to
fit through the holes without being removed.
IMPORTANT: Be sure that the scissor-type locking latches
engage the rack fully when the pins extend through the
holes marked with the template.
NOTE: Identify the left (L) and right (R) rack rails by
markings stamped into the sheet metal.
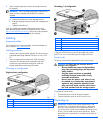
2. Secure the back end of the rails to the rack.
3. Slide the chassis into the rack.
4. Use the thumbscrews on the front of the chassis to secure it
to the rack.


