


8030A Active Monitoring System
General description
The bi-amplified GENELEC 8030A is a two
way active monitoring loudspeaker designed
to be small but still have high output, low col-
oration, and broad bandwidth.
The 8030A is ideal for near field monitor-
ing, mobile vans, broadcast and TV control
rooms, surround sound systems, home stu-
dios, multimedia applications and also for
use with computer soundcards. As an active
loudspeaker, it contains drivers, power ampli-
fiers, active crossover filters and protection
circuitry. The MDE™ (Minimum Diffrac-
tion Enclosure™) loudspeaker enclosure is
made of die-cast aluminium and shaped to
reduce edge diffraction. Combined with the
advanced Directivity Control Waveguide
TM
(DCW
TM
), this design provides excellent fre-
quency balance in difficult acoustic environ-
ments. If necessary, the bass response of
the 8030A’s can be extended with a Genelec
7050A or 7060A subwoofer.
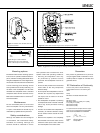
Positioning the loudspeaker
Each 8030A monitor is supplied with an inte-
grated amplifier unit, mains cable and an
operating manual. After unpacking, place the
loudspeaker in its required listening position,
taking note of the line of the acoustic axis
(see Figure 1).
Connections
Before connecting up, ensure that the mains
switch is off and the volume control fully
counter-clockwise (see Figure 1). Do not con-
nect the loudspeaker to an unearthed mains
supply or using an unearthed mains cable.
Audio input is via a 10 kOhm balanced
female XLR connector labelled “INPUT”. An
unbalanced source may be used as long as
pin 3 is grounded to pin 1 at the unbalanced
source connector (see Figure 2).
The male XLR “OUTPUT” connector can
be used for daisy-chaining up to six 8030A’s
together or for connecting a Genelec 7050A
stereo subwoofer. The volume control atten-
uates the signal on this output, so the first
“master” loudspeaker on a daisy chain can
be used to adjust the level on the whole
chain. The volume controls on the “slave”
loudspeakers should be set fully clockwise.
Once the connections have been made,
the loudspeakers are ready to be switched
on.
Setting the volume control
The input sensitivity of the loudspeakers can
be matched to the output of the mixing con-
sole or other source by adjusting the volume
control on the front panel (see Figure 1).
Setting the tone controls
The frequency response of Genelec 8030A
can be adjusted to match the acoustic envi-
ronment by setting the tone control switches
on the rear panel. The controls are “treble
tilt”, “bass tilt” and “bass roll-off”. An acous-
tic measuring system such as MLSSA or
WinMLS is recommended for analyzing the
effects of the adjustments, however, care-
ful listening with suitable test recordings can
also lead to good results if a test system is not
available. Table 1 shows some typical settings
in various situations. Figure 4 shows the effect
of the controls on the anechoic response.
Treble tilt
Treble tilt (switch 1) attenuates the treble
response above 5 kHz by 2 dB, which can be
used for smoothening down an excessively
bright sounding system.
Bass tilt
Bass tilt offers three attenuation levels for the
bass response below 1 kHz, usually neces-
sary when the loudspeakers are placed near
room boundaries. The attenuation levels are
-2 dB (switch 3 “ON”), -4 dB (switch 4 “ON”)
and -6 dB (both switches “ON”).
Bass roll-off
Bass roll-off (switch 2) activates high-pass
filtering at 85 Hz to complement the low-pass
filter on a Genelec 7050A subwoofer. This
switch should always be set to “ON” when
using the 8030A with 7050A subwoofers.
The factory setting for all tone controls is
“OFF” to give a flat anechoic response.
Always start adjustment by setting all
switches to “OFF” position. Measure or listen
systematically through the different combina-
tions of settings to find the best frequency
balance.
Mounting considerations
Align the loudspeakers correctly
Always place the loudspeakers so that
their acoustic axes (see figure 1) are aimed
towards the listening position. Vertical place-
ment is preferable, as it minimises acoustical
cancellation problems around the crossover
frequency.
Maintain symmetry
Check that the loudspeakers are placed
symmetrically and at an equal distance from
the listening position. If possible, place the
system so that the listening position is on the
centerline of the room and the loudspeakers
are placed at an equal distance from the cen-
terline.
Minimise reflections
Acoustic reflections from objects close to the
loudspeakers like desks, cabinets, computer
monitors etc. can cause unwanted coloura-
tion blurring of the sound image. These can
be minimised by placing the loudspeaker
clear of reflective surfaces. For instance, put-
ting the loudspeakers on stands behind and
above the mixing console usually gives a
better result than placing them on the meter
bridge.
Minimum clearances
Sufficient cooling for the amplifier and func-
tioning of the reflex port must be ensured if
the loudspeaker is installed in a restricted
space such as a cabinet or integrated into
a wall structure. The surroundings of the
loudspeaker must always be open to the
listening room with a minimum clearance
of 5 centimeters (2") behind, above and on
both sides of the loudspeaker. The space
adjacent to the amplifier must either be
ventilated or sufficiently large to dissipate
heat so that the ambient temperature does
not rise above 35 degrees Celsius (95°F)