


Wall-Mounting the Micro Satellites
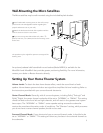
The Micro satellites may be wall-mounted using the included keyhole bracket.
Install a #8 or #10 mounting screw on the wall (not sup-
plied–consult a knowledgeable installer regarding the
proper hardware to use on your wall).
Attach the bracket to the back of the speaker with the
machine screw and acorn nut as shown.
If you are running wires behind the wall, make a
3
⁄8"
(9.5mm) wire hole, 1
3
⁄4" (44mm) below the mounting screw
for the wire.
The speaker may be angled for optimum coverage of the
listening area.
An optional pedestal shelf stand/wall-mount bracket (Model MRB II) is available for the
Micro90x II and Micro80x II that provides greater positioning flexibility. For more information,
contact your dealer or Boston Acoustics directly.
Setting Up Your Home Theater System
Volume Levels: To obtain the best home theater effect, match the sound levels of each
speaker. Home theater systems include a test signal that simplifies this level matching. Refer to
the instructions provided with your surround sound electronics.
Center Channel Mode: Generally, with all surround systems, including Dolby
®
ProLogic
®
and
Dolby
®
Digital, the center channel mode should be set to “NORMAL” or “SMALL.” This setting
diverts low bass to the front left and right channels, and will result in the greatest total system
bass output. The “NORMAL” or “SMALL” center speaker setting ensures the subwoofer
receives the most bass information under all conditions. The “Phantom” setting, which presumes
you do not have a center channel speaker, should not be used.
Surround Channel Mode: If your electronics have a surround channel mode, it should also be
set to “NORMAL” or “SMALL.” This setting will divert any low bass in the surround channels to
the subwoofer.
1
1
2
3
2
3
5