


Specifications are subject to change without notice
AtlasSound.com
1601 JACK MCKAY BOULEVARD ENNIS, TEXAS 75119 U.S.A. • TELEPHONE: (800) 876-3333 • FAX: (800) 765-3435
©2007 ATLAS SOUND LP Printed in U.S.A. ATS002583 RevA 02/07 PP
INSTALLATION INSTRUCTIONS
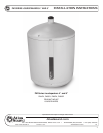
PM SERIES LOUDSPEAKERS 4" AND 8"
9
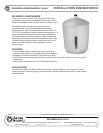
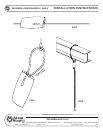
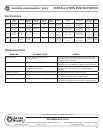
FIG.9
SUSPENDED INSTALLATION VIA DOWN PIPE (NOT- INCLUDED)
Using 3/4” Diameter Ceiling Fan Hardware
Atlas Sound’s PM series speaker may also be installed using industry standard ceiling fan hardware. This
hardware is available at most local hardware stores. Using this type of installation allows speaker cable
and safety cable to be concealed with the down pipe providing a very clean installation.
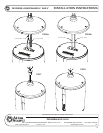
1. Remove the 3 top cover mounting screws, loosen the 2 side top cover screws rotate the top
cover counterclockwise, and pull up to remove the top cover. (Fig. 1 and 2)
2. Locate suitable support structure in the area the speaker is to be installed.
3. Mount the ceiling mount canopy and down pipe per manufacturer instructions.
4. Screw the PM speaker top cover onto the bottom of the down pipe, install the safety screw
though the side of the top cover and through the end of the down pipe. (Fig. 9)
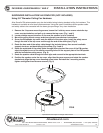
5. Route the bare end of the safety cable though the included clamp, then around a suitable
support structure, and back through the clamp. (Fig. 3 and 4)
6. Route the eyelet end of the safety cable through down pipe and the cover of the PM speaker,
attach the eyelet to one of the smaller mounting holes on the support plate of the PM speaker
with the included mounting screw. (Fig. 9)
7. Route the speaker cable through the down pipe and connect to the appropriate terminals.
8. Position the speaker under the top cover, align the side cover screws and rotate the speaker
clockwise to align the top cover mounting screw holes. Reinstall the 3 mounting screws,
tighten and tighten the side cover screws. (Fig. 9)