


8
Front Stage Loudspeakers
System Setup
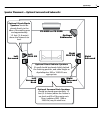
Using Optional Surround Speakers
If you are setting up a full home theater
system, any of our surround speakers,
boxed or in-wall, will work very well with
the Front Stage Loudspeakers. All Atlantic
Technology speakers are “voiced” to the same standards of tonal neutrality
and sonic accuracy. Our model 2200SR Bipole/Dipole surround speakers,
for example, would be an excellent match for an FS-based home theater
system. Begin with the side speakers set to “Dipole,” then experiment with
the Bipole/Dipole switch to obtain the most pleasing and realistic effect in
your listening room.
See your Atlantic dealer or visit our website (www.atlantictechnology.com)
for more information.
The best location for surround speakers is straight out to the sides, or
slightly behind the primary listening area, approximately 1-2 feet (.3-.6m)
above seated ear level, but no closer than 2 feet (.6m) from the ceiling (see
previous page). The surround speakers are primarily intended to re-create
the ambient sounds taking place in the movie scene. Therefore, throughout
most of a movie or TV program you may not be consciously aware of output
from these speakers. In other words, don’t worry if you aren’t hearing the
surround speakers. Please try to avoid the trap of turning the surrounds up
and up so that you hear them most of the time. The result will be a much
less believable surround experience.
Setting Levels
When setting up a complete home theater we strongly recommend that you
use a Sound Pressure Level (SPL) meter. As of this writing Radio Shack®
has one that’s affordably priced (approximately $40-$60) that can be used
effectively. To use this meter, turn on your system, put the processor/receiver
in Test Mode and set its main volume control somewhere between -20
dB and 0dB (or a reasonably loud level in your listening room). Sit in the
prime listening position, set the SPL meter to the 70dB scale, slow response,
and C weighting. Hold the meter with the microphone pointed up towards
the ceiling and in front of you. Cycle the test tone from speaker to speaker,
setting each to the same level (usually75dB) using the individual level set-
tings available in the processor/receiver (please see the instructions for
your processor/receiver if you are unsure of how to access the test signal
or level controls).
IMPORTANT NOTE:
The power recommendation for these speaker
systems assumes that you will not operate your amplifier/receiver in
a way that produces distortion. Even rugged speakers like these can
be damaged by an amplifier driven into audible distortion. The harsh
amplifier distortion (“clipping”) that occurs in this situation will even-
tually cause damage to the speaker system. This type of damage may
be cumulative and can build up over time, as the amplifier is driven
into overload again and again. Such damage is easily identifiable
through examination of the damaged speaker’s voice coil and is not
covered by the warranty.
These systems will play very loudly when provided with enough undistorted
power to do so. If necessary, consult your dealer or Atlantic Technology for
additional information.
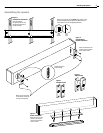
Connecting Your System
We recommend that you connect your system using high quality dual
conductor stranded wire of 16 gauge or heavier, for lengths up to 25 feet
(8m) . Remember, the lower the gauge number, the heavier the wire. Use
heavier gauge wire for longer runs. Please contact your audio/video dealer
or installer for specific cable recommendations and further information
regarding special circumstances. The terminals themselves are designed to
allow the use of very heavy speaker wire or connectors. Be sure to tighten
them securely, but don’t over-tighten them.
WARNING:
To prevent risk of electrical shock or damage to your
equipment, always switch off the amplifier or receiver when making
any system connections.
You can connect your speakers by using a variety of audio connectors such
as banana plugs, pin connectors, spade lugs, etc., or you can:
1.
Remove ½” (13mm) of insulation from each wire end.
2.
Twist the stranded wire together, keeping the two ends
separate.
3.
Place the appropriate wire through the postholes in the
connectors. These holes are revealed when you loosen the
connector’s capscrew.
4.
Tighten down the capscrew tightly, but be careful not to
over tighten it.
5.
Check the tightness of the capscrews 24 hours after hookup
and occasionally after that, as they can loosen over time.
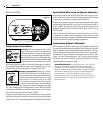
We recommend that you check your local electrical codes to make sure
that you are not using improper connectors. It’s important to observe
polarity while making speaker connections: red (+) terminals on the
amplifier to red (+) on the speaker, black (–) on the amplifier to black (–)
on the speaker. Look carefully at the wires you are using and note that one
of the conductors of each pair will typically be identified by color printing
on the outer jacket, ridges on the outer jacket, or a thread intertwined with
the wire strands. By convention, the marked wire is connected to the red
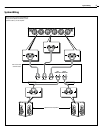
(+) terminal. Whether you are connecting a complete system, or adding a
single speaker component to your present system, the wiring should look
like the system wiring diagrams on the opposite page.
WARNING:
Before turning on the amplifier, be certain that no stray
wire strands are touching across any terminals as this might damage
your amplifier.
Finally, check the polarity of your front speakers by listening to some ste-
reo music with good bass content. If the sound seems “hollow”, unusu-
ally spread out, or seem to have weak bass, recheck your connections for
proper polarity and correct any out of phase connections by reversing the
connections to one speaker only, if necessary.