


©
American Audio
®
- www.AmericanAudio.us - APX-152™/APX-PowerPro™ - Instruction Manual Page 13
APX-152™/APX-PowerPro™ Rigging and Mounting Options
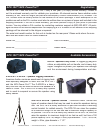
Speaker Rigging Hardware –
The APX-152™ and the APX-Power Pro™ may be permanently
installed or mounted using any of the many available third party wall brackets and ceiling mounts
available. Always be sure to follow all safety instructions and guidelines included with the mounting
hardware for safe and proper installation. American Audio
®
carries an assortment of rigging hardware
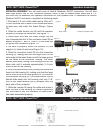
specially designed to work with the APX-152™ and the APX-Power Pro.™ The Z-APX/B is a heavy-
duty bolt and may be used to secure the speaker to a cable or chain. The Z-APX/H is a heavy-duty
eyebolt and is used to suspend or secure the speaker using safety cables. Please contact your dealer
for more information and availability.
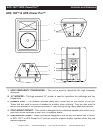
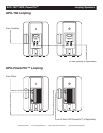
Rigging Points –
The APX-152™ and the APX-Power Pro™
include four rigging points. These points are detailed on page six.
The rigging points are used to “fly” or suspend the speaker in the
air by some means.
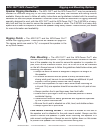
Pole Mounting –
The APX-152™ and the APX-Power Pro™ also
include a pole mount option. The pole mount socket located on the bot-
tom of the speaker may be used to secure the speaker to a speaker tri-
pod, such as the American Audio
®
SPS-1B or the SPS-2B as illustrated
on the left. Always be sure to follow the guidelines listed below when pole
mounting your speaker;
• Always be sure the stand is designed to support the weight of
the speaker
• In outdoor situations that are prone to windy conditions and
strong wind gust, be sure to use sandbags as additional tri-pod
support, this will greatly reduce the risk of tipping
• Do not stack speakers on top of each other when mounting on
a tri-pod. Only one speaker should be mounted to a tri-pod at one
time.
• Always position the tri-pod legs away from foot traffic
• Extend the tri-pod legs to their fully extended position to avoid
accidental tipping
• Observe and follow all safety guidelines and regulations specified
by the tri-pod’s manufacturer
• Be sure the tri-pod is situated on a flat, level, and stable surface
• Always tighten all tri-pod locks
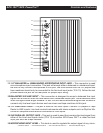
Pole Mount Locking Screw –
This screw is located on the rear of
the speaker and is attached to the pole mount socket. Always use this
screw to secure the speaker in place when mounting this speaker in a
pole mount configuration. Always be sure to tighten down on this screw
to prevent the speaker from shifting directions during use.