


AV100 5
AV100 Control Features
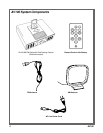
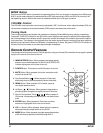
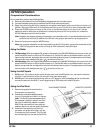
The AV100 provides 3 control buttons, plus a volume control wheel and a tuning knob (See Figure x.)
Power On/Off:
1. Press the Line Power rocker switch at the rear of the unit to the on ( I ) position; the mode LEDs flash for
2 seconds and go out.
2. With the line power switch on, power is applied to the radio system when the Power (
) button on top of
the AV100 or on the Remote Control is momentarily pressed; the mode LED indicating the last system
mode in effect prior to turnoff lights blue, and the Radio system is ready for use.
3. Power is turned off when the Power button is momentarily pressed; the mode LEDs flash once and the unit
powers down as evidenced by the audio output tubes turning off .
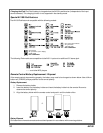
Installing and Setting Up the AV100
You can begin to enjoy your AV100 Radio system as soon as the installation is completed as follows:
1. Determine the desired area where the unit is to be installed; i.e., table top, stereo cabinet, etc.
Note: If possible, the unit should be positioned near a window to achieve the best reception with the AM
and FM antennae.
2. Make sure the line power rocker switch at the rear of the unit is in the off (O) position. Then plug the
power cable into the mating connector located to the right of the switch. Plug the other end of the cable
into a wall outlet supplying 120 volts, 60Hz.
Note: If the line switch is in the on (I) position when the power cord is plugged into the outlet, the mode
LED indicators on top of the unit will all flash on for 2 seconds and then go out. If the switch is
then turned off, the indicators will momentarily flash on and go out.
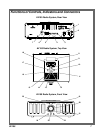
3. Connect the FM antenna lead to the FM ANTENNA (F) connector at the rear of the unit.
4. Construct the AM antenna stand:
a. Hold the antenna loop upside down.
b. Fold the stand piece up and over, mating the slot on this piece with the three tabs on the bottom of
the antenna. Press until the two pieces snap together, making sure the antenna lead wire exits
cleanly through the side of the stand.
5. Connect the AM antenna lead wires into the 300-Ohm AM ANTENNA terminals at the rear of the unit.
6. Press the line power rocker switch on the rear of the unit to the on ( I ) position; the mode LEDs flash on
for 2 seconds and then go out.
7. Momentarily press the POWER (
) button on top of the unit; the audio power output vacuum tubes
visible through each window at the front of the unit light up, indicating the unit is powered on. In addition,
the mode LED on the top will light indicating the mode in affect prior to power turnoff.