4
|
KIV-BT900/ KIV-700
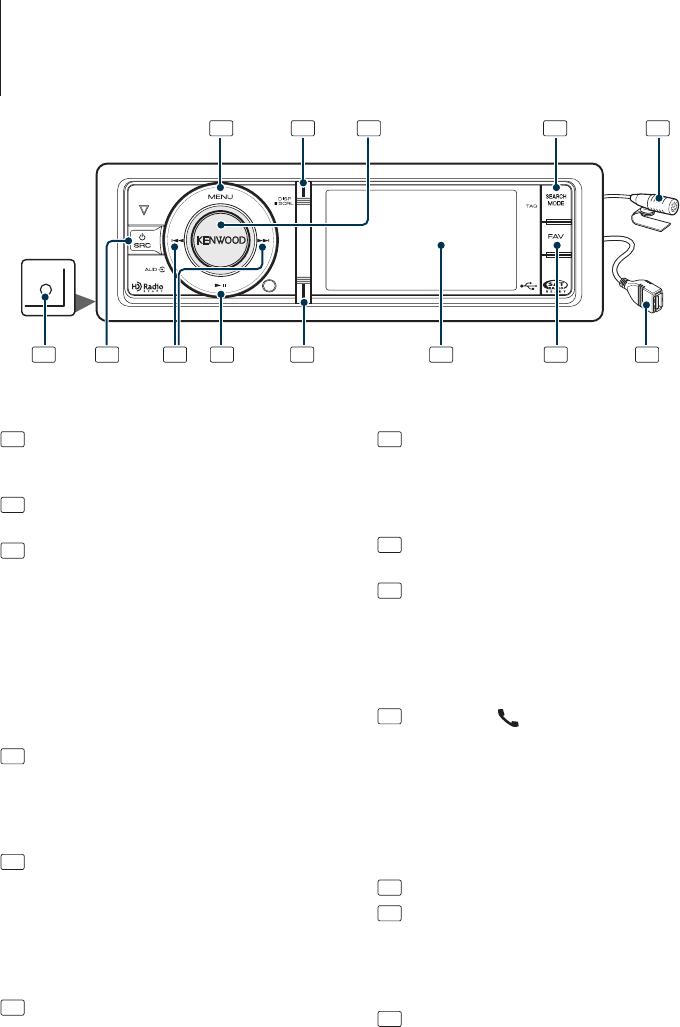
Component Names and Functions
AUX
1
[MENU] button
To select a song or set functions. See <Menu List
Operation> (page 5).
2
[DISP] button
To change display item (press the button).
3
[Volume] knob
To adjust volume (turn the knob).
To select menu setting item (turn and press the
knob). See <Menu List Operation> (page 5) for
details.
KIV-BT900 : To display Play mode in the Menu List
(press the knob at least 1 second).
KIV-700 : To make a voice dialing call (press the
knob at least 1 second). *
1
See <Make a Voice
Dialing Call> (page 33).
4
[SEARCH MODE] button
To enter Search mode (iPod), move between
folders (Audio file), etc. For more details, see
operations of each source described in page 6
or later.
5
Microphone (KIV-BT900)
The microphone for hands free phone is
supplied.
When your voice cannot be recognized due
to the low microphone volume or noises in
the vehicle, adjust the microphone settings by
<Bluetooth Setting> (page 50).
6
Auxiliary Input Terminal
Portable audio device can be connected with the
mini-plug (3.5 mm ø).
• Use the mini-plug cable which is stereo type and does
not have any resistance.
7
[SRC] button
To turn on this unit and select the Source (press
the button).
To turn off this unit (press the button at least 1
second).
8
[
4
] / [
¢
] buttons
To select a station and song. (press the button).
9
[
38
] button
To start or interrupt playback for audio file and
iPod. (press the button).
To select the remove mode, and remove the USB
device or an iPod (press the button at least 2
seconds or more).
10
KIV-BT900: [ ] button
To enter Bluetooth mode (press the button).
To make a voice dialing call (press the button at
least 1 second). See <Make a Voice Dialing Call>
(page 33).
KIV-700: [PLAY MODE] button
To display Play mode in the Menu List (press the
button). *
1
11
Display window
12
[FAV] button
To recall a registered favorite item (press the
button).
To register to Favorite (press the button at least
1 second).
13
USB Terminal
A USB device or an iPod can be connected.
⁄
*
1
Only with KCA-BT300/BT200 (optional accessory)
connected.
1 2 3 4 5
6 7 8 9 10 11 12 13
Rear view
