42560-EU-EN-V5.1-9/11
6
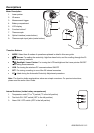
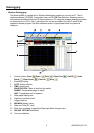
The MODE button options
The MODE button is used to select from a list of available meter functions. The selected function is
displayed on the bottom line of the LCD. Each function is listed below along with a detailed account
of its use. Press the MODE button to step from one function to the next.
EMS (Emissivity Value)
To change the emissivity value, use the UP and DOWN arrows (the available emissivity range
is 0.10 to 1.00). The current emissivity setting is always shown at the top of the LCD display. A
setting of 0.95 covers about 90% of all applications. Emissivity is discussed in a dedicated
section of this User Guide.
MAX (Maximum function)
In the MAX mode, the highest reading encountered during a single measurement scan is
displayed next to the MAX icon.
MIN (Minimum function)
In the MIN mode, the lowest reading encountered during a single measurement scan is
displayed next to the MIN icon.
DIF (Max minus Min value)
In the DIF mode, the MAX less the MIN is displayed next to the DIF display icon for a single
measurement scan.
AVG (Average value)
In the AVG mode, all of the readings in a single measurement scan are averaged and the
result is displayed next to the AVG icon.
HAL (High Alarm temperature setting)
The temperature that, when exceeded, causes the audible/visual alarm to trigger. Use the
arrow buttons to change the high alarm limit.
LAL (Low Alarm temperature setting)
The temperature that, when exceeded high to low, causes the audible/visual alarm to trigger.
Use the arrow buttons to change the low alarm limit.
T k (Type-K contact thermocouple sensor function) the temperature reading of the Type-K
contact probe is shown next to the ‘T k’ icon display. If the sensor is not correctly inserted to
the meter the display will show ‘OL‘. The supplied thermocouple is rated for a maximum
temperature of 482
o
F (250
o
C).
LOG 1 through 20 (20 reading internal datalogger)
Repeatedly press the MODE button unit the LOG icon is displayed on the LCD. Pull the
measurement trigger to take a reading and then press the SET button to store the reading to
the location represented by the number shown next to the LOG icon. Use the arrow keys to
navigate the 20 storage locations.
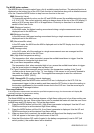
Over-range Indicator
If the temperature measurement exceeds the specified temperature range, the thermometer will display OL
(overload) in place of a temperature reading.
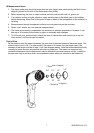
High and Low Alarm Feature
The Model 42560 has an alarm feature whereas a High Alarm setting and a Low Alarm setting can
be programmed by the user. When either Alarm point is reached the meter will alert the user via an
audible beep and LCD display icon. Follow the steps below:
1. Press the MODE button until the HAL (High Alarm) parameter is displayed. Use the UP and
DOWN arrow keys to set the desired High Alarm setting.
2. Press the MODE button until the LAL (Low Alarm) parameter is displayed. Use the UP and
DOWN arrow keys to set the desired Low Alarm setting.
3. When an alarm limit is reached, the audible alarm will sound and the display icon HIGH or
LOW will appear in the lower right hand corner of the LCD.
4. Note that if the bottom DIP switch (located in the battery compartment) is set to OFF (left
switch position), the audible alarm will be disabled.