


6
Suspended and Bracket Installation
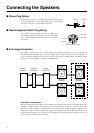
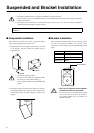
■ Suspended Installation
The C112VA and C115VA can be used in suspended “flying”
rigs by using an appropriate suspension wire.
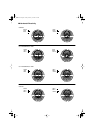
1. Replace the bolts with the supplied eyebolts (3/8") as shown
in the diagram, and then suspend the speaker using an
appropriate wire.
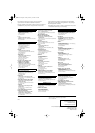
2. The speaker angle can be adjusted for optimum coverage by
adjusting the lengths of the suspension wires, but the down-
ward tilt angle must be less than 45 degrees, as shown in the
diagram.
■ Bracket Installation
The C112VA has bracket-mounting screws on the top, bottom,
and sides of the speaker enclosure. The C112VA can be
mounted on a wall or ceiling using the optional brackets listed
below.
• Consult an installation expert to arrange for installation or construction work.
• Choose suspension wire, an installation location, and mounting hardware that are strong enough to support the
weight of the speaker.
• Some fittings may deteriorate over extended periods of time due to wear or corrosion. For safety the installation
should be checked thoroughly at regular intervals.
Yamaha cannot be held responsible for damage or injury caused by insufficient strength of the support structure or improper
installation.
• Use only the supplied eyebolts.
• Use two or more eyebolts for suspended installa-
tion. Always use the eyebolts marked .
• Do not suspend a speaker from another suspended
speaker.
Bolts
Bolts
Eyebolts
Eyebolts
Maximum
45
Degrees
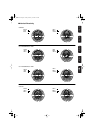
Bracket Model
Wall bracket BWS251-300, BWS251-400
Ceiling bracket BCS251
Baton bracket BBS251
• Use only the specified screws (W5/16")
to attach the bracket to the speaker.
The mounting screws are installed on the speaker
when it leaves the factory. Refer to the instruc-
tion manual supplied with your bracket for
installation details.
Screws (W5/16")