


FlashPro 8000
20
2. Press [ MENU ] button to open function menu .
3. Scroll to [REC INPUT ]
4. Use [! ] or [ " ] button to set REC INPUT at [ MIC IN ]
Recording from Line-in
You can use a line –in cord to record music directly from an audio device
( such as CD player)
1. Scroll to [REC ] and press [Ok ]button
2. Press [ MENU ] button and scroll to [REC INPUT ]
3. Use [! ] or [" ] button to set REC INPUT at [ LINE IN ]
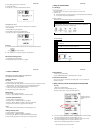
Key Lock
! To lock the FlashPro 8000 front panel buttons from being accidentally pressed,
scroll
and press [ OK ] button.
! Press [ MENU ] to re-set the default again to effect the buttons.
Starting the recording process
1. Scroll to [Rec] and press [Ok ]button
2. Press [Ok] button again to start the voice recording.
FlashPro 8000
9
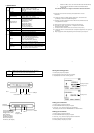
Under Windows 98 , the removable disk drives look like drives G , I and J
in the following figure.
3. Using the FlashPro 8000
3-1 Starting up
_________________________________________________________________
1) Charge the batteries
! Before using for the first time, charge the batteries for a full four hours.
2) Power On /Off
! Press the power button. The green light will go on and the operating system will boot up.
! To shut off the unit, press the power button.
3-2 Driver installation
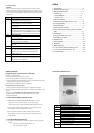
Windows Me and Windows XP HomeEdition and Professional Edition
,Win2000 Professional SP 3 above
Windows 98/98 SE
Windows Me and Windows XP HomeEdition and Professional Edition, Win2000
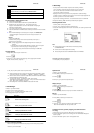
Professional SP 3 above users do not need to install any drivers. Windows will
automatically detect your device as following figure.
Restart your computer after installation is complete
Browse your CD-ROM drive and run "setup.exe "to begin driver installation.
Press "Next" and follow the installation instructions.
2
Insert your driver Installation into your CD-ROM drive and double click on
"My computer".
1
3
4
FlashPro 8000
18
7. Listen to FM Radio
Remember to connect the earphone to earphone jack .
The earphone acts as the FM antenna.
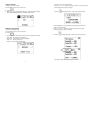
Presetting a Channel
Auto tuning:
1. Scroll to [ Radio ] and press [Ok ]button
2. Press and hold the [ # ] or [ $] buttons for more than 0.5 seconds ; then release to auto scan
FM radio stations . The tuner will stop at the first receivable broadcast station.
3. Press [ Ok ] button The current FM station will be set to a preset channel
number. You can store up to 20 stations in memory.
4. To stop auto tuning, press the [ ESC ] button .
Manual tuning :
1. Scroll to [ Radio ] and press [Ok ]button
2. Press the [ # ] or [ $] buttons to tune into the desired station
To recall a memorized station:
1. Scroll to [ Radio ] and press [Ok ]button
2. Press [Ok ] button , “ PRESET” will appear in the display.
3. Press the [ # ] and [ $] buttons to switch to other preset radio bands.
4. To go back to the manual tuning, just press [ Ok] button again.
Notes:
- The last station tuned in will be recalled, even after switching the unit.
Deleting a channel preset
1. Scroll to [ RADIO ] and press [OK ]button
2. Press [OK ] button , “ PRESET” will appear in the display.
3. Use the [ # ] and [ $] buttons to find the desired file you want to delete.
4. Press and hold [ copy ] button for 2 seconds to remove the preset band
FlashPro 8000
11
3-6 Disk Selection
1. Switch on your FlashPro 8000
2. Press [ DISK SELECT] button to select desired source or target.
3-7 Auto Power off Function
There is an auto screen- off function to save battery power . If the unit is idle for 35
seconds it will shut off.
4. Using a memory card to transfer photos to FlashPro 8000
Auto Copy
1. Switch on your FlashPro 8000
2.Insert memory card(s) into FlashPro 8000 card slot .
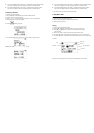
3.Press the “ Copy “ button , copy function will be performed.
! If the “ OK” message displays on the screen , it indicates the file is successfully copied
The icon
☺
will display on the main page after switching the unit.
! If the “ NG” message displays on the screen, it indicates the copy function is failed.
The icon
$
will display on the main page after switching the unit.
Please refer to the troubleshooting sections for a first check.
4. Use [ OK ] button to go next Verify function.
Display the amount of
transferring files and
folders