


11
© 2002 Directed Electronics, Inc
CROSSOVER INSTALLATION
Review the
Installation Precautions
section of this guide before proceeding.
Crossover Adjustment and
Wiring Connections
This Viper crossover has the ability to
work in car audio systems from basic
single amplifier systems to the most
sophisticated multiple amplifier systems
with signal processors and amplifier chan-
nels dedicated to each speaker.
Control Switches
The control switches can be accessed
under the removable elliptical cover next
to the input connector. Pry up the cover
to make crossover adjustments.
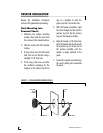
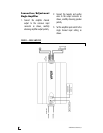
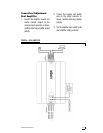
Input Switch
The input switch tells the crossover what
type of amplifier system is being used.
If a single amplifier channel will power
both the tweeter and the woofer, follow
the Single Amplifier Input instructions.
(See Figure 5.)
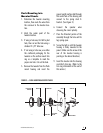
If an amplifier channel will power the
tweeter and another channel will power
the woofer, follow the Dual Amplifier
Input instructions. (See Figure 6.)
Attenuation Switch
The tweeter attenuation switch can
adjust the tweeters from +3 dB to -6 dB
to compensate for vehicle interior and
mounting location. It is used to brighten
or soften the tweeter response according
to listener's preference. (See Figure 5.)
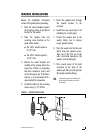
Removing Trim Rings
Hold the tweeter housing while gently
turning the trim ring in a clockwise direc-
tion until it releases. The trim ring can
then be easily lifted away from the
tweeter housing.
Installing Trim Rings
FFlluusshh MMoouunntt AAsssseemmbbllyy
- With the
arrow in the tweeter housing facing
up, place the trim ring into the
housing with the Viper logo at the
bottom and turn in a counter clock-
wise direction until the trim ring
clicks into place.
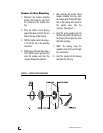
SSuurrffaaccee MMoouunntt AAsssseemmbbllyy
- Insert the
trim ring into the housing and turn in
a counter clockwise direction until
the trim ring clicks into place.