


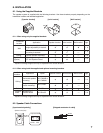


12
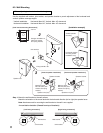
8.5. Speaker Stand Mounting
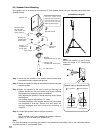
The speaker can be mounted on the optional ST-16A Speaker Stand using the supplied joint bracket and
speaker bracket.
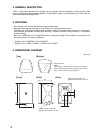
[Installation example]
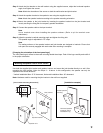
Note
Mount the speaker so that it faces
within the range of 15º upward and
downward.
b
a
15
º
15
º
Speaker bracket
15º upward
[Speaker angle vs. Bracket position]
30°
15º downward
0°
Joint bracket
b
a
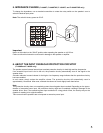
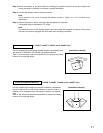
1
2
3
3
Fixing bolt
M5 x 60
Speaker unit
Joint bracket
Machine screw
M5 x 20 (with
plain washer and
spring washer)
Speaker bracket
ST-16A (option)
Butterfly nut
(supplied with
the ST-16A)
Washer
(supplied with
the ST-16A)
Bracket
(supplied with the ST-16A)
Hexagon bolt
(supplied with the ST-16A)
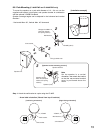
As hole seals are
adhered over the holes,
remove them using a
pointed tool before
attaching the bracket.
Step 1. Attach the joint bracket to the speaker stand bracket using
the speaker stand's supplied bolt and nut.
Step 2. Attach the speaker bracket to the speaker's bottom using the
supplied screws.
Step 3. Mount the speaker to the joint bracket by inserting the
speaker bracket into the joint bracket and loosely securing
the fixing bolt for temporary speaker installation.
After adjusting the speaker's vertical mounting angle, tighten
the fixing bolt.
The speaker angle is adjustable in 7.5º steps.
The mating surfaces of the speaker bracket and joint bracket
are designed to interlock. Ensure that both parts are
securely engaged with each other after mounting is
complete.
Step 4. Connect the speaker cable to the input terminals.
Note
Use a terminal cover when installing the speaker outdoors.
(Refer to p. 6 for terminal cover attachment.)
Note
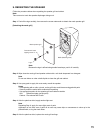
For more information on mounting the bracket to the stand and stand usage, refer to the instruction manual
enclosed with the ST-16A Speaker Stand.