


10
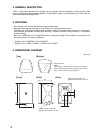
8.4. Ceiling Mounting
Use the supplied joint bracket and speaker bracket.
Note
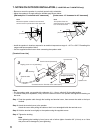
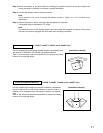
Speaker coverage angles can only be adjusted in the vertical direction (Max. 45º downward).
Adjust the speaker's tilt angle within the shaded range shown below:
Vertical orientation
[Installation example]
[Speaker angle vs. Bracket position]
30º
15º
Joint bracket
Speaker
bracket
0º (horizontal) 45º downward
b
a
45º
b
a
0°
(horizontal)
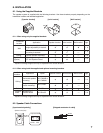
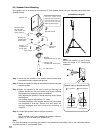
4-ø6 mm
[Joint bracket mounting dimensions]
ø10 mm
25 mm
30 mm
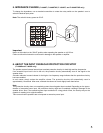
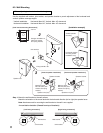
Step 1. Mount the joint bracket to the ceiling surface.
Note
Hardware used for mounting the joint bracket to the ceiling is
not supplied.
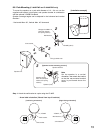
Step 2. Attach the speaker bracket to the speaker's bottom using the
supplied screws.
Machine screw
M5 x 20 (with
plain washer and
spring washer)
1
3
5
2
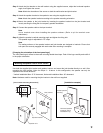
Fixing bolt M5 x 60
Speaker unit
Front panel logo*
Joint bracket
Fixed mounting screw hole
(4 holes)
Anchor bolt mounting hole
Speaker bracket
Ceiling board
Anchor bolt
Joint bracket
Effective length
• Use an appropriate anchor bolt for supporting
the full weight of the speaker and for the size
of mounting hole in the joint bracket.
• Ensure that the effective length of the anchor
bolt is 20 mm or less.
• When speaker rotation capability is not desired,
secure with the 4 fixed mounting screw holes.
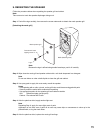
Notes
As hole seals are
adhered over the holes,
remove them using a
pointed tool before
attaching the bracket.
* Changing the orientation of the front panel logo
The front panel logo is affixed to the mesh net using
double-faced tape. Peel off the logo carefully and
reaffix it in the proper orientation.