


Setting Clock Time
1. Slide the Setting Switch to Time. The display will show time setting on the screen
and flash.
2. Press the Hour/Month Button to advance the hour forward, or the Minute/Date
Button to advance the minute forward. Remember to set the correct AM or PM
time.
Note: While pressing and holding either Hour/Month or Minute/Date Button
the hour/minute will advance at a moderate pace and then get faster. This
will assist you in setting the date quickly and accurately.
3. The clock has auto DST (day saving time) feature which will automatically adjust
the clock time for DST. If your living area has no DST, please manually adjust.
Setting Alarm Time
1. Slide the Setting Switch to Alarm. The display will show alarm time setting
screen and flashing.
2. Press the Hour/Month Button to advance the hour forward, or the Minute/Date
Button to advance the minute forward. Remember to set the correct AM or PM
alarm time.
Note:After all the settings, slide the Setting Switch to Lock to return to the normal
display mode.
1. Set alarm time as indicated in Setting Alarm Time.
2. Rotate the unit to vertical mode to active the alarm. ALARM ON will show on
middle of the display to indicate alarm is actived.
3. To stop the alarm from sounding on the following day, just rotate the unit to horizontal
mode. ALARM OFF will show on left side of the unit to indicate alarm is off.
4. If the alarm is not turned off after it sounds, it will play for approximately 5 minutes
then turn off automatically. This cycle will repeat every 24 hours unless the controls
are changed.
1. Press the Sound On/Sleep Button to listen to nature sounds. Press the
Hour/Month Button or the Minute/Date Button to select the sounds.
2. Press the Sound On/Sleep Button again for sleep mode. Nature sound will turn
off automatically after several minutes. Press the Sound On/Sleep Button again
to change the amount of sleep time.
3. Adjust the Volume Control as desired.
4. When listening is completed, press the Snooze/Off/Backlight Button to turn
it off.
Setting Date, Time and Alarm Time
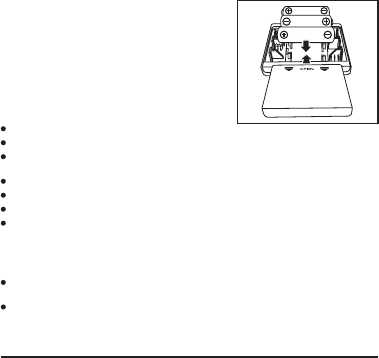
Install Operating Batteries:
1. The battery compartment is located on the back
of the cabinet and opens the battery
compartment door.
2. Install 3 "AAA" batteries, making sure that the
positive and negative polarities match up with
the diagram inside the battery box.
3. Close the battery compartment door, making
sure the door latch clicks shut.
For the Best Possible Performance:
We recommend using alkaline batteries.
Non-rechargeable batteries are not to be recharged.
Rechargeable batteries are to be removed from the clock before being charged
(if removable).
Different types of batteries or new and used batteries are not to be mixed.
Only batteries of the same or equivalent type as recommended are to be used.
Remove exhausted batteries from the clock.
The supply terminals are not to be short-circuited.
For using AC adapter, you don't need to install "AAA" batteries but we recommend to
install backup battery to prevent setting lost by power failure.
Install AC Adpater:
Plug the included AC Adapter into the DC Jack located on the back of the unit, then
plug the AC Adapter into a wall outlet.
If you are using a different AC adapter then the one supplied, make sure that it is a
DC 6V, 400mA Positive Center AC Adapter.
Setting Date
1. Slide the Setting Switch which is located on the back of the unit to Date The display
will show date setting on the screen and flash.
2. Press the Hour/Month Button to advance the month forward, the Minute/Date
Button to advance the date forward, or °F/°C/Year Button to advance the year
forward.
Note: While pressing and holding Hour/Month, Minute/Date or °F/°C/Year Button
the month/date/year will advance at a moderate pace and then get faster. This
will assist you in setting the date qucikly and accurately.
Controls and Indicators
Installation and Maintenance
Operating the Alarm
°F/°C/Year Button
1 2 3 4
1. Place unit on a level surface away from sources of direct sunlight or excessive heat.
Note: Protect your furniture when placing your unit on a natural oil or lacquered finish.
A cloth or other protective material should be placed between it and the
furniture.
2. Open battery compartment and install batteries as Getting Started.
3. Clean your unit with a soft cloth moistened only with mild soap and water. Stronger
cleaning agents, such as Benzine, thinner or similar materials can mar the surface
of the case.
4. If the unit is not to be used for a prolonged period, such as a month or longer, remove
the batteries to prevent possible corrosion. Should the battery compartment become
corroded or dirty, clean the compartment thoroughly and replace all the batteries.
Getting Started
Important! You may need to remove the Try-Me Pull Tab from the back of this unit.
The Pull Tab is for in-store use only. Throw the plastic tab away.
The Rotating Temperature Alarm Clock operates either by AC adapter or batteries. It
including 3 "AAA" batteries is meant for in-store demonstration use only, and should be
replaced with fresh batteries when the Alarm Clock is brought home. Also, it needs a
CR-2032 (not including) lithium battery for alarm clock setting backup. To replace or
install the batteries, follow these instructions:
Install Backup Batteries:
1. The battery compartment is located on the
back of the cabinet and opens the battery
compartment door.
2. Take out all "AAA" batteries if necessary and
then insert a flat-headed screwdriver into the
slot on the back up battery compartment cover,
gently pry off and remove the back up battery
cover.
3. Install a "CR-2032" lithium battery into the back
up battery compartment, making sure that the
positive and negative polarities match up as
indicated inside the battery box.
4. Close the back up battery compartment cover,
making sure the cover latch clicks shut.
Listening to Nature Sounds
Hour/Month Button
Minute/Date Button
Setting Switch
Snooze/Off
/Backlight Button
Dimmer Switch
Sound On/Sleep Button
CR-2032
DC Jack
Try-Me Pull Tab
DIMMER VOLUME
LO
MEDHI
DC 6V
400mA
LO HI
ALARM
TIMEDATE
LOCK
OPEN
Volume Control
Back up
battery cover
BACK VIEW