


POWER
ON / OFF
BAND
AM / FM
ALARM
SET
ALARM
ON / OFF
ENTERSET
SNOOZE
DIMMER
SETTING THE ALARM:
•
Press ALARM SET.
•
Press < < or > > .
•
Select a PRESET radio station.
(skip this step to wake to buzzer)
•
Press ENTER.
Setting the Clock
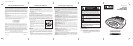
Controls and Indicators
4
9 Snooze/Dimmer Bar
7 Alarm On/Off Button
3 Reverse/Tuning Button 5 Forward/Tuning Button
4 Enter Button
6 Alarm Set Button
2 Radio Band Button
1 Power On/Off Button
J Radio Preset
Buttons
LOCKZONECAL.CLOCK
ON
OFF
+1
OFF
AUTO
DST
BOTTOM VIEW
K Clock Button
L Calendar Button
M Zone Button
N Preset Lock Switch
8 Volume Control
5
6 7
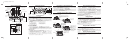
Display with Indicators
This unit includes three sets of 12 Preset Button Paper Inserts, each showing a different radio
station format (Jazz, Country, Rock, etc.). Follow these instructions to insert the inserts to
match the programmed stations.
Daylight-Saving
Time Indicator
Clock PM Indicator
Battery Low
Indicator
Unlock Indicator
Alarm Off
Indicator
Radio Dial /
Alarm Wake Time
Alarm Wake Time
AM/PM Indicators
Radio Band
AM/FM Indicators
Buzzer Alarm On
Indicator
Radio Alarm On
Indicator
1.
Slide the N Preset Lock Switch to “Off”. The Unlock Indicator will appear on the display.
Note: Be sure to slide the
N Preset Lock Switch back to “On” to prevent changing settings.
2. Press the M Zone Button,
the current Auto-Set Time Zone will flash
. Press the
3 Reverse/Tuning or 5 Forward/Tuning Button
to select your time zone. The display
will show each zone's current time setting. There are seven zones.
Time Zones
ATL : Atlantic Standard Time PAC: Pacific Standard Time
EAS: Eastern Standard Time ALS: Alaska Standard Time
CEN: Central Standard Time HAI: Hawaii Standard Time
MTN: Mountain Standard Time
3. Press the
4
Enter Button.
Manual Time and Date Settings
1. To change the time setting, press the K Clock Button. The clock display will flash.
Press the
3 Reverse/Tuning
and
5 Forward/Tuning Button
to set the time. Hold a
button for a few seconds to set the time rapidly. Be sure to set the correct AM/PM time, shown
by the PM indicator.
2. Press the 4 Enter Button. The clock will beep twice and the display will stop flashing.
Daylight-Saving Time
1. Depending on your living area and if Daylight Saving Time (DST) is observed, you can
manually switch DST on (+1), OFF or use the AUTO setting.
2. To manually turn on the DST function, just set the P DST Switch to +1. The DST icon
will appear and the time will advance 1 hour.
3. To manually turn OFF the DST function, set the P DST Switch to OFF. The time will go
back 1 hour.
4. Set the P DST Switch to AUTO to have the unit automatically adjust the time at the
beginning and end of Daylight Saving Time each year.
General Operating Instructions
Playing the Radio
Adjusting the Display Backlight
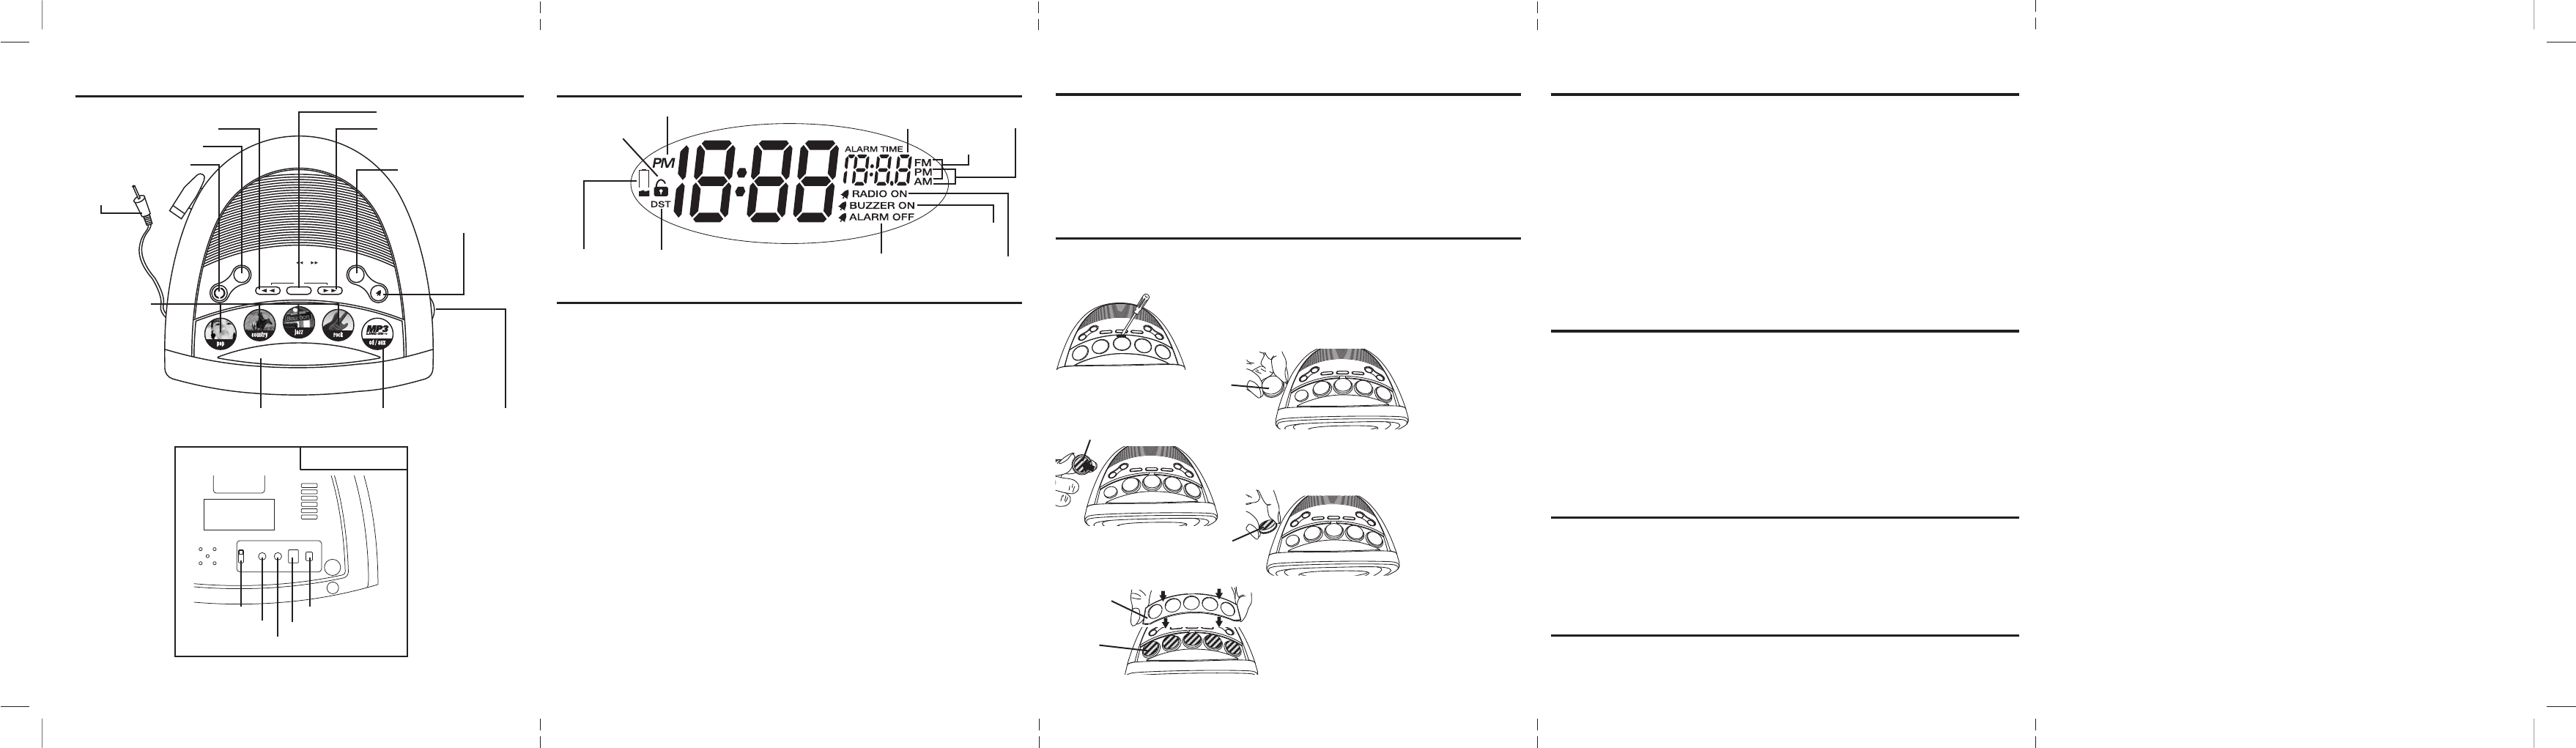
Changing the Preset Button Inserts
Programming the Preset Radio Stations
Auto-Set and Manual Time and Date Settings
This model is equipped with the Auto-Set feature, meaning that the time and date have been
programmed at the factory and will already be set when you first plug the model in. Auto-Set is
programmed for Eastern Standard Time. To change your time zone setting, perform steps below.
Setting and Operating the Alarm
1. Press the 6 Alarm Set Button. The wake time on the display will flash.
2. Press the 3 Reverse/Tuning or 5 Forward/Tuning button to set the alarm time.
Hold a tuning button for a few seconds to advance the time quickly.
3. For wake to buzzer, press the 4 Enter Button to set the alarm wake time. The unit
will beep twice and the Buzzer Alarm On Indicator will appear, showing that the buzzer
alarm will sound at the set time.
4. For wake to radio, press one of the J Radio Preset Buttons then 4 Enter Button
to set the alarm wake time. The unit will beep twice and the Radio Alarm On Indicator
will appear, showing that the radio alarm will sound at the set time.
5. When the alarm sounds, press the 9 Snooze/Dimmer Bar for a 9-minute Snooze
time, or press the 7 Alarm On/Off Button to shut off the alarm. The Alarm Off
Indicator will appear.
Note: Pressing 7 Alarm On/Off Button while alarm is sounding turns off alarm. The 7
Alarm On/Off Button also selects alarm mode.
This unit has four Radio Preset Buttons for guests to find local stations. It also includes 12
insert pictures for the buttons, each showing a different radio station format (Jazz, Country,
Rock, etc.). You should prepare or receive a list of four stations to program the settings.
1. Press the 1 Power On/Off Button to turn on the radio.
2. Set the AM or FM band by pushing the 2 Radio Band Button.
3. Press either the 3 Reverse/Tuning or 5 Forward/Tuning Button to find the station.
Hold a tuning button for a few seconds to scan the dial quickly.
Note: Extend the wire antenna for better FM reception.
4. Press and hold a J Radio Preset Button to set the station. The unit will beep twice.
This alarm clock radio features an adjustable display backlight, with dim, medium, and
bright settings. To select a backlight setting, press the 9 Snooze/Dimmer Bar until
desired brightness is reached.
1. There are two ways to turn on the radio. Press one of the J Radio Preset Buttons
to listen to one of the preset stations, or press the 1 Power On/Off Button. The
radio frequency will appear on the display.
2. Set the AM or FM band by pushing the 2 Radio Band Button.
3. Press either the 3 Reverse/Tuning or 5 Forward/Tuning Button to find the station.
Hold a tuning button for a few seconds to scan the dial quickly.
4. Rotate 8 Volume Control to adjust volume level.
5. Press 1 Power On/Off Button to shut off the radio.
Note:
• Extend the wire antenna for better FM reception.
• Keep Fluorescent lamps away from unit as they may cause interference with radio.
2 Remove each
clear button
cover.
Clear
Button
Cover
3 Place the paper
insert that matches
the programmed
station into the clear
cover
Button Insert
1 Insert a flat-headed screwdriver into
the slot behind the center preset button
and gently pry off and remove the
frame.
Clear Button Cover
with Insert
4 Replace the clear cover
together with paper
insert on the top of
black button.
Note: Each button
cover is numbered 1-5,
and must be placed on
the black buttons in
numerical order.
2
3
4
5
1
T1233BA I/B_Back Color: Black Dec 21, 07.
5 Replace the frame.
Gently press around
the frame to snap it
in place.
Clear Button Cover
with Insert
Frame
Press
Press
MP-3/Aux
Line-in Plug
Playing the MP-3 / Aux Line-in
O MP-3/Aux
Line-in Button
DST Switch P
1. Connect your CD/ MP-3 Player or other device to the MP-3/Aux Line-in Plug.
2. Press the O MP-3/Aux Line-in Button. 'AU' will appear on the display.
3. Turn the 8 Volume Control to adjust the volume level.
Note: To avoid distortion of sound, always set the volume level of the auxiliary device to
middle position, and adjust the desired volume level from the radio.
4. Press the 1 Power On/Off Button to shut off unit. Remember to turn off your audio
device, too.