


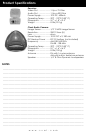

General Installation
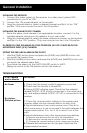
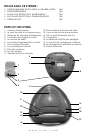
INSTALLING THE RECEIVER
1. Connect the video output on the receiver to a video input (yellow) RCA
connection on your TV or VCR.
2. Connect the 12V power adaptor to the receiver.
3. Using the channel selector, select a desired channel and flip it to the “ON”
position. *Only one channel can be in the ON position
INSTALLING THE ALARM CLOCK CAMERA
1. Place the alarm clock camera in an appropriate location, connect it to the
supplied adaptor and plug in the adaptor to your wall outlet.
2. Using the channel selector, select the same channel as chosen on the receiver
and flip it to the “ON” position. *Only one channel can be in the ON position
IN ORDER TO VIEW THE IMAGE ON YOUR TELEVISION OR VCR, IT MUST BE ON THE
APPROPRIATE INPUT (A/V) CHANNEL.
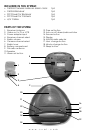
SETTING THE TIME AND ALARM ON THE CLOCK
1. Hold the [TIME] button down and press the [HOUR] and [MINUTE] button until
you reach the correct time.
2. Hold the [ALARM] button down and press the [HOUR] and [MINUTE] button until
you reach the desired alarm time.
3. To activate the alarm, set the [AUTO-ON-OFF] switch to AUTO.
Sliding the switch to the ON position will turn the radio on.
www.svat.com
TROUBLESHOOTING
You should...
1. Check that the power cord(s) is properly connected.
2. Check that the monitor is turned ON.
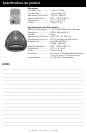
3. Wrong AC/DC adapter used. Check that the adapter
labeled OUTPUT: 10.2V ACx2 is connected to the clock cam-
era, and adaptor labled OUTPUT: 12V DC is connected to the
receiver.
1. Check the channel switch settings on the camera and
receiver. Make sure the channels match on both units.
2. Signal interference from a microwave oven. Check if a
micro-wave oven is in use or located in the path between the
camera and monitor. If so, turn it off or move it out of the
path.
3. Signal interference from other signal producing devices.
(a) Identify and eliminate the source of the interference.
(b) Relocate the camera and/or monitor closer to each other.
(c) Change the channel setting on both camera and receiver.
4. Camera and receiver are too far apart. Relocate the
camera and/or receiver.
If the Camera
and/or Monitor
No Power
No picture.
Distorted picture