


6
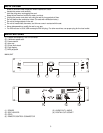
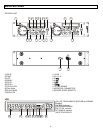
NAMES AND FUNCTIONS
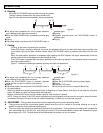
Control Unit
(1) OP/CL
Press it to open and close the disc holder. The main unit
also includes OPEN/CLOSE buttons. The disc holder
cannot be opened during playback, so stop playback
before pressing the button.
(2) TIME (Time Button)
Press this button to switch the time display among the
elapsed time and remaining time and total remaining time
of the disc.
(3) LCD
(4) RELAY
Use a std. Mini plug (stereo) to plug in Side1 to Side 2. Set
both sides of the CD player to single node on the control.
When Disc 1 ends the CD player will automatically change
to Disc 2 and when Disc 2 ends it will return to Disc 1,etc.
(5) PITCH - BUTTON
The CD slows down while this button is pressed.
Release the button to return to the original BPM.
(6) PITCH + BUTTON
The CD speeds up while this button is pressed.
Release the button to return to the original BPM.
(7) PITCH LOCK
Use these button to enable or disable BPM adjustment
with the pitch sliders. BPM adjustment with the pitch
sliders is enabled when the PITCH LED lights.
(8) PITCH SLIDER
Use the slider to adjust the CD pitch. Slide up to
decrease the pitch, down to increase the pitch.
(9) PLAY/PAUSE
Use the button to start playback. Press once to start
playback, once again to set the pause mode, and once
more to resume playback.
(10)
SGL/CTN (Single/Continuous Button)
Press it to switch between the single and continuous
play modes. The SINGLE mode is indicated by the
SINGLE indicator on the LCD
(11) CUE (Cue Button)
Press the CUE button during playback to return to the
position at which playback started.
(12) +10/-10
Use the button to skip ahead 10 tracks.
Use the button to rewinds 10 tracks.
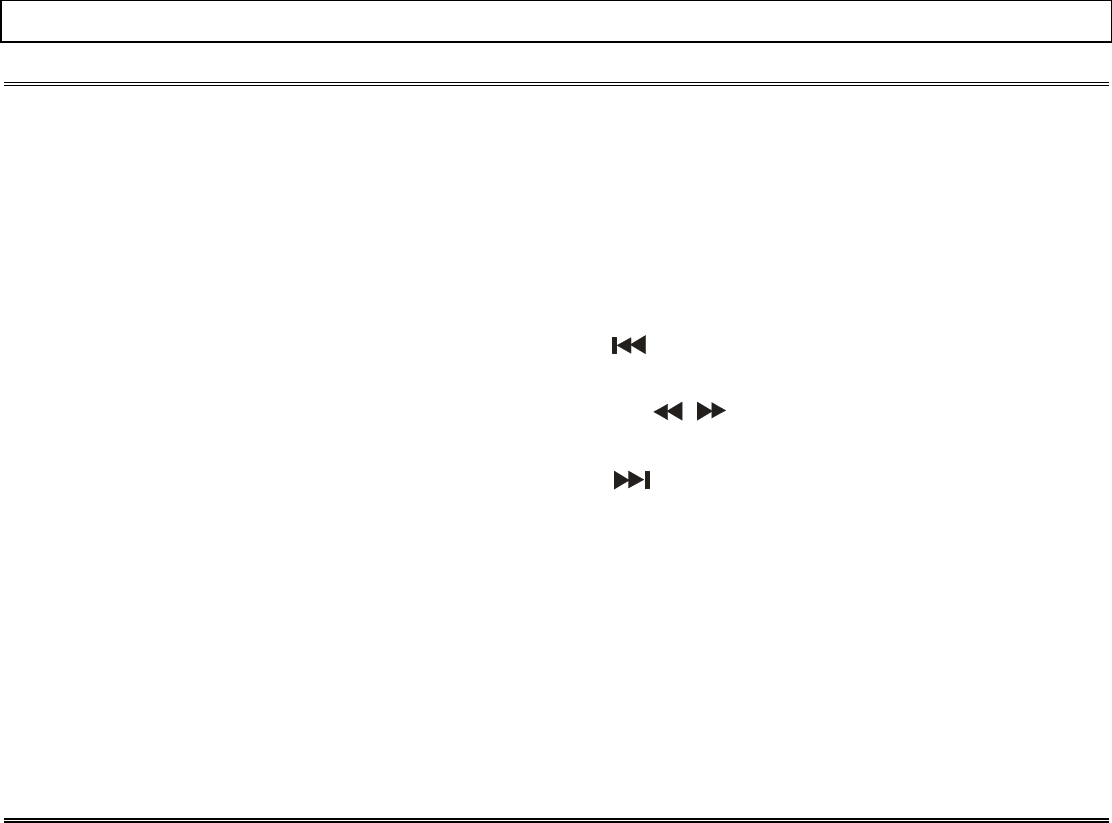
(13)
Use these button to go back to the beginning of the
current track or select a previous track for playing.
(14) ,(15)
Press these buttons to perform scan function during
pause mode or during play mode.
(16)
Use these button to skip to the next CD track.
(17)PITCH RANGE
Choose from pitch percentages of 4%,8% and 16%.
(18)CONTROL CONNECTOR
Connect this connector to the REMOTE connector on the
main unit using the included control cord.
(19)FADER START SOCKET
Via the Control socket, the respective CD-player can be
remotely controlled. If you are using a mixer with fader
start-function connect the player with the Control Out-
socket. Please note that these sockets must never be
connected with any voltage.
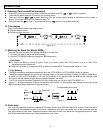
LCD
(20)~(23)Track, Minute, Second and Frame Displays
These displays indicate information for the CD’s current
position and time.
(24)BAR Indicator
These ten indicators provide a visual display of the
approximate position of the pickup within the current track.
(25)REMAIN Indicator
It indicates that the time shown on the display is the
remaining time of playing track
(26)TOTAL Indicator
It indicates that the time shown on the display is the
TOTAL REMAIN time of playing back
(27)CONTINU Indicator
When the indicator lights, the function will cause the unit
to play continuously.
(28) PITCH DISPLAY
It shows the BPM change range, the BPM changes within
a range of +/-16%.