


27
Troubleshooting
Should any problem persist after you have checked these symptoms, consult your nearest Sony
dealer.
Symptom
Cannot adjust the volume by
turning the rotary control on
the remote control.
Cannot start play by turning
the rotary control on the
remote control.
The volume does not increase
even if you press the VOL+
button repeatedly.
Cannot adjust the volume.
No sound, or noise is heard.
The playing time is too short
when powered with the dry
batteries.
The playing time is too short
when powered with the
rechargeable batteries.
“Lo batt” or “000” appears
in the display. The CD does
not play.
“HI dc In” appears in the
display.
Cause and/or corrective actions
c Pull the rotary control in the direction of the arrow indicated on
the control, then turn the control toward VOL + or –.
c The rotary control is pulled out. Push the control back, then turn
the control toward N/>.
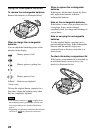
c The headphones/earphones are connected to the LINE OUT jack.
Connect them to the i (headphones) jack. (page 7)
c The headphones/earphones are connected to the LINE OUT jack.
Connect them to the i (headphones) jack. (page 7)
c Connect the plugs firmly. (page 7)
c Plugs are dirty. Clean the plugs with a dry soft cloth periodically.
c When playing a CD containing both MP3 files and files recorded
in a format other than MP3, you selected the latter file type. This
CD player can play tracks recorded in the CD-DA format or MP3
files recorded in the CD-ROM format only. (page 9)
c Check that you are using alkaline batteries and not manganese
batteries. (page 25)
c Replace the batteries with new LR6 (size AA) alkaline batteries.
(page 25)
c Charge and discharge the rechargeable batteries several times.
(pages 23, 24)
c The rechargeable batteries are used up completely. Charge the
batteries. (page 23)
c Replace the batteries with new LR6 (size AA) alkaline batteries.
(page 25)
c Use only the AC power adaptor or car battery cord in “Accessories
(supplied/optional).” (page 31)
c Remove all power sources, then insert the batteries or connect the
AC power adaptor again. (pages 7, 23 - 25)
Additional information
(Continued)