


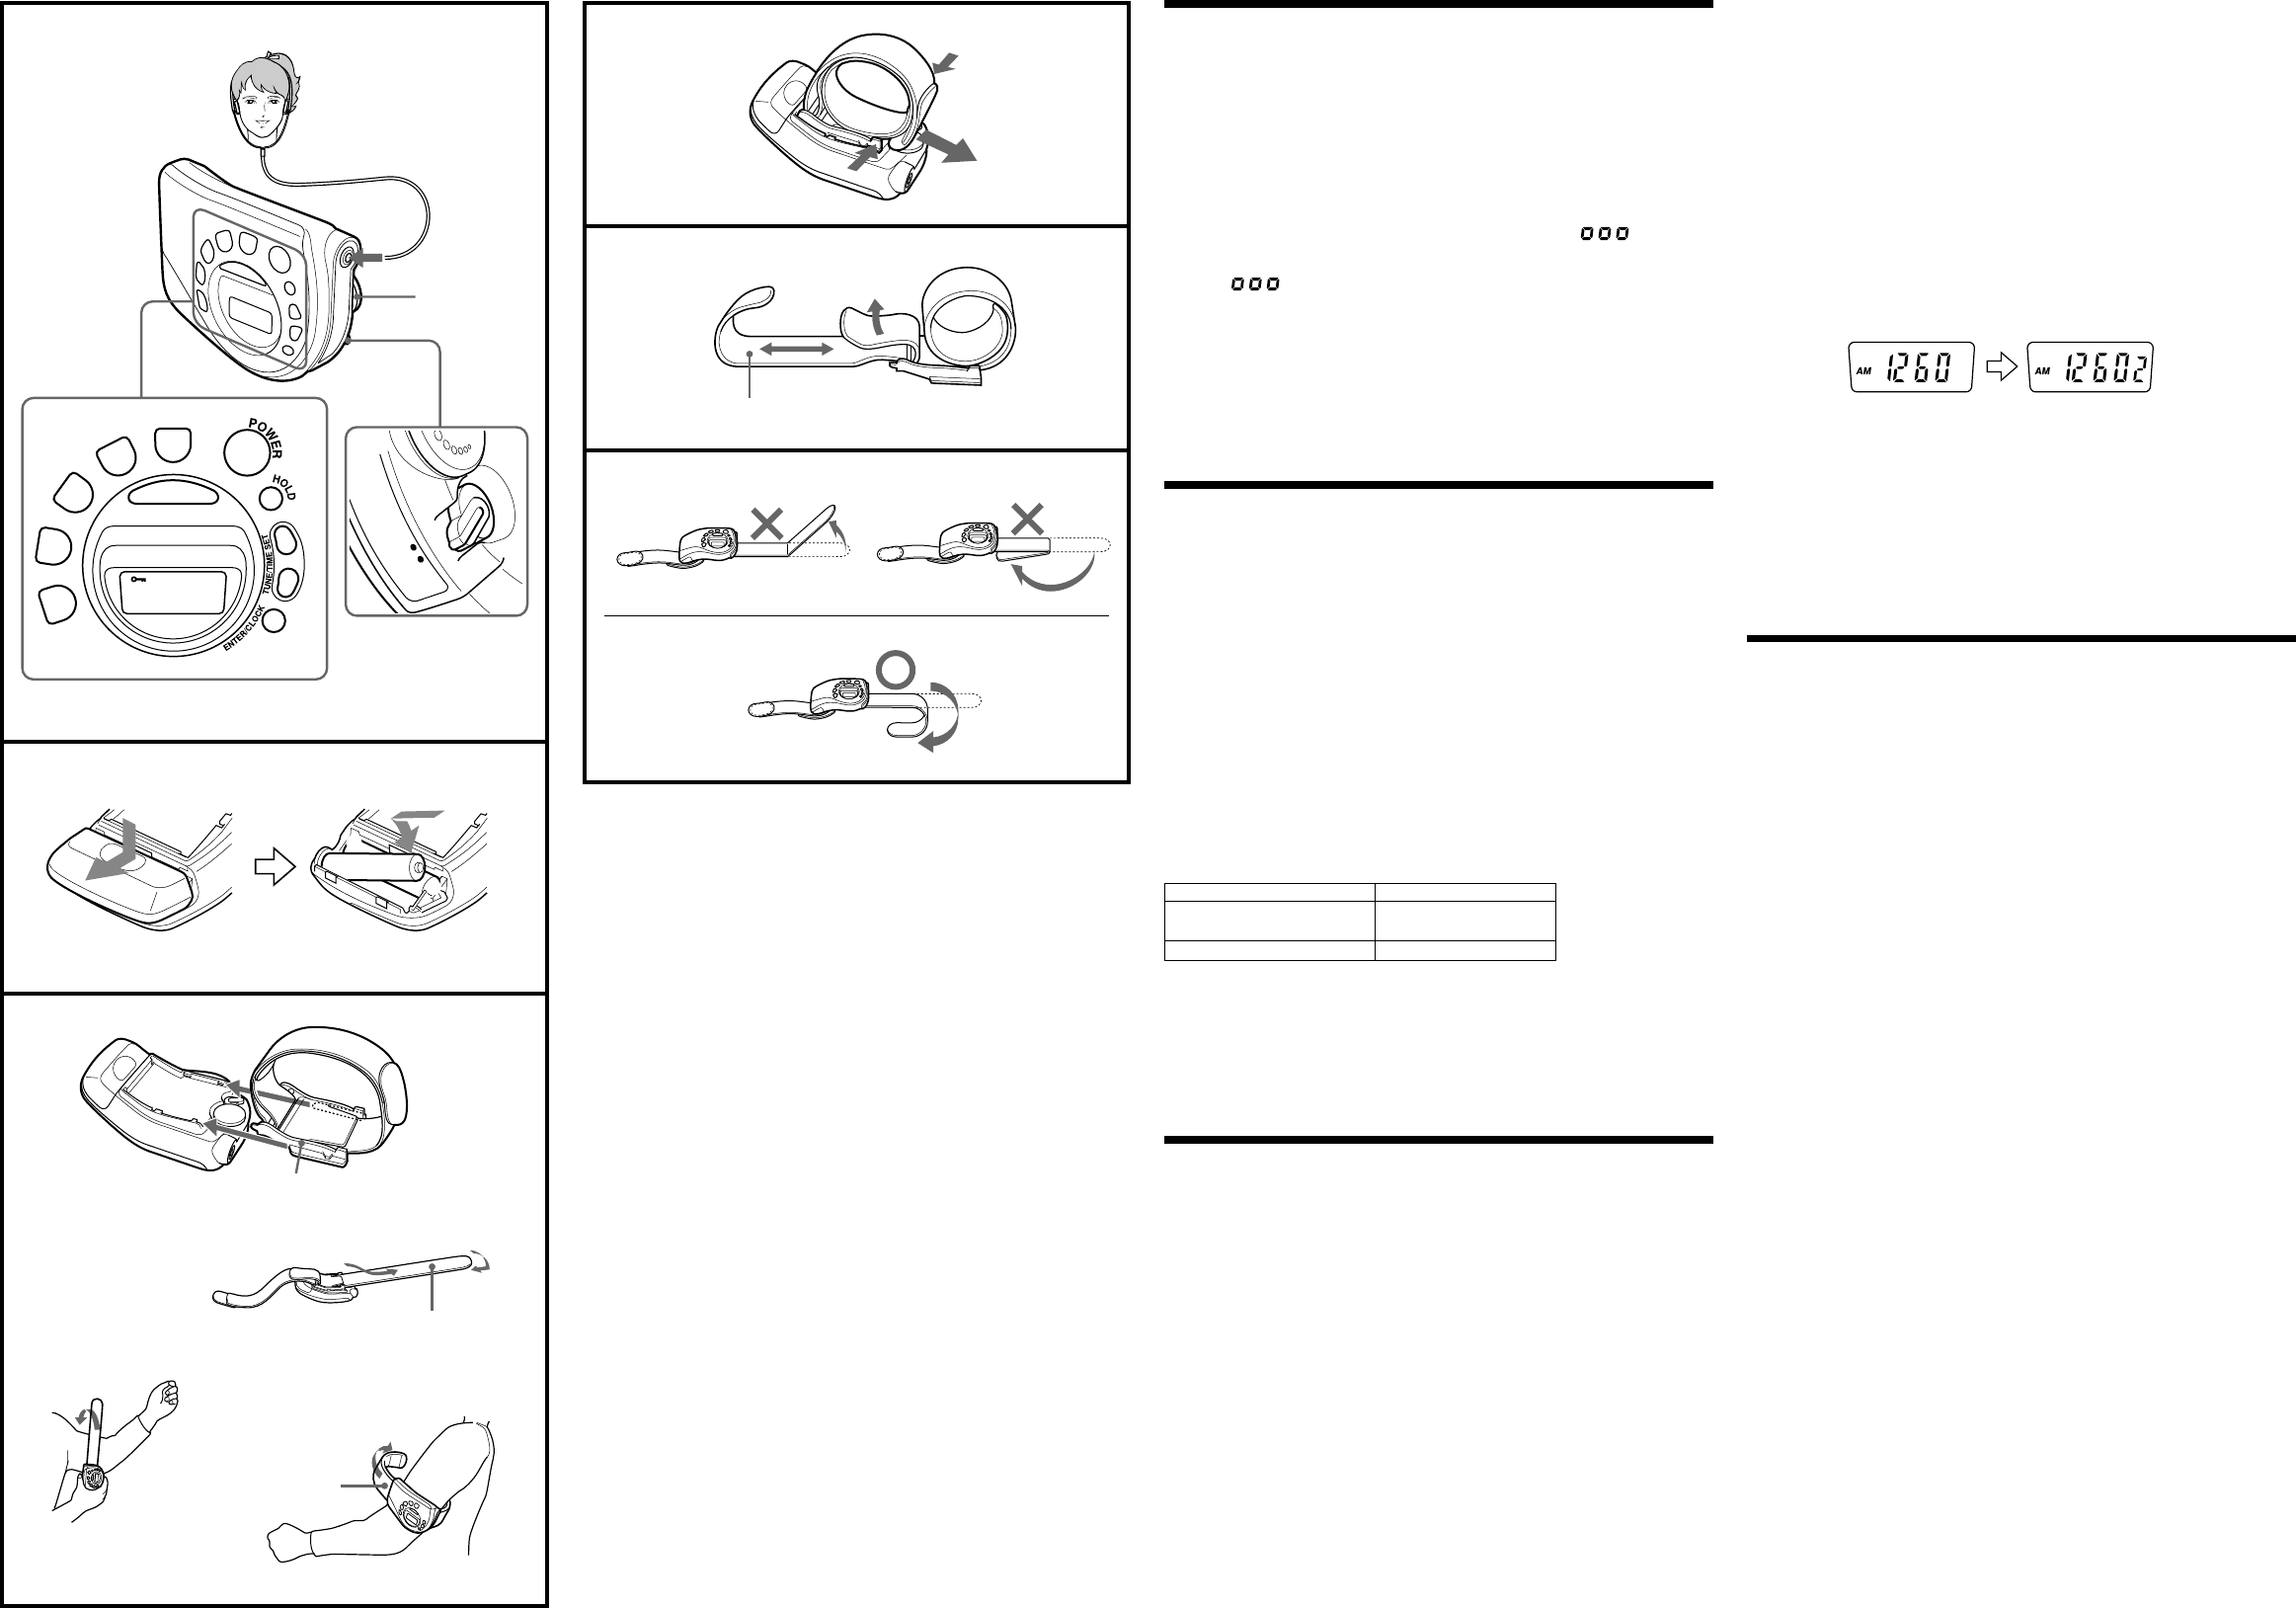
Installing Batteries
1 Install two size AAA (R03) batteries (not supplied) with correct polarity.
(See fig A.)
• When you install batteries for the first time, the display will flash “AM 12:00”. To stop
flashing, press ENTER/CLOCK.
• For battery life, see “Specifications”.
Knowing When to Replace the Battery
• When the batteries become weak, the sound becomes weak or distorted. When the
batteries are completely exhausted, the power is turned off and “ ” in the
display flashes. When the power is turned on with the indication flashing, the power
will be turned off right away.
When “
” starts flashing, replace both batteries with new ones.
•
Replace the batteries within about 40 seconds after removing the batteries. If you do not
replace them within 40 seconds, the preset stations may be erased, the clock setting may
be cleared and “AM 12:00” flashes in the display.
•
When the batteries are removed for a long time, preset stations will be erased and
“AM
12:00” is displayed
. Store stations and set the clock again.
Note
When the unit is not to be used for a long period of time, remove the batteries to avoid
damage caused by battery leakage and corrosion.
Setting the Clock
Set the clock when the radio is turned off.
1 When you insert batteries for the first time, digits flash in the display. To
stop flashing, press ENTER/CLOCK.
2 While holding down ENTER/CLOCK, press either TUNE/TIME SET + or –
till the correct time appears in the display. When you release ENTER/
CLOCK, the clock begins to operate and “:” flashes.
• Each press of TUNE/TIME SET + or – advances or returns the displayed time by one
minute.
• To set the current time rapidly, keep pressing TUNE/TIME SET + or – while holding
down ENTER/CLOCK.
Changing AM Channel Step
The channel step of this unit is factory-set to 10 kHz to match the frequency allocation
system of the country as listed.
You can change the channel step.
Area
North and South American
countries
Other countries
1 Change the AM channel step when the radio is turned off.
2 While holding down ENTER/CLOCK, keep pressing POWER for more than
5 seconds. The AM channel step will be changed.
If you proceed step 2 again, the channel step changes again.
• When the AM channel step is changed, the preset stations will be erased, the clock
setting will be cleared and “AM 12:00” flashes in the display.
Playing the Radio
Manual Tuning
1 Connect the supplied headphones to the 2 (headphones) jack.
2 Press POWER to turn the radio on.
3 Press BAND to select the band. Each press changes the band FM/AM
alternately.
4 Tune in a station by pressing either TUNE/TIME SET + or –.
5 Adjust VOL (volume).
• To turn off the radio, press POWER.
To improve radio reception
FM: Extend the headphones cord so that the FM sensitivity will be increased, as it
serves as the FM antenna.
AM: Rotate the unit horizontally for optimum reception. A ferrite bar antenna is built
into the unit.
On FM SENS DX/LOCAL selector (for FM reception)
DX: Normally set it to this position.
LOCAL: If a very strong station signal causes noise, set it to this position. The reception
will be more stable and noise will be reduced.
To prevent accidental change of the receiving station
Press HOLD. “H” is displayed, indicating that all the functions of the buttons are
locked. To release the key protection, press HOLD again.
Preset Tuning
Once you preset the desired stations, you can tune them in by a simple operation. You
can preset up to 5 stations for each of the FM and AM bands.
Presetting the Station
Example:To set AM 1260 kHz in preset button 2.
1 Preset POWER to turn the radio on.
2 Tune in the station to preset. (See “Manual Tuning”.)
3 While holding down ENTER/CLOCK, press the appropriate preset button
2.
The station will be stored and the preset number will appear in the
display.
• To change the preset station, set a new station’s frequency in the number whose
station you want to change. The previous frequency is canceled.
Tuning in a Preset Station
1 Press POWER to turn the radio on.
2 Select the desired band by pressing BAND.
3 Press the desired preset number button.
The preset number will appar in the display.
4 Adjust VOL (volume).
Using the Arm Band (See fig. B)
1 Hold both edges of the connector and slide the connector onto the unit
until you hear a click
2 Unwind and straighten the wraparound band. To more easily straighten
the band, slightly bend the tip of the band in the opposite direction.
3 Hold the body of the unit and attach the straightened band to your arm.
The band will wind by itself.
4 Tighten the band with the rubber belt.
To remove the arm band from the unit (See fig. C)
Hold both edges of the connector and slide the connector.
To vary the length of the rubber belt to fit your arm (See fig. D)
Move the velcro fastener to the proper position.
If the rubber belt and wraparound band becomes dirty
Remove the rubber belt from the unit and clean them.
Caution (See fig. E)
• Avoid bending the wraparound band forcibly in the opposite direction. It may break.
• The straightened band will wind easily when you touch or wiggle it. Be sure to treat it
carefully.
Channel step
10 kHz
9 kHz
C
D
E
Rubber Belt
A
B
AAA (R03) x 2
Rubber Belt
4
Connector
3
√
√
wraparound
Arm Band
√
1
2
PRESET
PRESET
BAND
MHz kHz
FM
AM
PM
PRESET
1
2
3
4
5
DX
LO
CAL
F
M
S
E
N
S
VOL
2
}
]
]
}