


Troubleshooting
Should any problem persist after you have made these checks,
consult your nearest Sony dealer.
Recording cannot be made.
m The batteries are weak. Replace the battery for the main unit
and both batteries for the speaker unit, if the speaker is
installed, with new ones.
m There is no cassette.
m The tab on the tape has been removed. To reuse the tape for
recording, cover the tab hole with adhesive tape.
m The record/playback head is contaminated.
m VOR has been set improperly when VOR function is
activated.
m Connection is made incorrectly.
m The earphones are plugged in to EAR/MIC. Disconnect it.
You cannot insert the cassette.
m The cassette is inserted front side back.
You cannot close the cassette compartment lid.
m The cassette is inserted into the wrong part (it should be
inserted into the lid side).
m The cassette is not inserted completely.
Playback is not possible even if you press 9(
PLAY/DIR
m The tape has reached the end. Rewind the tape.
m The TAPE SPEED switch is not set to the 1.2 cm or 2.4 cm
position.
m The batteries are weak. Replace the battery for the main unit
and both batteries for the speaker unit, if the speaker is
installed, with new ones.
During CUE/REVIEW the tape stops or does not
run.
You cannot fast-forward or rewind.
m The batteries are weak. Replace the battery for the main unit
and both batteries for the speaker unit, if the speaker is
installed, with new ones.
m The zero stop counter function works. Press COUNTER
RESET for more than 2 seconds to make ZERO STOP
disappear form the display window.
The unit does not operate.
m The batteries have been inserted with incorrect polarity.
m The batteries are weak. Replace the battery for the main unit
and both batteries for the speaker unit, if the speaker is
installed, with new ones.
m The AC power adaptor or car battery cord is not firmly
connected.
m The batteries have been inserted; however, the AC power
adaptor is also connected but not plugged into the wall outlet.
m There is no cassette.
m HOLD is slid in the direction of the arrow. Slide HOLD in the
opposite direction of the arrow.
No sound comes from the speaker.
m The earphones are plugged in to EAR/MIC. Disconnect it.
m The volume is turned down completely.
The sound drops out, sound quality becomes
worse or sound has excessive noise.
m The volume is turned down completely.
m The batteries are weak. Replace the battery for the main unit
and both batteries for the speaker unit, if the speaker is
installed, with new ones.
m The record/playback head is contaminated.
m The earphone plug/microphone plug is dirty. Clean the plug,
insert it into the jack, turn it few times, then disconnect it and
connect it again.
m If the cassette has been put on a speaker without its case, the
sound quality may be distorted.
Recording is interrupted.
m The VOR system is working. When you do not use VOR,
press it to make VOR L or VOR H disappear from the display
window.
Recording cannot be erased completely.
m The erase head is contaminated.
z Additional Information
Precautions
On power
Operate the unit only on 1.5V DC. For AC operation, use the AC
power adaptor recommended for the unit. Do not use any other
type. For battery operation, use two size AAA (R03) batteries.
On the unit
• Use only the y (standard microcassettes) with this
unit. Non-standard cassettes cannot be used because their “L”
dimension (see illustration) is different.
• Do not leave the unit in a location near heat sources, or in a place
subject to direct sunlight, excessive dust or mechanical shock.
• Should any solid object or liquid fall into the unit, remove the
batteries or disconnect the AC power adaptor, and have the unit
checked by qualified personnel before operating it any further.
• When you do not use the unit for long, remove the batteries to
avoid damage caused by battery leakage and subsequent
corrosion.
• If the unit has not been used for a long time, set it in the playback
mode and warm it up for a few minutes before inserting a tape.
Keep personal credit cards using magnetic coding or spring-wound
watches etc. away from the unit to prevent possible damage from the
magnet used for the speaker.
If you have any questions or problems concerning your unit, please
consult your nearest Sony dealer.
Using Various Functions
To select the side to be recorded
To record on both sides continuously
1 Insert a cassette with the side to start recording facing the
lid.
2 Start recording on the upper side (9 FWD appears in the
display window). If REV ( is displayed, press p STOP for
more than 2 seconds to display 9 FWD.
When recording reaches the end of the upper side, it will
automatically continue on the reverse side.
Notes
• Make sure the tabs on both sides are not removed.
• Even if only the tab on the reverse side is removed, recording
cannot be made.
To Record on one side only
1 Insert a cassette with the side to start recording facing away
from the lid (reverse side).
2 Start recording on the reverse side (REV ( appears in the
display window). If 9 FWD is displayed, press p STOP for
more than 2 seconds to display REV (.
When recording reaches the end of the reverse side, it will
automatically stop.
Note
Make sure the tab on the reverse side is not removed.
VOR (Voice Operated Recording)
The VOR system works only while recording. Press VOR to
display VOR L or VOR H first and then press r REC. The unit
automatically starts recording the sound and pauses when there
is no sound (you can save tapes and batteries).
VOR L: To record for dictation in a noisy place.
VOR H: To record at meetings or in a quiet place.
When you use this system in a noisy place the unit stays in the
recording mode. If the sound is too soft, on the contrary, the unit
will not start recording. Press VOR to display VOR L (low) or
VOR H (high) depending on the conditions. When you do not
use this function, press VOR during recording until VOR L or
VOR H disappears in the display window.
Notes
• The VOR system depends on the environment conditions. If you
cannot get the desired results, record without the VOR system.
• When using the VOR system, the unit starts recording only when a
sound is detected, therefore, the beginning of the word may not be
recorded. For an important recording, we recommend to recording
without the VOR system.
• The VOR L or VOR H indicator appears during playback too.
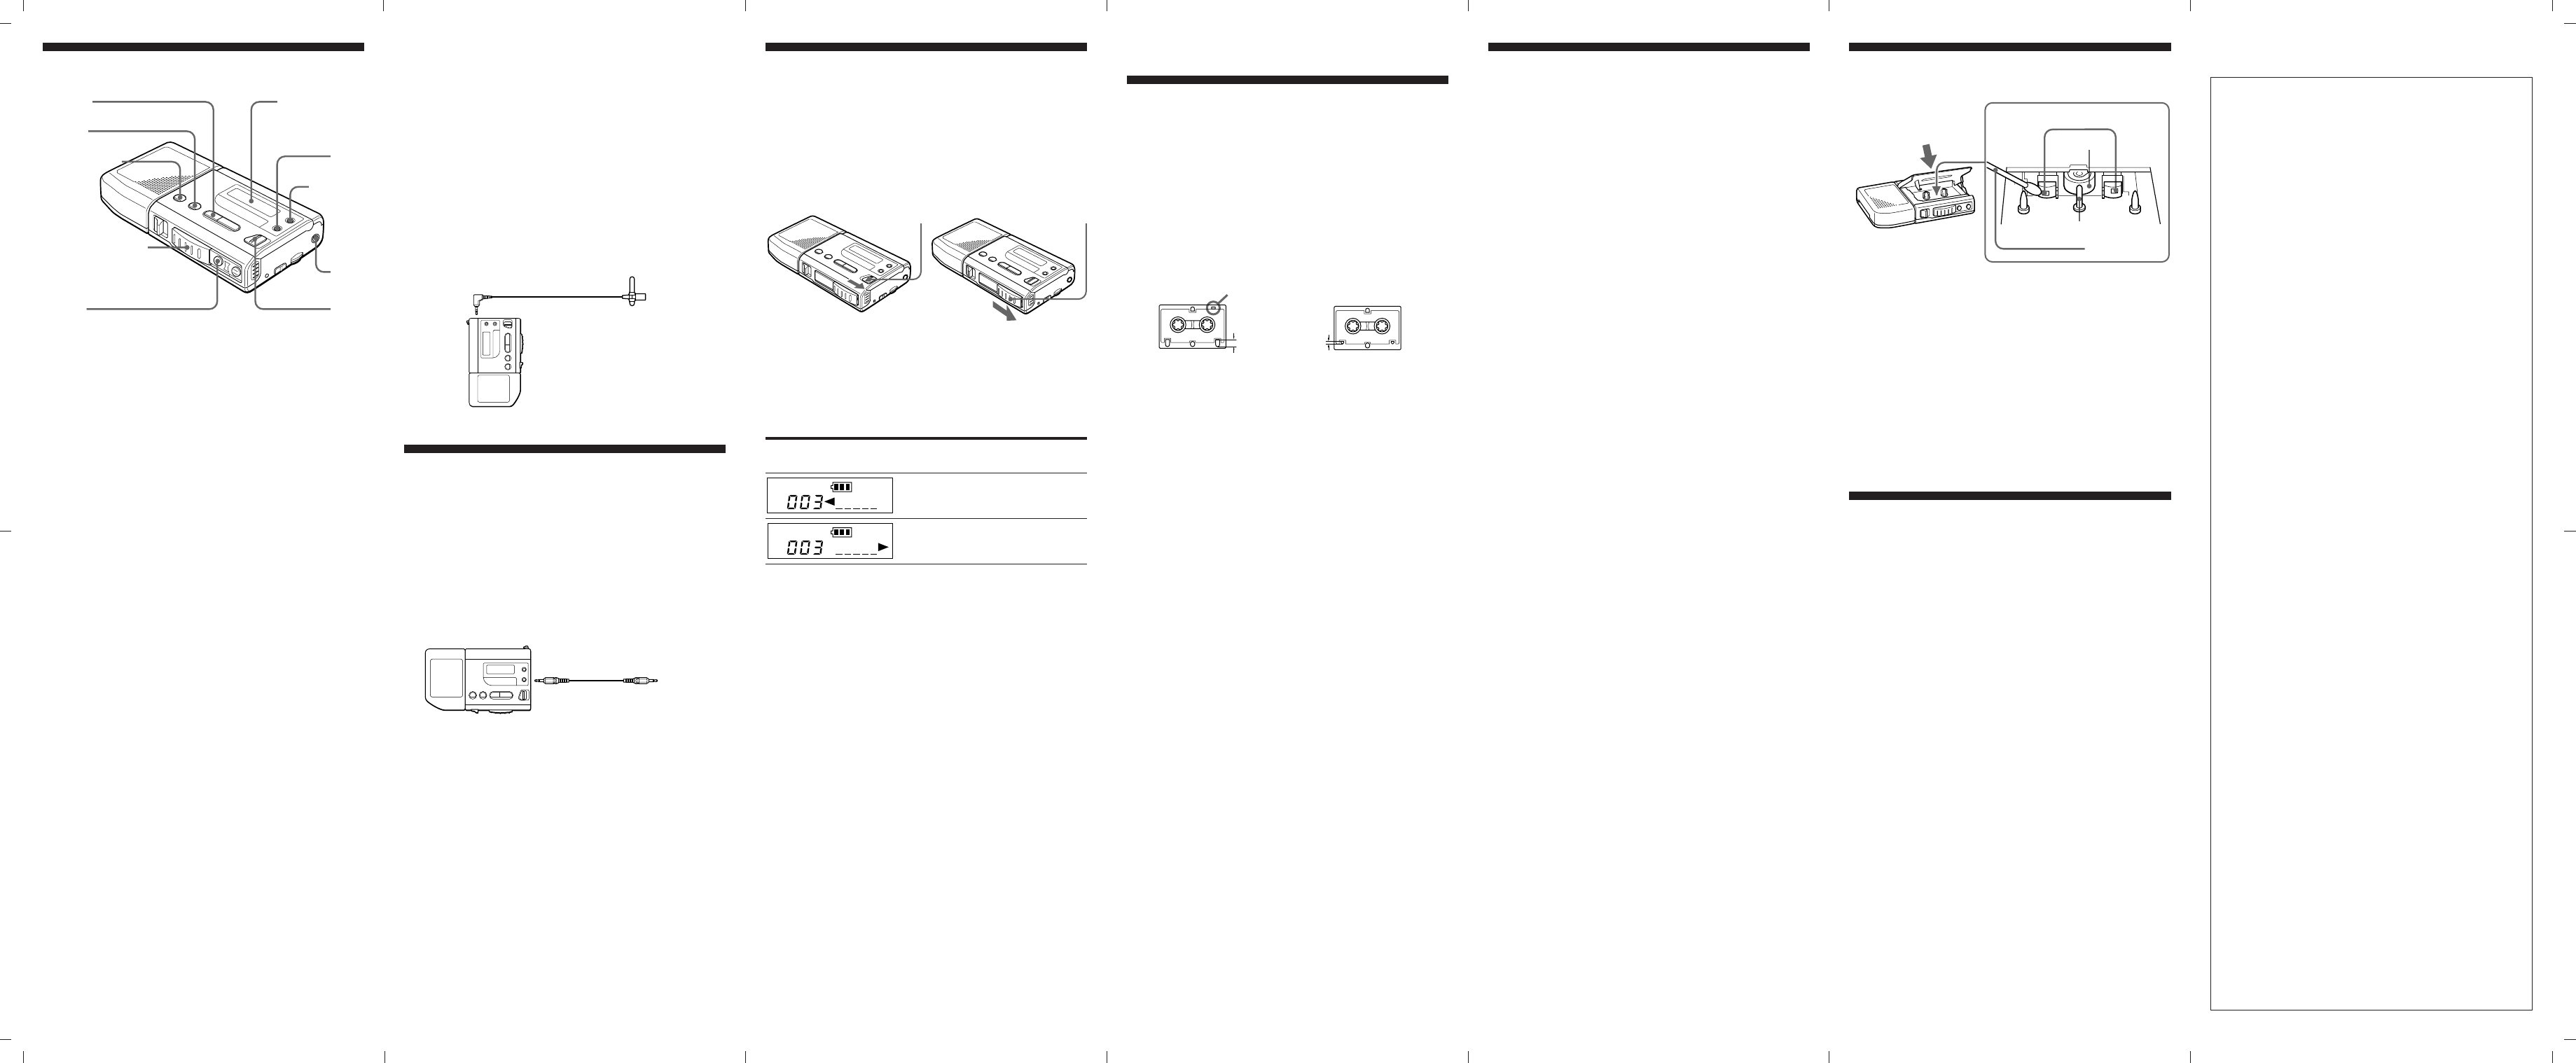
HOLD
Display window
RECORD PROTECT
Start recording during playback
Press r REC during playback, recording starts immediately. It is
useful when you want to re-record the portion which was just
recorded.
Review the portion just recorded
Press REW/REVIEW during recording. Release the button at the
point to start playback.
Recording with the supplied
Microphone
Connect the supplied microphone to EAR/MIC. The built-in
microphone will be disconnected and the sound through the
external microphone will be recorded.
To start recording, insert a cassette and press r REC.
Recording with the connected
equipment
Use VOR system depending on the environment condition.
Notes (Before recording)
• When connecting cords, be sure you connect plugs firmly.
• Make a trial recording to make sure that you made connections
correctly and adjusted the volume properly.
• The following examples use Sony products. If you have any
problem when using other products, read the instruction manual
of those products.
1 Insert a cassette.
2 Adjust the sound of the connected equipment.
3 Press r REC.
Using Other Functions
HOLD function
This function locks the unit to prevent it from operating when
you accidentally press a button except VOR, COUNTER RESET,
r REC and P PAUSE. To lock the unit, slide HOLD H in the
direction of the arrow. The H indicator appears in the display
window.
To prevent r REC and P PAUSE from pressing, slide the
RECORD PROTECT cover so that the buttons cannot be seen.
To check the direction of the tape in the display
window
9 FWD appears when recording on the upper side.
REV ( appears when recording on the reverse side.
The indication will disappear about one minute after the tape
starts running. To display the indication, press p STOP.
Display during Side of the tape during
recording/playback recording/playback
Upper side
Reverse side
TAPE SPEED selector
2.4 cm: For optimum sound (recommended for normal use). A
60-minute recording can be made using both sides of the MC60
microcassette.
1.2 cm: For longer recording time. A 120-minute recording can
be made using both sides of the MC60 microcassette.
Tape counter
While the upper side of the tape is running (9 FWD appears in
the display window), the numbers in the tape counter increase.
While the reverse side is running (REV ( appears in the
display window), they decrease.
Press COUNTER RESET to return to 000.
To return the tape to the position of 000
Press COUNTER RESET for more than 2 seconds until ZERO
STOP appears in the display window. During rewind or
REVIEW, the tape stops at 000. Press COUNTER RESET for
more than 2 seconds to make the ZERO STOP indicator
disappear.
r REC
VOR
p STOP
REW/REVIEW
EAR/
MIC
FF/CUE
COUNTER
RESET
This warranty is valid only in the United
States.
Maintenance
To clean the tape heads and path
Wipe the heads, pinch roller, and the capstan with a cotton swab
moistened with alcohol every 10 hours of use. You can see the inside
through the window of the cassette compartment lid. Clean the
pinch-roller from top to bottom by rotating it.
To clean the exterior
Use a soft cloth slightly moistened in water. Do not use alcohol,
benzine or thinner.
To clean the microphone plug
Clean the plug of the supplied microphone periodically with a soft
dry cloth. Otherwise, noise may be recorded. When using an
optional external microphone, clean its plug in the same way.
Specifications
Tape
y (normal position type)
Recording system
2-track 1 channel monaural
Frequency range
300 - 4,000 Hz
Speaker
Approx. 3.6 cm (1
7
⁄16 in.) dia.
Power output
80 mW
Input
Microphone input jack (minijack/plug in power) (same jack as
the earphone jack) sensitivity 0.33 mV for 3 kilohms or lower
impedance microphone
Output
Earphone jack (minijack) for 8 - 300 ohms earphone
Power requirements
1.5 V DC
One size AAA (R03) battery for the main unit and two for the
speaker unit
Dimensions (w/h/d) (incl. projecting parts and controls)
Approx. 64.7 × 67 × 21.8 mm
(2
5
⁄8 × 2
3
⁄4 ×
7
⁄8 in.)
Approx. 64.7 × 108 × 21.8 mm with the speaker unit
(2
5
⁄8 × 4
3
⁄8 ×
7
⁄8 in.)
Mass
Main unit: Approx. 100 g (3.5 oz.)
Speaker unit: Approx. 40 g (1.4 oz.)
Approx. 120 g (4.2 oz.) when using, incl. one battery and cassette
Approx. 180 g (6.3 oz.) with the speaker unit, incl. two batteries
Supplied accessories
Microphone (1), Holder clip for microphone (1)
Earphone (1), Carrying case (1), Hand strap (1)
Design and specifications are subject to change without notice.
Supplied microphone
M-950
EAR/MIC
HOLD RECORD PROTECT
REV
FWD
Non-standardStandard
Only standard microcassettes have
a small indention of side A.
Approx. 2.5 mmApprox. 5 mm
Cotton swab
Capstan
Pinch-roller
You can see the inside
through the window of
the cassette
compartment lid.
Record/playback/
erase head
M-950
EAR,
EARPHONE,
@
EAR/
MIC
RK-G64HG connecting
cord (not supplied)
Audio
equipment