


VOL
MUSICNEWS
TONE
TUNING
/TIME ADJ
DC IN 4.5
V
DX LOCAL
SENS
LIGHT
DISPLAY
MODE
ENTER
/CLOCK
FINE
PRESET/
MANUAL
POWERHOLD
LW/MW
SW
FM
kHz
TUNE
PRESET
HOLD
SLEEP
STAND
BY 1
STAND
BY 2
BATT
1
2
MHz
STANDBY MODE
1 – STANDBY TIME – 2
SW FMLW/MW
NORMAL
PRESET
MODE
A
English
English
For LW/MW reception
Retract the telescopic antenna and rotate the unit
to reorient the built-in ferrite bar antenna to obtain
optimum reception.
For SW reception
Gently pull out the telescopic antenna to its full
length and set it vertically to obtain optimum
reception.
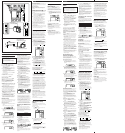
Using an external antenna for SW and
LW/MW reception (see Fig. A)
Use a wide-range antenna AN-1 or AN-102 (not
supplied).
1 Use the connecting cord to connect the
antenna controller OUTPUT jack to the
antenna coupler INPUT jack.
2 For SW reception, attach the antenna
coupler to the telescopic antenna.
For LW/MW reception, position the
antenna coupler near the unit, where
LW/MW reception is optimal.
•Keep the unit and antenna away from fluores-
cent lights, televisions, computers, and other
equipment which may generate noise.
•Retract the telescopic antenna when using an
external antenna.
•Set up the external antenna as far away from the
street as possible.
•For more details on the external antenna, refer to
the antenna Operating Instructions.
Setting the standby
You can turn on the radio and tune in your
favorite station at the desired time with the dual
standby function (Standby 1 and Standby 2).
Before you set the standby, assign the station to
which you wish to listen at the desired time for
Standby 1 to preset number 1. Similarly, assign the
station to which you wish to listen at another
desired time for Standby 2 to preset number 2.
Refer to “Presetting stations” for more details.
1 If the radio is operating, press DISPLAY
MODE to display the clock.
2 Press LW/MW•STANDBY TIME 1 for
Standby 1 and FM•STANDBY TIME 2
for Standby 2 for more than one second
until you hear a beep. In this display
mode, the hour and “
1
” (or “
2
”)
start flashing.
TUNE
HOLD
SLEEP
STAND
BY 1
STAND
BY 2
BATT
PRESET
MODE
1
3 Turn the TUNING/TIME ADJ control
until the desired hour is displayed.
4 Press LW/MW•STANDBY TIME 1 (or
FM•STANDBY TIME 2) to set the
desired minute.
5 Turn the TUNING/TIME ADJ control
until the desired minute is displayed.
6 Press LW/MW•STANDBY TIME 1 (or
FM•STANDBY TIME 2)
The minute stops flashing, and a few seconds
later, “
1
” (or “
2
”) stops flashing and
remains in the display while the unit returns to
the clock display.
To set/cancel standby mode or
confirm the standby time
Each time STANDBY MODE is pressed, the display
changes in the following order.
1
* n
2
* n
1
2
n (None)
* The display will be flashing initially. Only while
the display is flashing, the preset standby time
will be displayed to allow checking of the
standby time for Standby 1 or Standby 2.
•When the standby time arrives and standby is
activated, the radio turns on. The unit will then
turn off automatically after 60 minutes.
To turn off the radio before 60 minutes have
elapse, press POWER.
•When you have set Standby 1 and Standby 2,
and a second preset standby time arrives while
the first standby function is operating, the most
recent standby function will have priority over
the other and tune in the appropriate station.
•When identical standby times are set for Standby
1 and Standby 2, only Standby 1 is operational.
•To cancel the standby function temporarily, slide
HOLD to the right to display “H” while the
radio is turned off. When the hold function is
canceled and “H” disappears, the standby
function is operational.
Activating the buzzer
To activate the buzzer instead of the radio at the
desired time, delete the station assigned to either
preset number 1 or preset number 2 as necessary.
Refer to “Deleting a preset station” for further
details.
To stop the buzzer, press any button. The buzzer
will sound continuously for about 60 minutes if no
button is pressed.
•The buzzer volume is not adjustable.
Setting the sleep
timer
You can turn off the radio automatically after a
specified number of minutes (60, 30, or 15 minutes)
with the sleep timer.
1 Press (Sleep).
The radio turns on and the duration of “60”
minutes and
flash.
TUNE
HOLD
SLEEP
STAND
BY 1
STAND
BY 2
PRESET
MODE
2 Press repeatedly to select the desired
duration for the sleep timer.
60 (minutes) n 30 n 15
After about three seconds, the unit returns to
the frequency display.
The sleep timer is operational.
•To reset or extend the duration, press
and
select the desired duration as shown in step 2.
•To turn off the radio before the selected duration
elapses, press POWER.
Using other functions
Hold function
When the hold function is used, neither the
buttons nor the TUNING/TIME ADJ control are
operational. Use the hold function to prevent
accidental operation. The hold function can also be
used to cancel the standby function temporarily.
1 Slide HOLD in the direction of the arrow.
“H” appears on the display and all buttons
and the TUNING/TIME ADJ control cease to be
operational.
TUNE
HOLD
SLEEP
PRESET
MODE
•To cancel the hold function, slide HOLD to the
left.
To cancel the standby function
temporarily
Slide HOLD to the right to display “H” while the
radio is turned off. When the hold function is
canceled and “H” disappears, the standby
function is operational.
•When the hold function is used, the display is
not illuminated.
Light function
Press LIGHT to turn on the light for about 15
seconds to view the display in the dark.
•If any function on the unit is performed during
the light on, the light continues to turn on for
longer than 15 seconds.
Français
Operating the Radio
Before operating the radio, make sure of your
location. If in North or South America, the MW
Channel Step must be changed.
•Refer to “Changing the MW Channel Step”
when changing the MW tuning frequency
step.
Manual tuning
1 Press POWER to turn on the radio.
2 Press either SW, LW/MW, or FM to
select the desired band.
Each time SW is pressed, the indicator moves
up one meter band.
3 Turn the TUNING/TIME ADJ control to
tune in the desired station.
The indicator moves in accordance with the
frequency number, enabling you to use it to
select the station.
When a broadcast is received, the red TUNE
lamp is illuminated.
4 Turn the VOL control to adjust the
volume.
To turn off the radio, press POWER.
About tuning step
The frequency step employed by the TUNING/
TIME ADJ control to tune in stations can be
changed with the NORMAL/FINE selector.
The selector should usually be set to NORMAL.
Switching to FINE permits finer tuning.
NORMAL: The tuning step is 9 kHz for LW, 9 kHz
(or 10 kHz) for MW and 5 kHz for SW. The step
for FM is 0.1 MHz. The steps widen when the
control is turned quickly.
FINE: The tuning step for LW/MW and SW is
1 kHz, and that for FM is 0.05 MHz. The steps
widen when the control is turned quickly.
•To enjoy FM stereo reception, plug the stereo
headphones to the 2 (headphones) jack.
•When listening to news, set the TONE selector to
NEWS for optimum results. Vocal output will be
sharper and clearer. When listening to music, set
it to MUSIC for optimum results.
•When interference is prevalent during reception,
set the SENS DX•LOCAL selector to LOCAL.
Under normal conditions, set it to DX.
•Reception of around 10250 kHz and 20500 kHz
may be difficult because of extraneous internal
signals generated by the built-in oscillators.
Preset tuning
This unit is factory-preset with 20 stations. You can
preset up to 20 stations by assigning your favorite
stations to the preset numbers 0 to 19.
Presetting stations
1 Manually tune in the station you wish to
preset.
Refer to “Manual tuning” for more details.
SW
kHz
TUNE
2 Press and hold ENTER/CLOCK until you
hear a beep and the preset number starts
flashing.
PRESET
HOLD
PRESET
MODE
3 Turn the TUNING/TIME ADJ control
until the preset number (0 to 19) under
which you wish to store the selected
station to is displayed.
PRESET
HOLD
PRESET
MODE
4 Press ENTER/CLOCK.
A double-beep sounds and the preset number
stops flashing.
PRESET
HOLD
PRESET
MODE
To change the preset station
Follow the same procedure to store a new station
to the selected preset number. The previous preset
station is overwritten by the new preset station.
•When either SW, LW/MW, or FM is pressed in
the preset tuning mode, the unit enters the
manual tuning mode.
•To interrupt and cancel presetting, press
PRESET/MANUAL. The unit will return to the
manual tuning mode.
•When about 60 seconds elapse with no operation
while the preset number is flashing, the unit will
return to the previous indication.
Tuning in a preset station
1 Press POWER to turn on the radio.
2 Press PRESET/MANUAL if the unit is in
the manual tuning mode to enter the
preset tuning mode, as necessary.
3 Turn the TUNING/TIME ADJ control to
display the preset number to which the
desired station is assigned.
4 Turn the VOL control to adjust the
volume.
Deleting a preset station
1 Press POWER to turn on the radio.
2 Press PRESET/MANUAL if the unit is in
the manual tuning mode to enter the
preset tuning mode, as necessry.
3 Turn the TUNING/TIME ADJ control to
display the preset number to which the
station you wish to delete is assigned.
4 Depress ENTER/CLOCK for more than
three seconds.
After ENTER/CLOCK is depressed for about one
second, a beep sounds and the preset number
starts flashing. Release ENTER/CLOCK when
you hear another beep and the frequency
display changes to a flashing “dEL”.
PRESET
HOLD
SLEEP
PRESET
MODE
PRESET
HOLD
SLEEP
PRESET
MODE
SW
kHz
TUNE TUNE
5 Press ENTER/CLOCK until a long beep
sounds.
•If about 60 seconds elapse with no operation
while the preset number and “dEL” are flashing,
the unit will return to the previous mode.
•A preset number that has been deleted can be
assigned a new station for preset tuning. Refer to
“Presetting stations”for more details.
•If all preset numbers 0 to 19 have been deleted
and you attempt to enter the preset tuning mode,
“----” appears in the frequency display, and
“PRESET” flashes for about three seconds. The
unit then returns to the manual tuning mode.
Changing the MW Channel
Step
This radio’s frequency channel step in the MW
band is set at 9 kHz when it is shipped from the
factory. Since the broadcasting channel step in
North and South America is 10 kHz, however, the
channel step should be changed when listening in
countries in these regions.
Area Channel step
North/South America 10 kHz
Other countries 9 kHz
To change the channel step
1 Press POWER.
2 Press LW/MW to receive LW/MW
broadcasting.
3 Press LW/MW until a double-beep
sounds.
The tuning step indication “10 kHz” or “9
kHz” appears, and the display returns to the
former frequency indication.
LW/MW
kHz
TUNE
LW/MW
kHz
TUNE
Improving reception
For FM reception
Gently pull out the telescopic antenna and adjust
the length, angle and direction to obtain optimum
reception.
Fonctionnement de la
radio
Avant d’utiliser la radio, vérifiez l’intervalle
d’accord. En Amérique du nord et du sud,
l’intervalle d’accord PO doit être changé.
•Voir “Changement de l’intervalle d’accord
PO” pour changer l’intervalle d’accord des
PO.
Accord manuel
1 Appuyez sur POWER pour allumer la
radio.
2 Appuyez sur SW, LW/MW ou FM pour
sélectionner la gamme souhaitée.
A chaque pression sur SW, l’indicateur change
de gamme métrique.
3 Tournez la commande TUNING/TIME
ADJ pour accorder une station.
Quand vous tournez cette commande,
l’indicateur change en fonction du numéro de
la fréquence, ce qui vous permet de l’utiliser
pour choisir la station.
Quand vous recevez une station, la diode
rouge TUNE s’allume.
4 Tournez la commande VOL pour régler
le volume.
Pour arrêter la radio, appuyez sur POWER.
Au sujet de l’intervalle d’accord
L’intervalle d’accord utilisé par la commande
TUNING/TIME ADJ pour accorder les stations peut
être changé avec le sélecteur NORMAL/FINE.
Le sélecteur doit être réglé en principe sur
NORMAL.
Le réglage sur FINE permet un accord plus précis.
NORMAL: L’intervalle d’accord est de 9 kHz pour
les GO, 9 kHz (ou 10 kHz) pour les PO et de 5
kHz pour les OC.
L’intervalle d’accord FM est de 0,1 MHz. Les
intervalles augmentent quand vous tournez
rapidement la commande.
FINE: L’intervalle d’accord pour les GO, PO et OC
est de 1 kHz et l’intervalle pour la gamme FM
est de 0,05 MHz. Les intervalles augmentent
quand la commande est tournée rapidement.
• Pour écouter une émission FM en stéréo,
branchez un casque stéréo sur la prise 2
(casque).
• Quand vous écoutez des informations, réglez le
sélecteur TONE sur NEWS pour une réception
optimale. Les voix seront plus nettes et claires.
Pour écouter de la musique, réglez-le sur MUSIC.
• Si les interférences prévalent pendant la
réception, réglez le sélecteur SENS DX•LOCAL
sur LOCAL. Si la réception est normale, réglez sur
DX.
• La réception des fréquences autour de 10250 kHz
et 20500 kHz peut être difficile à cause des
signaux internes parasites générés par les
oscillateurs intégrés.
Accord direct des
stations préréglées
20 stations ont été préréglées en usine, mais vous
pouvez prérégler vos 20 stations préférées sur les
numéros de préréglage 0 à 19.
Préréglage des stations.
1 Accordez manuellement la station que
vous voulez prérégler.
Voir “Accord manuel” pour des informations
détaillées.
SW
kHz
TUNE
2 Appuyez en continu sur ENTER/CLOCK
pendant plus d’une seconde jusqu’à ce
que vous entendiez une tonalité. Le
numéro de préréglage se met à clignoter.
PRESET
HOLD
PRESET
MODE
3 Tournez la commande TUNING/TIME
ADJ jusqu’à ce que le numéro de
préréglage (0 à 19) sur lequel vous voulez
prérégler la station soit affiché.
PRESET
HOLD
PRESET
MODE
4 Appuyez sur ENTER/CLOCK.
Une double tonalité retentit et le numéro de
préréglage cesse de clignoter.
PRESET
HOLD
PRESET
MODE
Pour changer de station
Procédez de même pour mémoriser une nouvelle
station sur le même numéro de préréglage. La
station précédente est remplacée par la nouvelle.
• Si vous appuyez sur SW, LW/MW ou FM dans le
mode d’accord direct, l’appareil passe au mode
d’accord manuel.
• Pour interrompre ou annuler le préréglage,
appuyez sur PRESET/MANUAL. L’appareil
revient au mode d’accord manuel.
• Si environ 60 secondes s’écoulent sans aucune
opération, alors que le numéro de préréglage
clignote, l’indication précédente est de nouveau
affichée.
Accord d’une station préréglée
1 Appuyez sur POWER pour allumer la
radio.
2 Appuyez sur PRESET/MANUAL si
l’appareil est en mode d’accord manuel
pour entrer dans le mode d’accord direct
des stations préréglées.
3 Tournez la commande TUNING/TIME
ADJ pour afficher le numéro de
préréglage correspondant à la station
souhaitée.
4 Tournez la commande VOL pour ajuster
le volume.
Suppression d’une station préréglée
1 Appuyez sur POWER pour allumer la
radio.
2 Appuyez sur PRESET/MANUAL si
l’appareil est en mode d’accord manuel
pour entrer dans le mode d’accord direct.
3 Tournez la commande TUNING/TIME
ADJ pour afficher le numéro de
préréglage correspondant à la station que
vous voulez supprimer.
4 Appuyez sur ENTER/CLOCK pendant
plus de trois secondes.
Après avoir appuyé sur ENTER/CLOCK
pendant plus d’une seconde, une tonalité
retentit et le numéro de préréglage se met à
clignoter. Relâchez ENTER/CLOCK quand vous
entendez une autre tonalité. L’affichage de la
fréquence est remplacé par le clignotement de
“dEL”.
PRESET
HOLD
SLEEP
PRESET
MODE
PRESET
HOLD
SLEEP
PRESET
MODE
SW
kHz
TUNE TUNE
5 Appuyez sur ENTER/CLOCK jusqú à ce
qu’une longue tonalité retentisse.
•Si environ 60 secondes s’écoulent sans aucune
opération, alors que le numéro de préréglage et
“dEL” clignotent, l’appareil revient au mode
précédent.
•Un numéro de préréglage qui a été effacé peut
être utilisé pour prérégler une nouvelle station.
Voir “Préréglage des stations” pour des
informations détaillées.
•Si tous les numéros de préréglage (0 à 19) ont été
effacés et que vous essayez d’entrer en mode
d’accord direct, “----” apparaît à la place de la
fréquence et “PRESET” clignote pendant environ
trois secondes. L’appareil revient en mode
d’accord manuel.
Changement de l’intervalle
d’accord PO
L’intervalle d’accord des fréquences radio de la
gamme PO a été réglé sur 9 kHz en usine. Comme
l’intervalle d’accord en Amérique du Nord et du
Sud est de 10 kHz, il faut le changer pour écouter
la radio dans ces pays.
Zone Intervalle d’accord
Amérique sur Nord/Sud 10 kHz
Autres pays 9 kHz
Pour changer l’intervalle d’accord
1 Appuyez sur POWER.
2 Appuyez sur LW/MW pour recevoir sur
la gamme GO ou PO.
3 Appuyez sur LW/MW jusqú à ce que
deux tonalités retentissent.
L’indication d’intervalle d’accord “10 kHz” ou
“9 kHz” apparaît puis la fréquence précédente
est de nouveau affichée.
LW/MW
kHz
TUNE
LW/MW
kHz
TUNE
Amélioration de la
réception
Réception FM
Tirez avec précaution l’antenne télescopique et
ajustez-en la longueur, l’angle et la direction.
Réception GO/PO
Rentrez l’antenne télescopique et tournez
l’appareil pour réorienter l’antenne barre de ferrite
intégrée.
Réception OC
Tirez complètement et avec précaution l’antenne
télescopique et mettez-la à la verticale.
Utilisation d’une antenne externe
pour la réception OC et GO/PO
(voir Fig. A)
Utilisez une antenne longue portée AN-1 ou AN-
102 (non fournies).
1 Utilisez le cordon de liaison pour
raccorder la prise OUTPUT du contrôleur
d’antenne à la prise INPUT du coupleur
d’antenne.
2 Pour la réception OC, fixez le coupleur
d’antenne à l’antenne télescopique.
Pour la réception GO/PO, positionnez le
coupleur d’antenne près de l’appareil où
la réception GO/PO est optimale.
•N’utilisez pas l’appareil près de lampes
fluorescentes, de téléviseurs ni d’ordinateurs car
ils peuvent causer des interférences.
•Rentrez l’antenne-tige quand vous utilisez une
antenne extérieure.
•Installez l’antenne extérieure le plus loin possible
de la rue.
•Pour des informations détaillées sur l’antenne
extérieure, reportez-vous à son mode d’emploi.
Minuterie d’attente
La radio peut être mise automatiquement sous
tension et accorder votre station favorite grâce à la
double minuterie d’attente (STANDBY 1 et
STANDBY 2). Avant d’utiliser une minuterie, vous
devez désigner la station que vous voulez écouter
à que l’heure souhaitée pour la minuterie 1 sur le
numéro de préréglage 1 et la station pour la
minuterie 2 sur le numéro de préréglage 2. Voir
“Préréglage des stations” pour des informations
détaillées.
1 Si la radio fonctionne, appuyez sur
DISPLAY MODE pour afficher l’heure.
2 Appuyez pendant plus d’une seconde
sur LW/MW•STANDBY TIME 1 pour
sélectionner la minuterie 1 et sur
FM•STANDBY TIME 2 pour
sélectionner la minuterie 2 jusqu’à ce
que vous entendiez une tonalité. Dans ce
mode, l’heure de “
1
” (ou “
2
”) se
met à clignoter.
TUNE
HOLD
SLEEP
STAND
BY 1
STAND
BY 2
BATT
PRESET
MODE
1
3 Tournez la commande TUNING/TIME
ADJ jusqu’à ce que l’heure souhaitée
apparaisse.
4 Appuyez sur LW/MW•STANDBY TIME
1 (ou FM•STANDBY TIME 2) pour
régler les minutes.
5 Tournez la commande TUNING/TIME
ADJ jusqu’à ce que les minutes
souhaitées soient affichées.
6 Appuyez sur LW/MW•STANDBY TIME
1 (ou FM•STANDBY TIME 2)
Les minutes cessent de clignoter et quelques
secondes plus tard, “
1
” (ou “
2
”) cesse
de clignoter et reste sur l’affichage tandis que
l’heure réapparaît.
Pour mettre en/hors service la
minuterie d’attente ou la et
confirmer la minuterie
A chaque pression sur STANDBY MODE,
l’affichage change dans l’ordre suivant.
1
* n
2
* n
1
2
n (rien)
* L’affichage clignote d’abord. Quand il clignote
seulement, l’heure préréglée est affichée et vous
pouvez la contrôler (minuterie 1 ou 2).
•A l’heure préréglée, l’attente est annulée et la
radio se met en marche; elle s’arrêtera d’elle-
même au bout de 60 minutes.
Pour éteindre la radio avant l’arrêt automatique,
appuyez sur POWER.
•Si, à l’heure de mise sous tension d’une
minuterie, l’autre minuterie fonctionne, la
minuterie réglée en dernier a priorité, et la
station correspondante est reçue.
•Si vous réglez les minuteries d’attente 1 et 2 sur
la même heure, seule la minuterie 1 fonctionne.
•Pour annuler temporairement une minuterie,
poussez HOLD vers la droite pour afficher “H“
quand la radio est éteinte. Quand vous annulez
la fonction de verrouillage, “H“ disparaît, et la
minuterie d’attente est de nouveau en service.
Mise en service de la sonnerie
Pour sélectionner la sonnerie au lieu de la radio
pour une heure précise, supprimez la station que
vous avez attribuée à la touche numérique 1 ou 2,
selon le cas.
Voir “Annulation d’une station” pour des
informations détaillées.
Pour arrêter la sonnerie, appuyez sur une touche
quelconque, sinon elle retentira pendant 60
minutes sans interruption.
•Le volume de la sonnerie n’est pas réglable.
Minuterie sommeil
La radio peut être éteinte automatiquement au
bout d’un certain nombre de minutes (60, 30 ou 15
minutes) par la minuterie sommeil.
1 Appuyez sur (Sommeil).
La radio s’allume et la durée de “60”
minutes ainsi que clignotent sur
l’affichage.
TUNE
HOLD
SLEEP
STAND
BY 1
STAND
BY 2
PRESET
MODE
2 Appuyez de façon répétée sur pour
sélectionner la durée souhaitée.
60 (minutes) n 30 n 15
Au bout de 3 secondes la fréquence réapparaît.
La minuterie sommeil est en service.
•Pour changer la durée ou la prolonger, appuyez
sur
et sélectionnez la durée souhaitée,
comme indiqué à l’étape 2.
•Pour éteindre la radio avant que la durée ne soit
écoulée, appuyez sur POWER.
Autres fonctions
Verrouillage des touches
Quand cette fonction est en service, aucune touche
ni la commande TUNING/TIME ADJ ne
fonctionnent. Utilisez cette fonction pour éviter
que les touches ne soient actionnées
accidentellement.
Vous pouvez aussi utiliser cette fonction pour
désactiver provisoirement la minuterie.
1 Poussez HOLD dans le sers de la fléche.
“H” apparaît sur l’affichage et aucune touche
ni la commande TUNING/TIME ADJ ne
fonctionnent.
TUNE
HOLD
SLEEP
PRESET
MODE
•Pour annuler le verrouillage, poussez HOLD vers
la gauche.
Pour annuler provisoirement une
minuterie
Poussez HOLD vers la droite pour afficher “H“
quand la radio est éteinte. Quand la fonction est
annulée, “H“ disparaît et la minuterie est de
nouveau en service.
•Quand le verrouillage est utilisé, l’affichage n’est
pas allumé.
Eclairage
Appuyez sur LIGHT pour allumer l’affichage
pendant 15 secondes environ et lire les indications
dans l’obscurité.
•Si vous effectuez une opération pendant que
l’éclairage est allumé, l’affichage restera éclairé
pendant plus de 15 secondes.
Telescopic antenna
Antenne télescopique
AN-1
Antenna coupler for LW/MW
Coupleur d’antenne pour les GO et PO
Antenna coupler for SW
Coupleur d’antenne pour les OC
Antenna controller
Contrôleur d’antenne
To OUTPUT
Vers OUTPUT
n
n
n
n