


English
Choosing Power
Sources
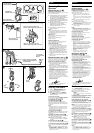
Batteries (See fig. A)
Installing the batteries
Before installing the batteries, be sure to wipe off
drops of water on the unit.
1 Push the button on the rear of the unit
to release the battery compartment.
Always place or hold the unit with the
face down to prevent the battery
compartment from falling off the unit.
2 Pull the battery compartment out from
the unit on the bottom.
3 Insert three size C (R14) batteries (not
supplied) with correct polarity.
Push the center battery until the 3
electrode is all the way in.
4 Put the battery compartment in its
original position.
Note
•Please handle the batteries not to drop them.
When replacing old batteries with new ones,
pull the battery compartment out first as the
illustration shows.
Battery life
Using Sony size C (LR14) alkaline batteries:
Approx. 270 hours
Using Sony size C (R14) batteries:
Approx. 100 hours
Replacing batteries
When the sound becomes weak or distorted,
replace all batteries with new ones.
Notes on batteries
• Do not charge the dry batteries.
• Do not carry the dry batteries with coins or
other metallic objects. It can generate heat if
the positive and negative terminals of the
batteries are accidentally contacted by a
metallic object.
• When you are not going to use the unit for a
long time, remove the batteries to avoid
damage from battery leakage and corrosion.
• Do not use different types of batteries at the
same time.
• When you replace the batteries, replace all
with new ones.
House current (See fig. B)
Open the cover of the DC IN 4.5 V jack and connect
the AC power adaptor (not supplied) to the jack.
Plug the AC power adaptor into a wall outlet.
Notes on the AC power adaptor
•To prevent battery leakage, we recommend
removing the batteries when the receiver is
connected to a wall outlet.
•When the AC power adaptor (not supplied) is
not to be used for a long period of time, unplug
it both from the DC IN 4.5 V jack and from the
wall outlet.
•Use only the recommended AC power adaptor
(not supplied)*. Using any other AC power
adaptor may cause damage to the unit.
•When the cover of the DC IN 4.5V jack is open
(to use the AC power adaptor), the jack area is
not water-resistant. When the AC power
adaptor is not connected to the DC IN 4.5V
jack, be sure to close the cover of the DC IN
4.5V jack. If you do not close the cover, the unit
will not be water-resistant.
Polarity of the plug
* For details of the AC power adaptor (not
supplied), see “Specifications”.
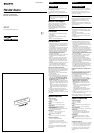
Playing the Radio
1 Turn up POWER/VOLUME to turn
power on and adjust the volume.
2 Select a desired band.
3 Tune in to a station using TUNING.
The TUNE indicator lights up when a
station is tuned in.
To turn off the radio
To turn the power off, turn POWER/VOLUME all
the way down to OFF where it clicks.
To listen with an earphone
(not supplied) (See fig. B)
Open the cover of the v (earphone) jack.
Connect the earphone to the v (earphone) jack.
The speaker is deactivated when an earphone is
connected.
Note
•When the earphone is not connected to the v
(earphone) jack, be sure to close the cover of
the v jack. If you do not close the cover, the
unit will not be water-resistant.
To turn on the backlight
Press LIGHT on the top of the unit to turn on the
backlight. The light will automatically turn off
after a while.
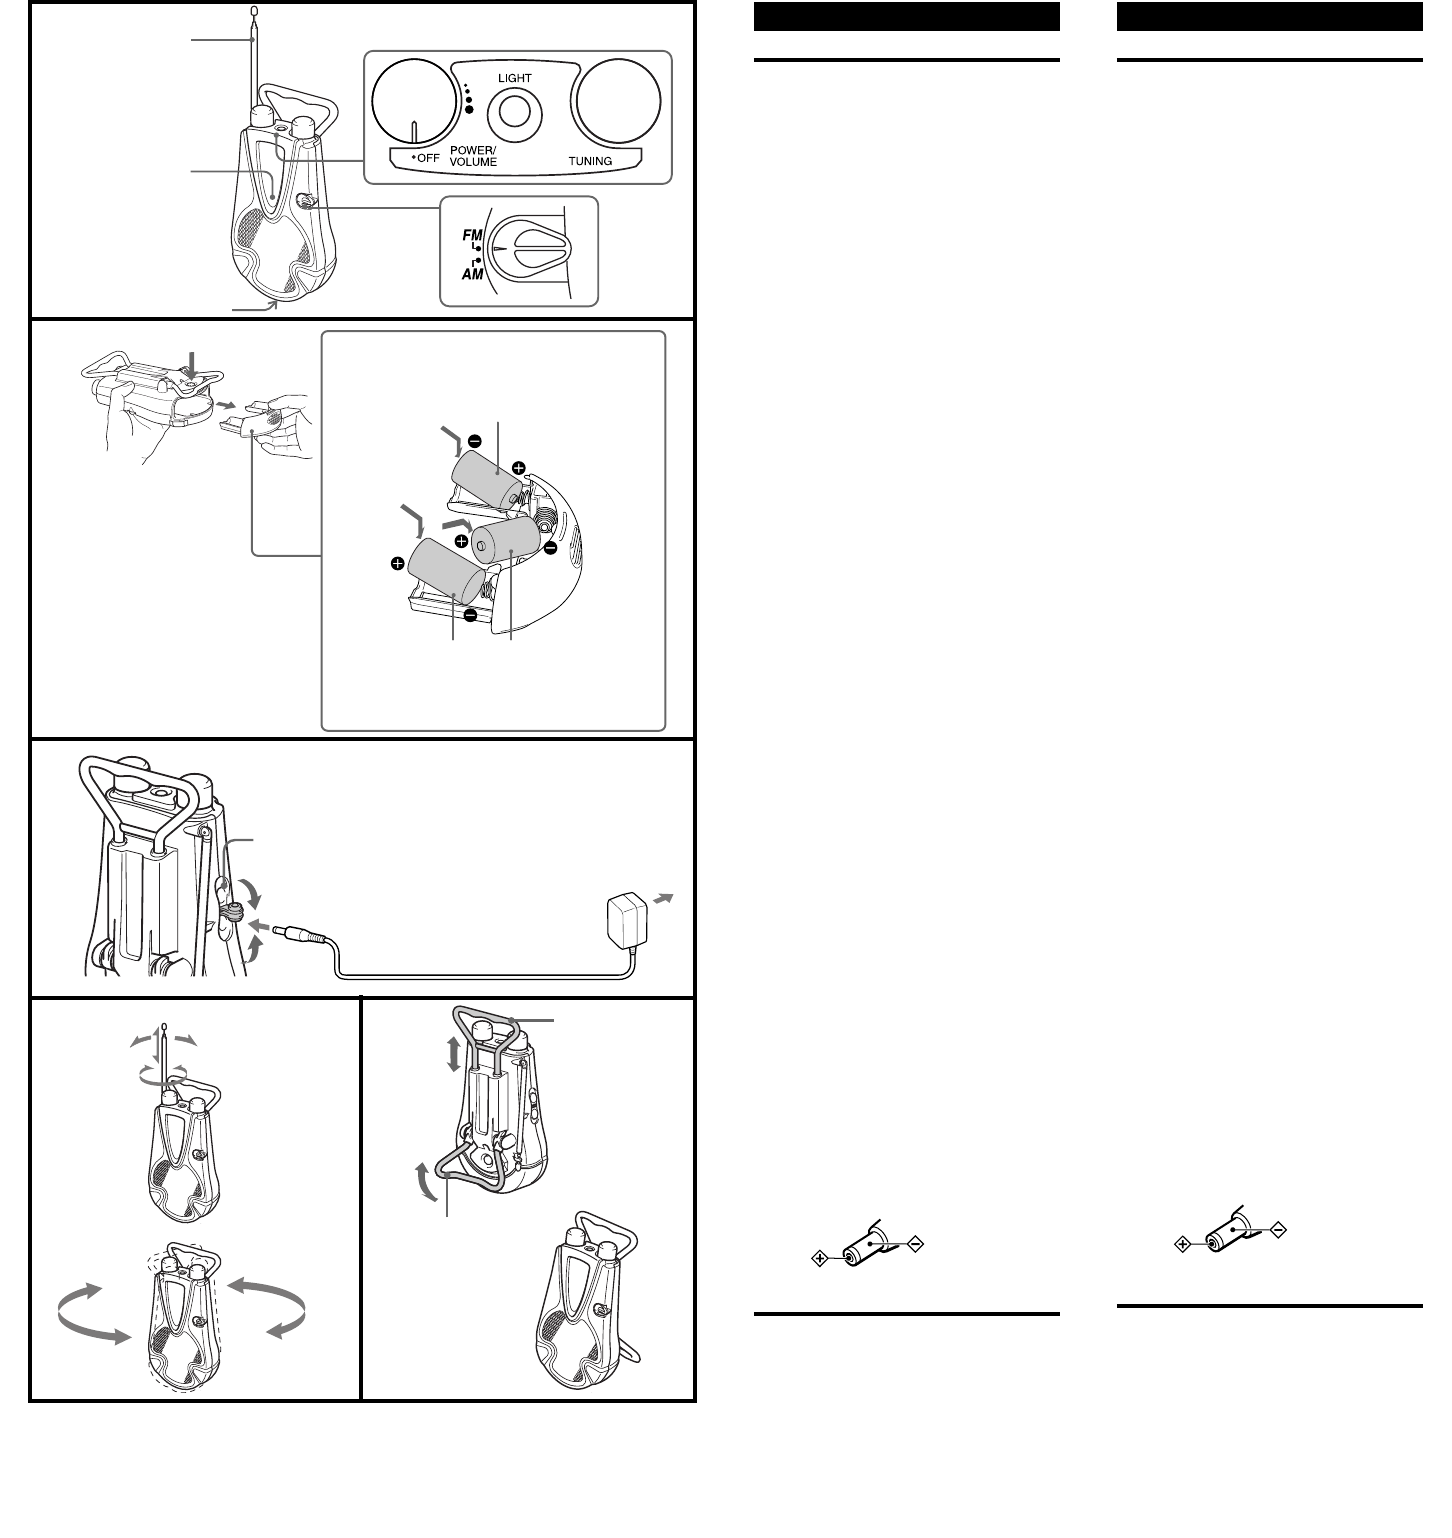
To improve reception (See fig. C)
FM: Extend the telescopic antenna and adjust the
angle for optimum reception.
AM:Rotate the unit horizontally for optimum
reception. A ferrite bar antenna is built into
the unit.
To use the stand (See fig. D)
To support the unit, unfold the stand until it stops.
To use the carrying handle (See fig. D)
To carry the unit, pull out the carrying handle.
Note
•When carrying the radio, do not hold it by the
POWER/VOLUME or TUNING knob. Holding
it in that manner is dangerous because it may
cause the case to fall.
Español
Elección de la fuente de
alimentación
Pilas (Consulte la fig. A)
Instalación de las pilas
Antes de instalar las pilas, cerciórese de secar las
gotas de agua de la unidad.
1 Presione el botón de la parte posterior de la
unidad para liberar el compartimiento de las
pilas.
Coloque siempre la unidad encarada hacia abajo
para evitar que caiga el compartimiento de las
pilas.
2 Extraiga el compartimiento de las pilas de la
parte inferior de la unidad.
3 Inserte tres pilas R14 (tamaño C) (no
suministradas) con la polaridad correcta. Empuje
el centro de la pila hasta que el electrodo 3 se
inserte completamente.
4 Coloque el compartimiento de las pilas en su
posición original.
Nota
• Maneje las pilas de forma que no se caigan.
Para reemplazar las pilas por otras nuevas, tire en
primer lugar del corte del compartimiento de las
mismas como se muestra en la ilustración.
Duración de las pilas
Utilizando pilas alcalinas LR14 (tamaño C) Sony:
Aproximadamente 270 horas
Utilizando pilas R14 (tamaño C) Sony:
Aproximadamente 100 horas
Reemplazo de las pilas
Cuando el sonido se vuelva débil o distorsionado,
reemplace las pilas por otras nuevas.
Notas sobre las pilas
• No cargue las pilas.
• No lleve las pilas con monedas ni otros objetos
metálicos. Si los terminales positivos y negativos
de las pilas se pusiesen accidentalmente en
contacto con un objeto metálico, se produciría
calor.
• Cuando no vaya a utilizar la unidad durante
mucho tiempo, extráigale las pilas para evitar los
daños que podría producir el electrólito de las
mismas en caso de fugarse.
• No utilice al mismo tiempo pilas de tipos
diferentes.
• Cuando tenga que reemplazar las pilas,
reemplácelas todas por otras nuevas.
Corriente de la red
(Consulte la fig. B)
Abra la tapa de la toma DC IN 4.5 V y conecte un
adaptador de alimentación de CA (no suministrado) en
dicha toma. Enchufe el adaptador de alimentación de
CA en un tomacorriente de la red.
Notas sobre el adaptador de
alimentación de CA
• Para evitar la fuga del electrólito de las pilas, le
recomendamos que extraiga éstas cuando conecte
la unidad a un tomacorriente de la red.
• Cuando no vaya a utilizar el adaptador de
alimentación de CA (no suministrado) durante
mucho tiempo, desconéctelo de la toma DC IN 4.5
V y del tomacorriente de la red.
• Utilice solamente el adaptador de alimentación de
CA recomendado (no suministrado)*. La
utilización de otro adaptador de alimentación de
CA podría dañar la unidad.
• Cuando abra la tapa de la toma DC IN 4.5V (para
utilizar el adaptador de alimentación de CA), la
zona de la toma no será resistente a las
salpicaduras de agua. Cuando el adaptador de
alimentación de CA no esté conectado a la toma
DC IN 4.5V, cerciórese de cerrar la tapa de la
misma. Si no la cerrarse, la unidad no sería
resistente a las salpicaduras de agua.
Polaridad de la clavija
* Con respecto a los detalles sobre el adaptador de
alimentación de CA (no suministrado), consulte
“Especificaciones”.
Radiorrecepción
1 Gire POWER/VOLUME hacia arriba para
conectar la alimentación y ajustar el volumen.
2 Seleccione la banda deseada.
3 Sintonice la emisora deseada utilizando
TUNING.
Cuando sintonice una emisora, se encenderá el
indicador TUNE.
Para desconectar la alimentación de la radio
Para desconectar la alimentación, gire
completamente hacia abajo POWER/VOLUME hacia
OFF hasta que chasquee.
Para escuchar con un auricular
(no sumministrado) (Consulte la fig. B)
Abra la tapa de la toma v (auricular).
Conecte el auricular a la toma v (auricular).
Cuando conecte el auricular, el altavoz se desactivará.
Nota
• Cuando no haya conectado un auricular a la toma
v (auricular), cerciórese de cerrar la tapa de dicha
toma. Si no cerrarse esta tapa, la unidad no sería
resistente a las salpicaduras de agua.
Para activar la iluminación de fondo
Para activar la iluminación de fondo, presione LIGHT
de la parte superior de la unidad. La iluminación se
desactivará automáticamente después de un
momento.
Para mejorar la recepción (Consulte la fig.
C
)
FM: Extienda la antena telescópica y ajuste al ángulo
de la misma hasta obtener la mejor recepción
posible.
AM:
Gire horizontalmente la unidad hasta
obtener la óptima recepción. La unidad
tiene incorporada una antena de barra de ferrita.
Para utilizar el soporte (Consulte la fig.
D
)
Para apoyar la unidad, despliegue el soporte hasta
que se pare.
Para utilizar el asa de transporte (Consulte la fig.
D
)
Para transportar la unidad, tire hacia fuera del asa de
transporte.
Nota
• Cuando transporte la radio, no la sujete por el
mando POWER/VOLUME ni TUNING.El sujetarla
de tal forma podría resultar peligroso porque la
caja podría caerse.
A
C D
Telescopic antenna
Antena telescópica
AC power adaptor (not supplied)
Adaptador de alimentación de CA
(no suministrado)
DC IN 4.5 V
FM
AM
v
Carrying handle
Asa de transporte
Stand
Soporte
Insert the # side of the battery first.
Inserte en primer lugar el lado # de la pila.
TUNE indicator
Indicador TUNE
size C (R14) battry ×3
3 pilas R14 (tamaño C)
B
Insert the 3 side of the battery first.
Inserte en primer lugar el lado 3 de la pila.
to a wall outlet
a un tomacorriente
de la red
Battery compartment
Compartimiento de las pilas