RDP-V20iP [GB]
4-288-623
-32(1)
To charge your iPod (only when
using the AC adaptor)
You can use the system as a battery charger for your iPod
when the power is supplied by the AC adaptor.
Charging begins when the iPod is connected to the
system. The charging status is displayed on the iPod. For
details, refer to the operating instructions supplied with
the iPod.
About the indicators on the system
POWER indicator (green)
Turns on when the system is turned on, and turns
off when the system is turned off.
BOOST indicator (amber)
Turns on/off repeatedly when you press BASS
BOOST.
When turned on: Emphasizes the bass sound
effect.
When turned off: Reproduces normal sound.
BATT indicator (amber)
Turns on when you use the system with the
rechargeable battery, and turns off when you use it
with the AC adaptor.
Flashes repeatedly when the rechargeable battery
becomes depleted.
CHG indicator (red)
Turns on when the rechargeable battery is being
charged, and turns off when charging is complete.
Note
When all indicators on the system flash repeatedly, the
system enters protected mode. For details, see “System
protection mode.”
Remote commander
Before using the supplied remote commander for the first
time, remove the insulation film.
Aim the remote commander at the (remote sensor) of
the system.
The POWER indicator (green) flashes when the remote
commander’s signal is received.
Some buttons may not work when playing an audio input
device connected to the AUDIO IN jack.
The VOL + and buttons have a tactile dot.
/ (power)*
Turns the system on/off. The POWER indicator
(green) lights up when the system is turned on.
(play/pause)
Starts playing an iPod. Press again to pause/
resume playback.
Press and hold to turn off the iPod.
(forward)
Goes to the next track.
Press and hold during playback to locate a desired
point.
Press and hold while paused and observe the
display on the iPod to locate a desired point.
(backward)
Goes back to the previous track. During playback,
this operation returns to the beginning of the
current track. To go back to the previous track
during playback, press twice.
Press and hold during playback to locate a desired
point.
Press and hold while paused and observe the
display on the iPod to locate a desired point.
/
Select a menu item or a track for playback.
MENU
Goes back to the previous menu.
Press and hold to go back to the main menu.
ENTER
Executes the selected menu item or starts
playback.
BASS BOOST
Press to obtain a heavy bass sound effect. The
BOOST indicator (amber) lights up. To disable the
effect, press the button again. The indicator turns
off.
VOL +/−
Adjusts the volume.
*
When using the rechargeable battery, press / to turn
on the system. The / button on the remote
commander can turn on the system only when the AC
adaptor is used.
Note
Some operations may differ or may not be available
between iPod models.
To replace the lithium battery
Under normal conditions, the battery will last
approximately 1 year. (The service life may be shorter,
depending on the conditions of use.) When the battery
becomes weak, the range of the remote commander
becomes shorter. Replace the battery with a new CR2025
lithium battery.
the + side facing up
Note
If you are not going to use the remote commander for a
long time, remove the battery to avoid any damage that
may be caused by leakage and corrosion.
Playing an iPod
Compatible iPod/iPhone models
The compatible iPod/iPhone models (as of October 2011)
are as follows.
Note
Update the software of your iPod/iPhone to the latest
version before using it with this system.
iPod touch (4th generation)
iPod touch (3rd generation)
iPod touch (2nd generation)
iPod nano (6th generation*)
iPod nano (5th generation)
iPod nano (4th generation)
iPod nano (3rd generation)
iPod classic
iPhone 4
iPhone 3GS
iPhone 3G
* The iPod nano (6th generation) cannot be controlled by
remote when the command of “MENU”, “”, “”, and
“ENTER” is pressed.
On copyrights
iPhone, iPod, iPod classic, iPod nano, and iPod touch are
trademarks of Apple Inc., registered in the U.S. and other
countries.
“Made for iPod,” and “Made for iPhone” mean that an
electronic accessory has been designed to connect
specifically to iPod or iPhone, respectively, and has been
certified by the developer to meet Apple performance
standards. Apple is not responsible for the operation of
this device or its compliance with safety and regulatory
standards. Please note that the use of this accessory with
iPod or iPhone may affect wireless performance.
Note
This system is not specified for use with an iPad.
Before setting an iPod on the
system
The attachment is set to the Dock of the system for
supporting the iPod. Check the attachment number below
compatible with your iPod, and change attachments if
needed. The attachment number is indicated on the
bottom of the attachment. The number “1” attachment is
set to the system by default.
Example
Rear of the attachment
Attachment number
Attachment
number
Compatible iPod models
1 iPod classic (160 GB)
iPhone 3GS
iPhone 3G
2 iPod touch (3rd generation
)
iPod touch (2nd generation
)
iPod nano (6th generation)
iPod classic (120 GB)
iPod classic (80 GB)
iPhone 4
3 iPod touch (4th generation
)
iPod nano (5th generation
)
iPod nano (4th generation
)
iPod nano (3rd generation
)
To change attachments
1 Pull the levers () of the attachment toward
each other to remove the projections of the
bottom of the attachment ().
2 Hold both ends of the attachment, and pull
out the attachment upward ().
3 Align the projections of the rear of the new
attachment to the corresponding indentations
of the Dock. Align () before ().
Rear of the attachment
4 Align the projections of the bottom of the
attachment () to the corresponding
indentations of the Dock, and push
downward.
To play back
1 Connect an iPod to the system.
Insert the iPod along the angle of the Dock
connector.
Notes
Before connecting the iPod, remove any cover or
case from it.
If a pop-up message appears on the display of the
iPod touch and iPhone, see “About App.”
2 Press / to turn on the system.
The POWER indicator (green) lights up.
Note
When using the rechargeable battery, press / to
turn on the system. The / button on the remote
commander can turn on the system only when the
AC adaptor is used.
3 Minimize the volume of the system by
pressing VOL – until the POWER indicator
(green) flashes 3 times in a row.
4 Press or operate your iPod to start
playback.
Support the iPod with your hand when
operating the iPod connected to the system.
Note
Depending on the status of the iPod, the button
on the system or on the remote commander may not
work. If so, operate the iPod to start playback.
5 Press VOL +/– to adjust the volume.
Notes
Only the audio playback function of an iPod is
supported by the system.
An iPod touch/iPhone will not work unless it is turned
on. Be sure to turn on the power of the iPod touch/
iPhone before operation.
Depending on the connected iPod, loud sound may be
suddenly output when adjusting the volume.
If the battery of your iPod is extremely low, charge it for
a while before operation.
When placing the iPod, hold the system securely.
Remove the iPod when transporting the system.
The volume of ringtones from an iPhone or applications
may differ from the volume of music from the iPhone.
For details, refer to the operating instructions supplied
with your iPhone.
Sony cannot accept responsibility in the event that data
recorded to an iPod is lost or damaged when using an
iPod connected to this system.
For details of environmental conditions for operating
your iPod, check the website of Apple Inc.
Tip
An iPod can be used to adjust the volume of the system.
When removing the iPod from the system, the volume
level of the iPod returns to the level at which it was set
before it was connected.
When removing the iPod from the system
Hold the system with your hand when removing the iPod.
Note
When removing an iPod, pull it off of the system at the
same angle as the Dock connector.
Connecting optional
components
You can also listen to music by connecting an audio input
device other than an iPod to the system.
Notes
Lower the volume of the system before connecting an
audio input device.
Depending on the shape of the stereo mini cable (not
supplied), the cable’s connector may not fit into the
AUDIO IN jack. Do not try to force the connector in.
This may cause damage to the system.
1 Connect the audio input device via a stereo
mini cable (not supplied) to the AUDIO IN
jack on the back of the system.
2 Press / to turn on the system.
The POWER indicator (green) lights up.
Note
Operations
About the system
Note on the power management system
After playback has finished, if no operation is performed
or no sound is output for the following times, the system
will automatically turn off:
When you use the system with the AC adaptor:
approximately 20 minutes
When you use the system with the rechargeable battery:
approximately 5 minutes
To prepare a power source
Firmly connect the supplied AC adaptor to the DC IN 13V
jack on the back of the system, and plug it into a wall
outlet (mains).
Notes on the AC adaptor
Use only the supplied AC adaptor. To avoid damaging
the system, do not use any other AC adaptor.
Polarity of the plug
Plug the AC adaptor into a nearby wall outlet (mains).
In the case of a problem, unplug it from the wall outlet
(mains) immediately.
Do not place the AC adaptor on a bookshelf or in a
confined place, such as a cabinet.
To avoid fire or electric shock, do not use the AC
adaptor in a place near liquid or subject to moisture.
Furthermore, do not place liquid-filled vessels, such as
vases, etc., on the AC adaptor.
The supplied AC power cord (mains lead) is only for
this system. Do not use it with any other device.
To use the rechargeable battery
This system contains a built-in rechargeable battery. You
can operate the system with the rechargeable battery
instead of the AC adaptor.
Charge the rechargeable battery before using the system
with it for the first time, and when it is depleted. By
connecting the AC adaptor to the wall outlet (mains),
charging starts automatically. The CHG indicator (red)
lights up when the rechargeable battery is being charged,
and turns off when charging is complete. You can operate
the system while charging the rechargeable battery.
Notes on the BATT/CHG indicators
When using the system with the rechargeable battery by
disconnecting the AC adaptor, the BATT indicator
(amber) turns on and the CHG indicator (red) turns off.
When using the system with the rechargeable battery, if
the battery becomes depleted, the BATT indicator
(amber) flashes. In this case, connect the AC adaptor to
charge the battery.
When you play music at an extremely high volume or
set the volume of the system to the maximum level, the
BATT indicator (amber) may flash. In this case, connect
the AC adaptor to charge the battery.
Battery Life
The usage time of the fully charged battery is
approximately 5 hours*
1
*
2
.
*
1
Measured by JEITA (Japan Electronics and Information
Technology Industries Association) standards. The
usage time is measured with the BASS BOOST function
set to off. The actual battery life will vary depending on
the temperature, the equalizer settings of your iPod or
audio input device, etc.
*
2
When charged and used in an environment where the
temperature is 25 ºC.
Notes on the rechargeable battery
It will take approximately 10 hours to charge the battery.
When you switch the power source between the AC
adaptor and the rechargeable battery by connecting/
disconnecting the AC adaptor, the system stops sound
output for a short while. This is not a malfunction.
The maximum power output will be lower when the AC
adaptor is disconnected.
In an extremely cold or hot environment, charging may
complete too quickly, or may not be possible. Use the
system within the designated temperature range (5 ºC to
35 ºC).
Charge the rechargeable battery at least biannually.
When the rechargeable battery loses its charge
quickly
Repeated recharging causes the capacity of the battery to
decrease over time. When the battery life drops to half the
usual time, even after a full charge, contact your nearest
Sony dealer to replace the battery.
When using the rechargeable battery, press / to
turn on the system. The / button on the remote
commander can turn on the system only when the
AC adaptor is used.
3 Minimize the volume of the system by
pressing VOL – until the POWER indicator
(green) flashes 3 times in a row.
4 Operate your audio input device and begin
playback.
Playback operation differs depending on the
audio input device. For details, refer to the
operating instructions supplied with your
audio input device.
5 Adjust the volume.
Set the audio input device to an adequate volume
level, and then adjust the volume by pressing VOL
+/– on the system.
Notes
When playing an audio input device connected to the
AUDIO IN jack, stop playback of your iPod and remove
it from the system.
Even if you connect a radio to the AUDIO IN jack, radio
signals may not be receivable, or signal reception may
be greatly reduced.
Disconnect the stereo mini cable from the system when
not used. Leaving the stereo mini cable plugged in can
result in noise.
About App
A dedicated dock app for iPod touch and iPhone available
at Apple App Store.
Search for “D-Sappli” and download the free app to find
out more about the functions.
Features:
D-Sappli includes two timer functions: Music Play
Timer and Sleep Timer.
The Music Play Timer allows you to play/pause desired
music at a desired time.
The Sleep Timer allows you to specify a time at which to
stop music playback.
The Music Play Timer and Sleep Timer work in
combination with the power supply of the unit.
D-Sappli also includes a clock display enlarge feature.
Notes
If the App to link with this system is not downloaded to
your iPod touch/iPhone, a pop-up message prompting
you to download D-Sappli may appear repeatedly.
Deactivate the App’s link function to stop the pop-up
message.
To deactivate the App’s link function: Connect the AC
adaptor, and then press / to turn on the system.
Remove your iPod touch/iPhone from the system, and
then press and hold on the system for more than 2
seconds while pointing the remote toward the
(remote sensor) on the system and pressing VOL − of
the remote commander. The POWER indicator (green)
quickly flashes for 2 seconds.
To re-activate the App’s link function: Repeat the above
steps. The POWER indicator (green) slowly flashes for 2
seconds.
When disposing of this system
If you dispose of this system in the future, please recycle
the built-in rechargeable battery for environmental
conservation. Follow the laws and regulations of your
country/region when recycling it. Remove the
rechargeable battery from the system as follows:
1 Remove the rubber pads and screws from the
bottom of the system, and open the bottom
cover.
2 Pull out the rechargeable battery upward, and
then disconnect the battery lead connector.
When disconnect the connector, be sure to hold the
connector itself, not the connector lead.
Notes
Before removing the rechargeable battery, use the
system with the rechargeable battery by disconnecting
the AC adaptor from the wall outlet (mains), and
deplete the charge as much as possible.
Turn off the system and disconnect the AC adaptor
before removing the rechargeable battery.
Only remove the screws when disposing of this system.
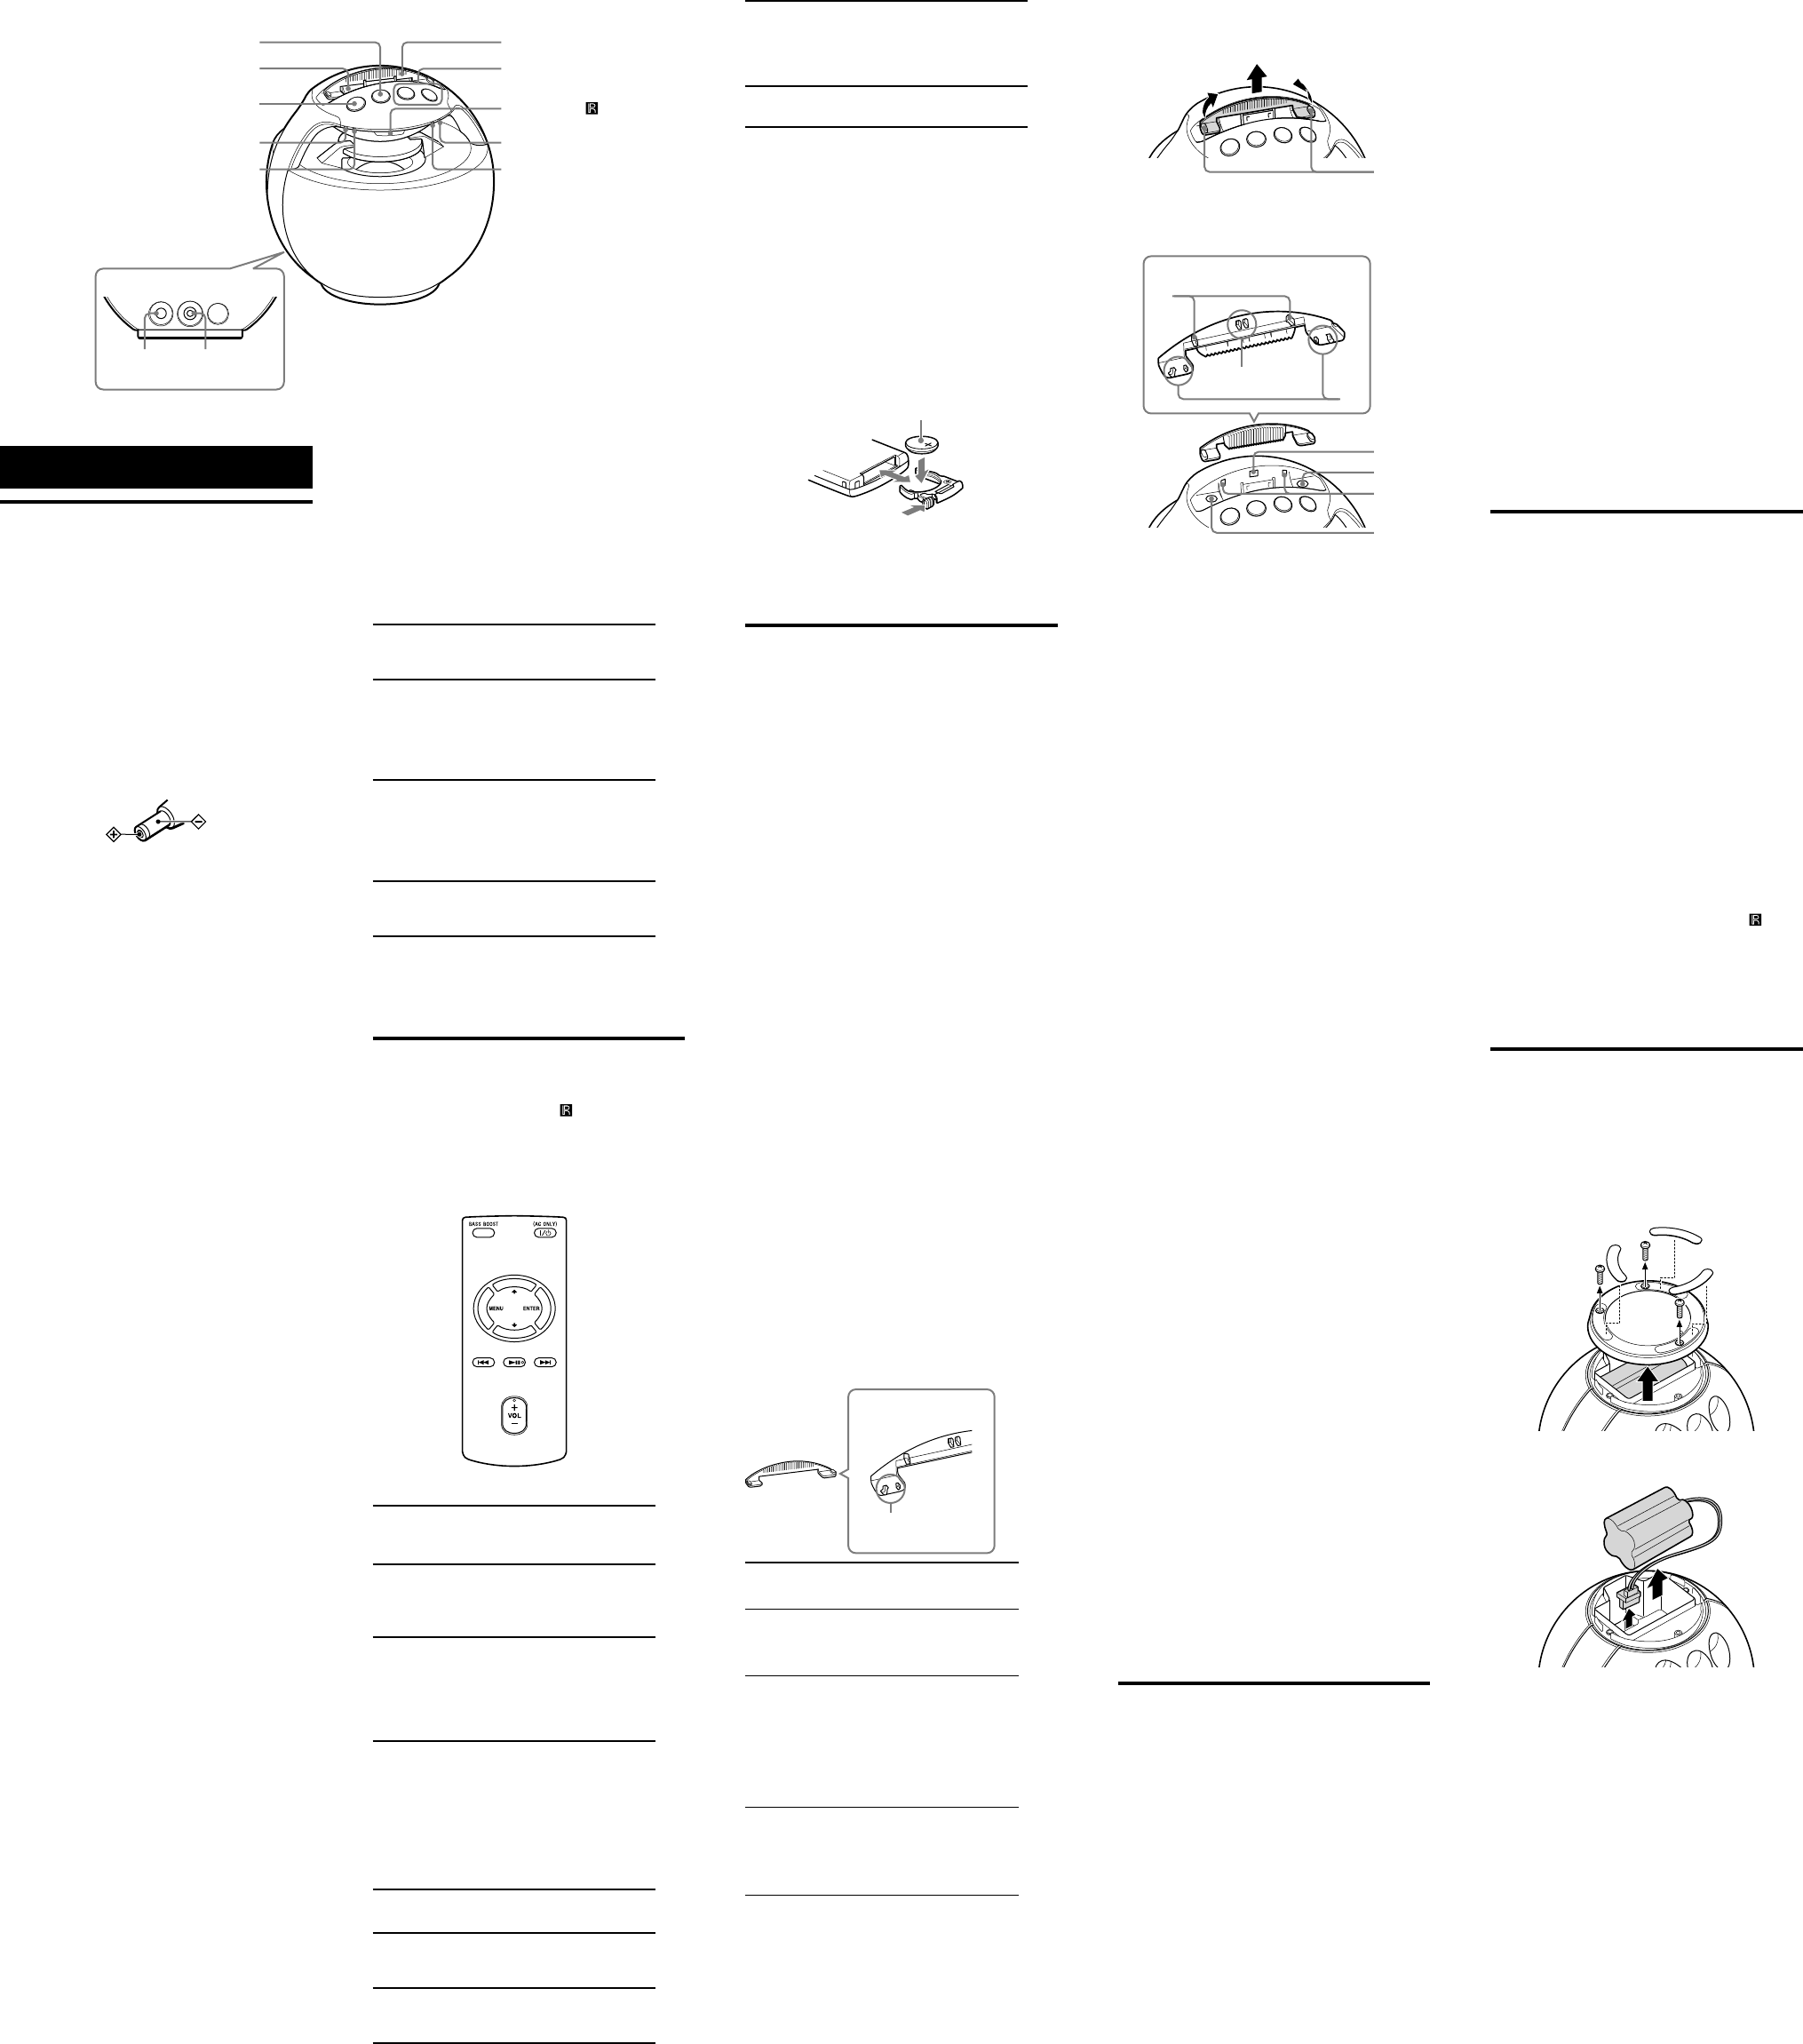
The VOL + button has a
tactile dot.
Dock
VOL +/− buttons
Remote sensor
BATT indicator
CHG indicator
Attachment
button
/ button
BOOST indicator
POWER indicator
AUDIO IN
jack
DC IN 13V
jack
Rear of the system
Parts and controls


