


To Set the Radio Alarm:
For the radio alarm, the station you specified as
the Wake-up station is played.
1 Tune in to a station and adjust the
volume.
2 Press ALARM SET RADIO for a few
seconds.
“ALARM” and “RADIO” appear on the
display.
After one beep, “ALARM” and the hour will
start to flash on the display.
3 Press TUNE/TIME SET + or – until the
desired hour appears.
To set the hour rapidly, hold down TUNE/
TIME SET + or –.
4 Press ALARM SET RADIO.
The minute will flash.
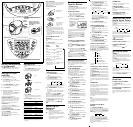
Playing a CD
An 8 cm (3-inch) CD can be played without an
adaptor.
1 Push OPEN/CLOSE to open the CD
compartment lid and place a disc.
2 Close the CD compartment lid.
3 Press CD u.
“NCD” and “TRACK 01” appear on the
display to indicate that track 1 of the CD is
playing.
4 Turn VOLUME to adjust the volume.
To Press
Pause CD u
Resume play after pause CD u again
Locate the beginning of .**
the current track (AMS*)
Locate the next track >**
(AMS)
Go back at high speed Hold down .**
Go forward at high speed Hold down >**
Locate the previous track . repeatedly**
(AMS)
Locate the succeeding > repeatedly**
track (AMS)
Stop play x
* AMS = Automatic Music Sensor
**These operations are possible during both play
and pause.
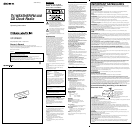
Setting the Brightness
of the Backlight
Press BRIGHTNESS to select high, middle or low
for the display according to your preferences.
Setting the Clock
and Date
1 Plug in the clock radio.
The display will flash “AM 12:00”.
2 Press CLOCK for a few seconds.
You will hear a beep and the year will start to
flash in the display.
3 Press TUNE/TIME SET + or – until the
correct year appears in the display.
4 Press CLOCK once.
5 Repeat steps 3 and 4 to set the month,
day, hour, and minute.
After setting the minute, press CLOCK to start
the counting of the seconds, and you will
hear two short beeps.
To display the year and date, press
SNOOZE•DATE/SLEEP OFF once for the date,
and within 4 seconds press it again for the year.
The display shows the date or year for a few
seconds and then changes back to the current
time.
To set the current time rapidly, hold down
TUNE/TIME SET + or –.
In step 5, when you press CLOCK after the
minute setting to activate the clock, the seconds
start counting from zero.
To change the display to the
daylight saving time (summer time) indication
Press D.S.T./SUMMER T.
“
” is displayed and the time indication
changes to summer time.
To deactivate the summer time function, press
D.S.T./SUMMER T. again.
Push
Labeled surface up
Close the lid
FM wire
antenna
AC power
cord
About CD-Rs/CD-RWs
This unit is compatible with CD-Rs/CD-RWs but
playback capability may vary depending on the
quality of the disc, the recording device and
application software.
To handle compact discs
Correct
Handle the disc
by its edge.
Incorrect
Do not touch the
surface.
Do not stick paper or
tape nor write
anything on the
surface.
Notes
•Discs with non-standard shapes (e.g., heart,
square, star) cannot be played on this unit.
Attempting to do so may damage the unit. Do
not use such discs.
•If you press CD u when there is no disc in
the CD compartment, “00” flashes for about 5
seconds on the display and the unit turns off
automatically.
Various Modes of CD
Playback
You can play tracks repeatedly or in random
order.
Press CD PLAY MODE.
Each press changes the play mode as follows:
Display Play
Indication mode
none (normal play)
All the tracks are played once.
m
“REP 1” (single repeat)
A single track is played repeatedly.
m
“REP ALL” (all repeat)
All the tracks are played repeatedly.
m
“SHUFFLE” (shuffle play)
All the tracks are played once
in random order.
m
“SHUFFLE REP” (shuffle repeat)
All the tracks are played repeatedly
in random order.
Playing the Radio
—Manual Tuning
1 Press RADIO•BAND to turn on the
radio.
“RADIO” appears on the display.
2 Press RADIO•BAND repeatedly to
select the desired band.
Each press changes the band as follows:
AM
FM1
FM2
WEATHER
TV
When using FM1 or FM2 preset mode, you
may listen to the radio on either mode (See
“Presetting Your Favorite Station”).
3 Use TUNE/TIME SET + or – to tune in
to a station.
Two short beeps sound when the minimum
frequency of each band is received during
tuning.
4 Adjust volume using VOLUME.
When you release TUNE/TIME SET + or – after
locating your desired station, the display returns
to the previous display after about 10 seconds.
To check the frequency of the tuned-in station,
press RADIO•BAND and the frequency appears
for about 10 seconds.
To turn off the radio, press OFF x•ALARM
RESET.
Improving the
Reception
TV/WEATHER/FM:
Extend the FM wire antenna fully to
increase reception sensitivity.
AM: Rotate the unit horizontally for optimum
reception. A ferrite bar antenna is built
into the unit.
Do not operate the unit over a steel desk
or metal surface, as this may lead to
interference of reception.
i
(headphones)
jack
The PRESET TUNING 3 button has a
tactile dot.
There is a tactile dot
beside volume to show
the direction to turn up
the volume.
Presetting Your
Favorite Station
—Preset Tuning
You can preset up to 10 stations in FM (5 stations
in FM1, 5 stations in FM2), and 5 stations in each
AM, TV, WEATHER.
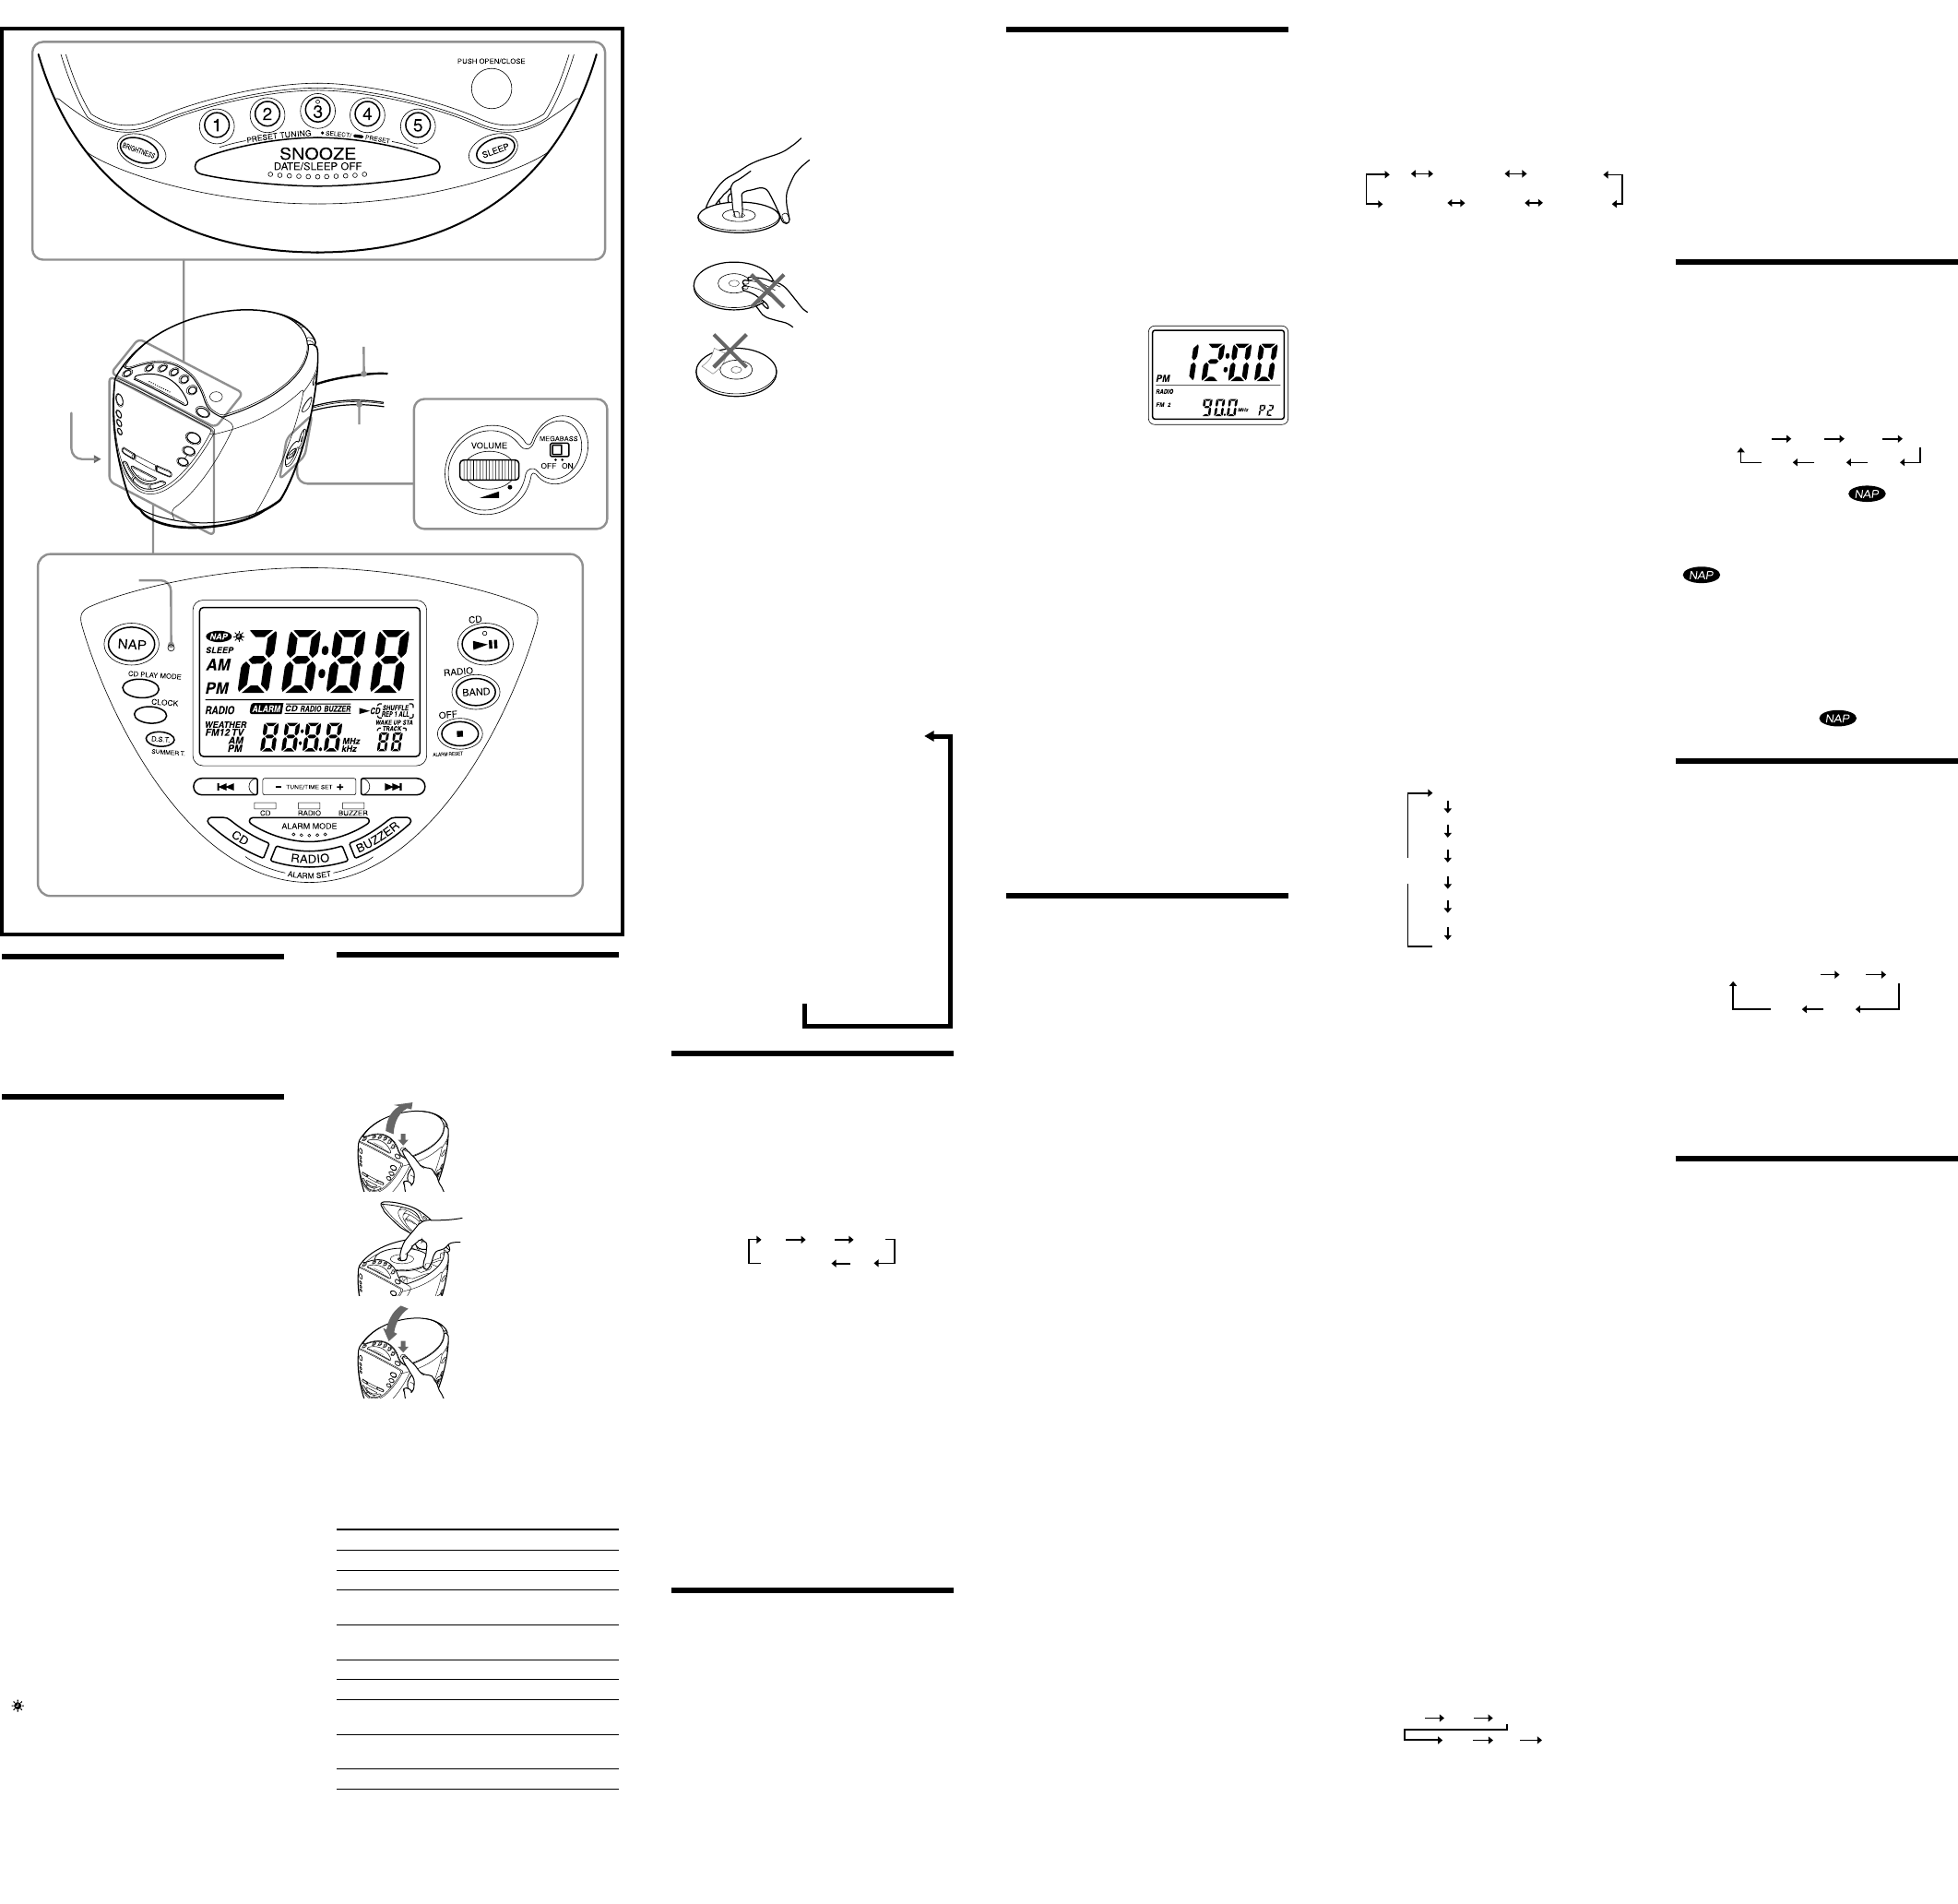
Presetting a Station
1 Follow steps 1 to 4 in “Playing the
Radio” and manually tune in to the
station you wish to preset.
2 Hold down the PRESET TUNING
button you wish to preset until you
hear two short beeps.
Example: Display
window when you
preset FM 90 MHz
in the PRESET
TUNING 2 button
for FM2.
The frequency remains on the display for about
10 seconds and then returns to the previous
display.
To preset another station, repeat these steps.
To change the preset station, tune in to the
desired station and hold down the PRESET
TUNING 1 to 5 button. The new station will
replace the previous station on the PRESET
TUNING button.
Tuning in to a Preset Station
1 Press RADIO•BAND to turn on the
radio.
2 Press RADIO•BAND to select the band.
3 Press the desired PRESET TUNING
button.
4 Adjust the volume using VOLUME.
After about 10 seconds, the display will
return to the previous display but the PRESET
TUNING button number will remain.
Note
Holding down the desired PRESET TUNING
button for more than a few seconds in step 3 will
replace the previous station on the PRESET
TUNING button with the station you tuned in to.
Setting the Alarm
This clock radio is equipped with 3 alarm
modes—CD, radio and buzzer. Before setting the
alarm, make sure to set the clock (see “Setting the
Clock and Date”).
To Set the Alarm Time
To Set the CD Alarm:
For the CD alarm, the track you specified as the
Wake-up track is played first.
(If the CD play mode is set to “SHUFFLE” or
“SHUFFLE REP”, however, all the tracks are
played in random order.)
1 With the alarm turned on, adjust the
volume to the level you require.
2 Press ALARM SET CD for a few
seconds.
“ALARM”, “CD” appear on the display.
After one beep, “ALARM” and the hour will
start to flash in the display.
3 Press TUNE/TIME SET + or – until the
desired hour appears.
To set the hour rapidly, hold down TUNE/
TIME SET + or –.
4 Press ALARM SET CD.
The minute will flash.
5 Repeat step 3 to set the minute and
press ALARM SET CD.
The wake-up track number flashes on the
display.
6 Press TUNE/TIME SET + or – to select
the desired wake-up track number.
The wake-up track number can be set up to
99.
7 Press ALARM SET CD.
Two short beeps will confirm the setting.
5 Repeat step 3 to set the minute and
press ALARM SET RADIO.
“WAKE UP STA” appears and the preset
number flashes on the display.
6 Press TUNE/TIME SET + or – to select
the wake-up station.
Preset number changes in the order as
follows:
P
-
AM P1 to 5 FM1 P1 to 5
FM2 P1 to 5TV P1 to 5WEATHER
P1 to 5
“P–” is the last received station.
You can directly select the desired wake-up
station by pressing RADIO•BAND or the
PRESET TUNING button while the indication
“P–” is not displayed.
7 Press ALARM SET RADIO.
Two short beeps will confirm the setting.
To Set the Buzzer Alarm:
1 Press ALARM SET BUZZER for a few
seconds.
“ALARM” and “BUZZER” appear on the
display.
After one beep, “ALARM” and the hour will
start to flash on the display.
2 Press TUNE/TIME SET + or – until the
desired hour appears.
To set the hour rapidly, hold down TUNE/
TIME SET + or –.
3 Press ALARM SET BUZZER.
The minute will flash.
4 Repeat step 2 to set the minute and
press ALARM SET BUZZER.
Two short beeps will confirm the setting.
To Set the Alarm Mode
Before setting the alarm mode, be sure to set the
alarm time. (See “To Set the Alarm Time”.)
Repeat the pressing of ALARM MODE to select
the alarm mode you want. Every time you press
ALARM MODE, CD/RADIO/BUZZER indicator
changes in the order as follows:
CD
RADIO
BUZZER
CD+RADIO
CD+BUZZER
RADIO+BUZZER
CD+RADIO+BUZZER
OFF
The alarm time which plays or sounds next is
displayed.
To Check the Alarm Setting
For ALARM SET CD, pressing once displays the
alarm time, pressing twice displays the wake-up
track number.
For ALARM SET RADIO, pressing once displays
the alarm time, pressing twice displays the wake-
up station.
For ALARM SET BUZZER, pressing once displays
the alarm time.
The display shows the alarm setting for a few
seconds and then returns to the previous display.
Alarm time in CD alarm, radio alarm and buzzer
alarm is set at AM 12:00 when you purchased the
unit.
ALARM ON—
If you set the CD alarm and there is no disc in
the CD player, the buzzer alarm will sound in its
place at the time set.
For the buzzer alarm, the beeping of the alarm
becomes more rapid after every few seconds in
three progressive stages.
When headphones (not supplied) are plugged
into the unit, buzzer alarm through the speakers
and the headphones regardless of the alarm
mode setting. In this case, the unit will not play a
CD or radio.
Note
When CD, radio and buzzer alarms are set for
the same time, the CD alarm takes precedence. If
the CD alarm is not set, the radio alarm takes
precedence.
To Doze for a Few More
Minutes
Press SNOOZE•DATE/SLEEP OFF.
The CD, radio or buzzer alarm turns off but will
be automatically activated again after about 10
minutes. Every time you press SNOOZE•DATE/
SLEEP OFF, the snooze time changes as follows:
10
20
50
60
30
40
The display shows the snooze time for a few
seconds and returns to show the current time.
When you press SNOOZE•DATE/SLEEP OFF
after the current time appeared, the snooze time
starts from 10 minutes again.
The maximum length of the snooze time is 60
minutes.
The CD u button has a tactile dot.
ALARM OFF—
The CD, radio, or buzzer alarm is turned off
automatically after 60 minutes.
To Stop the Alarm
Press OFF x•ALARM RESET to turn off the
alarm.
The alarm will come on again at the same time
the next day.
To Deactive the Alarm
Press ALARM MODE repeatedly until CD/
RADIO/BUZZER indicator go off.
Using the NAP Timer
(Count Down Timer)
The NAP timer sounds the buzzer after a preset
time duration.
Press NAP repeatedly until the desired minutes
is displayed.
Every press changes the display as follows:
OFF
(current time)
10
20
90
120
60
30
The NAP indicator turns on, “ ” and the
NAP time is displayed for a few seconds.
NAP timer starts counting down the NAP time.
When selected NAP time has passed, the beep
sound comes on, and the NAP indicator and
“
” on the display flash.
To Stop NAP Timer
Press NAP or OFF x•ALARM RESET to turn off
the buzzer.
To Deactive NAP Timer
Press NAP.
The NAP indicator and “
”go off.
Setting the Sleep
Timer
You can enjoy falling asleep to the CD or the
radio using the built-in sleep timer that turns off
the CD or the radio automatically after a preset
duration.
Press SLEEP during CD or radio play.
You can set the sleep timer to durations of 90,
60,30, or 15 minutes. Every push changes the
display as follows:
off (current time)
90
60
30
15
“SLEEP” will appear in the display when the
duration time is set.
The CD or the radio will play for the time you
set, then shut off.
To turn off the CD or the radio before the preset
time, press SNOOZE•DATE/SLEEP OFF.
Other Useful
Functions
To Obtain Powerful Bass
Switch MEGA BASS to ON.
The “MEGA BASS” system produces a powerful
bass sound.
To listen with a headphones
(not supplied)
Connect an headphones (not supplied) to the i
jack. The sound through the speaker will not be
heard.
NAP indicator