


Setting the Clock
and Date
When the unit is plugged in, “AM 12:00,” “We,” and
“
” will flash in the display.
Note
If you cannot see the display clearly, press and hold
ENTER/BRIGHTNESS to set the desired brightness
(high, middle or low).
To Set the Clock and Date
Automatically
This radio is equipped with a radio-controlled clock-
auto-adjust system.
The clock-auto-adjust receives standard time data
(year, month, day, hour, minute, second, and D.S.T.)
on a prescribed frequency, and uses that to
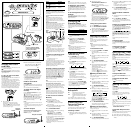
automatically reset the clock. To receive correct local
time, set the zone selector (illustrated below) on the
rear of the radio to the time zone you are in (Eastern,
Central, Mountain, or Pacific). If the selector is set to
the wrong zone, the displayed time will be wrong.
There are no zone settings for Alaska and Hawaii.
1 Plug in the unit.
The Clock Auto Adjust function activates
automatically. “ ” will flash in the display.
It takes about three minutes from the moment that
reception starts until the displayed time is correct
even if the reception is good.
Radio-controlled
clock antenna
AC power cord
FM wire antenna
VOLUME
Zone selector
2 When clock adjustment is completed, the
clock will start to operate. “ ” will stop
flashing and remain in the display.
Notes
• If the radio is turned on before clock adjustment is
completed, the unit stops receiving time signals.
• If CLOCK AUTO ADJUST is pressed before
clock adjustment is completed, the unit stops
receiving time signals.
Unable to set the Clock
Automatically
Press CLOCK until you hear one beep and press Jog
lever v (up) or V (down) to set the correct time and
date.
(See “To Set the Clock and Date Manually”.)
To initiate Clock Auto Adjust
manually
Pressing CLOCK AUTO ADJUST allows you to
receive time signals.
“
” will flash in the display. When the Clock Auto
Adjust process is completed, the clock will be
corrected, if needed, and “ ” will stop flashing and
remain lit in the display.
If the radio fails to receive time signals for about 12
minutes, the clock will remain unadjusted, and “
”
will disappear from the display.
Notes
•The radio is being operated, the unit cannot receive
time signals.
• If the radio is turned on while the Clock Auto Adjust
system is activated, the unit stops receiving time
signals.
To check reception
The display shows reception conditions when time
signals are being received (when the power cord is
inserted in a wall socket, or CLOCK AUTO
ADJUST is pressed).
Display Reception
Changes regularly between
“
” and “ ” at one second Good
intervals
“ ” or “ ” stays on,
or intervals between changes Defective
are irregular
To improve reception
Reception is governed largely by where the radio-
controlled clock antenna is set up and which direction
it is pointed in.
Location of radio-controlled clock antenna
setup:
If the installation is within a building made of
reinforced concrete, reception will be weaker the
farther the antenna is from a window. To improve
reception, place the antenna as close as possible to the
window.
Direction the antenna faces:
Reception changes depending on the direction that the
antenna is facing. Look at the display window to
check reception, and turn the antenna so that it faces
in the direction where reception is most stable.
Reception may be poor when the antenna is placed on
a metal surface such as that of a steel desk.
Notes
Reception may be impossible in these locations:
• Close to a television set, personal computer,
refrigerator or similar electrical appliance or
equipment.
• Close to high voltage wires or overhead power lines.
• Locations where there could be interference from
electrical signals such as a construction site, airport
or any other place where there is a large volume of
traffic.
Location of transmitting source
Time signals are transmitted from the following
location:
Fort Collins, Colorado, U.S.A.
40˚ 40’ N, 105˚ 03’ W
Time signal strength varies depending on the time of
reception (you will get better reception at night). If the
clock is not set or corrected automatically after you
change the location or direction of the radio-
controlled clock antenna, wait a while and see if you
get better reception at a later time.
Automatic updating of time data
The Dream Machine is equipped with the Clock Auto
Adjust system that automatically receives time signals
during the night, when reception is best. The system
makes nine corrections every hour from 8 p.m. to 4
a.m. During automatic operation, “
” does not flash.
If the Clock Auto Adjust system is unable to receive
time signals for more than 24 hours “ ” goes off. In
such a case, press CLOCK AUTO ADJUST to
initiate Clock Auto Adjust manually and change the
position or direction of the radio-controlled clock
antenna for improved reception.
Note
Automatic updating cannot be manually cancelled.
On daylight Saving Time adjustment
The Clock Auto Adjust system automatically switches
the clock indication to Daylight Saving Time (summer
time), and back, at the necessary time of the year.
“ ” will be displayed when the clock is in Daylight
Saving Time.
Note
According to reception conditions, the actual
adjustment to or from Daylight Saving Time by the
Clock Auto Adjust system may be done later than the
exact moment of transition in the yearly calendar.
To Set the Clock and Date
Manually
1 Plug in the clock radio.
The display will flash “AM 12:00”.
2 Press CLOCK for a few seconds.
You will hear a beep and the year will start to
flash in the display.
3 Press Jog lever v (up) or V (down) until the
correct year appears in the display.
4 Press ENTER/BRIGHTNESS.
5 Repeat steps 3 and 4 to set the month, day,
hour, and minute.
After setting the minute, press ENTER/
BRIGHTNESS to start the counting of the
seconds, and you will hear two short beeps.
•To set the current time rapidly, hold down Jog lever
v (up) or V (down).
• In step 5, when you press ENTER/BRIGHTNESS
after the minute setting to activate the clock, the
seconds start counting from zero.
• When the alarm setting mode is entered, the clock
cannot be set.
Note
The clock is set to automatically receive time signals
and will continue to do so even if it is manually reset.
To display the year and date
Press SNOOZE/DATE/SLEEP OFF once for the
date, and within 2 seconds press it again for the year.
The display shows the date or year for a few
seconds and then changes back to the current
time.
To set the brightness of the
backlight
If you cannot see the display clearly, press and hold
ENTER/BRIGHTNESS to set the desired brightness
(high, middle or low).
Changing AM
Channel Step
The AM channel step differs depending on area. The
channel step of this unit is factory-set to 10 kHz to
change the setting as shown below to be able to listen
to the radio.
Area Channel step
North and South America 10 kHz
Other countries/regions 9 kHz
1 Plug in the clock radio.
Press OFF/ALARM RESET to turn off the
power.
2 While holding down OFF/ALARM
RESET, keep pressing ON/BAND for
more than 5 seconds.
The AM channel step will be changed.
If you proceed to step 2 again, the channel step
changes again.
Notes
•When the AM channel step is changed, the preset
stations for AM will be initialized.
•When the AM channel step is changed, the FM
channel step also will be changed.
Playing the Radio
—Manual Tuning
1 Press ON/BAND to turn on the radio.
The display shows the band and frequency for a
few seconds and then changes back to the current
time.
2 Press ON/BAND repeatedly to select the
desired band.
Each press changes the band as follows:
AM
FM1
FM2
When using FM1 or FM2 preset mode, you may
listen to the radio on either mode. (See “Presetting
Your Favourite Station”.)
3 Use TUNING + or – to tune into the
desired station.
The FM frequency advances or reverses in 0.1
MHz channel steps and the AM frequency in 10
kHz channel steps.
Two short beeps sound when the minimum
frequency of each band is received during tuning.
4 Adjust volume using VOLUME.
•To turn off the radio, press OFF/ALARM RESET.
•To check the station being received, press TUNING
+ or – or ON/BAND lightly. The display shows the
band and frequency for a few seconds and then
changes back to the current time.
Improving the
Reception
FM: Extend the FM wire antenna fully to
increase reception sensitivity.
AM: Rotate the unit horizontally for optimum
reception. A ferrite bar is built in to the
unit.
Do not operate the unit over a steel desk or metal
surface, as this may lead to interference of reception.
Presetting Your
Favourite Station
—Preset Tuning
You can preset up to 10 stations in FM (5 stations in
FM1, 5 stations in FM2), and 5 stations in AM.
Presetting a Station
1 Follow steps 1 to 4 in “Playing the Radio”
and manually tune into the station you wish
to preset.
2 Hold down the desired
STATION•SELECT/PRESET button
until you hear two short beeps.
Example: To preset AM 1 260 kHz onto preset
2 button.
The display shows the frequency for a few
seconds and then changes back to the current
time.
To preset another station, repeat these steps.
To change the preset station, tune in to the desired
station and hold down the PRESET TUNING 1
to 5 button. The new station will replace the
previous station on the preset button.
Tuning into a preset station
1 Press ON/BAND to turn on the radio.
2 Press STATION•SELECT/PRESET
where the desired station is stored.
3 Adjust volume using VOLUME.
After a few seconds, the display will return to the
current time but the preset button number will
remain.
Setting the Alarm
You can choose from two types of alarm, Radio or
Buzzer.
The alarm will come on at the same time everyday.
The factory setting alarm time for the radio and
buzzer is 12:00am.
Notes
• Set the current time before setting the alarm.
• Radio reception is interrupted while the alarm time
is being set.
To set the Alarm Time
1 Press and hold ALARM A or ALARM B
for a few seconds.
After one beep, the hour flashes in the alarm
display.
2 Press Jog lever v (up) or V (down) to select
the hour.
To set the hour rapidly, hold down Jog lever v
(up) or V (down).
3 Press ENTER/BRIGHTNESS.
After one beep, the minutes flash on the alarm
display.
4 Repeat steps 2 and 3 to set the minute.
A beep sounds to confirm the time setting.
“RADIO•SOUND” appears.
You can choose between “RADIO” and
“SOUND” modes.
Set the alarm mode as follows:
• RADIO: see “A Setting the Radio Alarm”
• SOUND: see “B Setting the Sound Alarm”
A Setting the Radio Alarm
For the radio alarm, the station you specified as the
wake-up station is played.
1 Perform steps 1 to 4 in “To set the Alarm
Time.”
2 Press Jog lever v (up) or V (down) to select
“RADIO” alarm mode.
“WAKE UP STATION” appears in the display.
3 Press ENTER/BRIGHTNESS.
After one beep, the preset number flashes in the
display.
4 Press Jog lever v (up) or V (down) to select
the desired wake-up station.
Preset number changes in the order as follows:
“P-” is the last received station.
You can directly select the desired wake-up
station by pressing ON/BAND or the
STATION•SELCET/PRESET button while the
indication “P-” is not displayed.
5 Press ENTER/BRIGHTNESS.
Two short beeps will confirm the setting, and the
ALARM A or B display will disappear.
B Setting the Sound Alarm
For the sound alarm, the sound you specified as the
wake-up sound is played.
1 Perform steps 1 to 4 in “To set the Alarm
Time.”
2 Press Jog lever v (up) or V (down) to select
“SOUND” alarm mode.
“WAKE UP SOUND” appears in the display.
3 Press ENTER/BRIGHTNESS.
The displayed wake-up sound number will sound.
4 Press Jog lever v (up) or V (down) to select
the desired wake-up sound.
1: Buzzer
2: “Four seasons: Spring” Antonio Lucio Vivaldi
3: “For Eliza” Ludwig van Beethoven
5 Press ENTER/BRIGHTNESS.
Two short beeps will confirm the setting, and the
ALARM A or B display will disappear.
To Use the Radio and Buzzer
Alarm
1 Set both alarm times for ALARM A or B.
(see above).
2 Press ALARM A or ALARM B.
The ALARM A or B display will be turned on.
If the same alarm time is set for both Alarm A and B,
Alarm A takes priority.
To Doze for a Few More Minutes
Press SNOOZE/DATE/SLEEP OFF.
The radio or buzzer turns off but will automatically
come on again after about 10 minutes. Every time you
press SNOOZE/DATE/SLEEP OFF, the snooze
time changes as follows:
The display shows the snooze time for a few seconds
and returns to show the current time. When you press
SNOOZE/DATE/SLEEP OFF after the current time
appeared, the snooze time starts from 10 minutes
again.
The maximum length of the snooze time is 60
minutes.
To Stop the Alarm
Press OFF/ALARM RESET to turn off the alarm.
The alarm will come on again at the same time the
next day.
To Deactivate the Alarm
Press ALARM A or ALARM B.
The ALARM A or B display turns off.
Using the NAP Timer
(Count Down Timer)
The NAP timer sounds the buzzer after a preset time
duration.
Press NAP repeatedly until the desired minutes are
displayed.
Every press changes the display as follows:
You will hear two beeps when the display turns from
“OFF” to “10”.
“
” appears and the NAP time is displayed for a
few seconds.
NAP timer starts counting down the NAP time.
When selected NAP time has passed, the beep sound
comes on, and “ ” flashes on the display.
The buzzer is turned off automatically after about 60
minutes.
To Stop the NAP Timer
Press NAP or OFF/ALARM RESET to turn off the
buzzer.
To Deactive the NAP Timer
Press NAP.
“
” go off in the display.
Setting the Sleep
Timer
You can fall asleep to the radio using the built-in
sleep timer that turns off the radio automatically after
a preset duration.
Press SLEEP.
The radio turns on. You can set the sleep timer to
durations of 90, 60, 30, or 15 minutes. Every push
changes the display as follows:
You will hear two beeps when the display turns from
“OFF” to “90”.
“SLEEP” will appear in the display when the duration
time is set.
The radio will play for the duration you set, then shut
off.
•To turn off the radio before the preset time, press
SNOOZE/DATE/SLEEP OFF.
To Use Both Sleep Timer and
Alarm
You can fall asleep to the radio and also be awakened
by the radio or buzzer alarm at a preset time.
1 Set the alarm. (See “Setting the Alarm”.)
2 Set the sleep timer. (See “Setting the Sleep
Timer”.)
Jog lever
Reception
conditions
Flashes
Lit
Reception conditions
Screw
(not
supplied)
The PRESET TUNING 3 button has
a tactile dot.
There is a tactile dot beside
volume to show the direction
to turn up the volume.