


TIME ZONE CLOCK
SLEEP NAP RADIO
DST
A
L
A
R
M
R
E
S
E
T
RADIO
RADIO BUZZERMELODY
TIME ZONE
SLEEP
NAP
WEEKEND
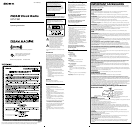
RADIO BUZZERMELODY
ALARM SET
ON/OFF
MODE
ALARM SET
ON/OFF
MODE
AB
HIGH
BAND
ALARM
TIME SET
TUNING
AM FM VOLUME
LOW
BRIGHTNESS
PUSH
ALARM
TIME SET
WEEKEND
About the backup
battery
To keep good time, as backup power source, this unit
contains one CR2032 battery inside of the unit, in
addition to the house current.
The battery keeps the clock operating in the event of a
power interruption.
Knowing when to replace the
battery
When the battery becomes weak, “E” appears on the
display.
In the event of a power interruption when the battery
is weak, current time, alarm functions, and NAP timer
will be initialized.
Replace the battery with a Sony CR2032 lithium
battery. Use of another battery may present a risk of
fire or explosion.
Note
If the “AM 12:00” flashes on the display when the
unit is connected to AC outlet for the first time, the
battery may be weak. In this case, consult a Sony
dealer.
Replacing the battery with new
one
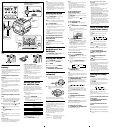
1 Keep AC plug connected to the AC outlet,
insert a pointed object into the hole beside
the battery compartment to eject the tray
and then pull out. (See Fig. A-1)
2 Install a new battery in the tray with the E
side facing forward. (See Fig. A-2)
3 Push the tray back into the unit. (See Fig.
A-3)
4 Press RADIO ON to turn “E” off on the
display
Note
If you replace the battery, do not disconnect AC plug
from AC outlet.
Otherwise, current time, alarm and NAP timer will be
initialized.
Battery Warning
When the unit will be left unplugged for a long time,
remove the battery to avoid undue battery discharge
and damage to the unit from battery leakage.
Battery
compartment
AC power
cord
NOTES ON LITHIUM BATTERY
• Dispose of used battery promptly. Keep the lithium
battery out of the reach of children. Should the
battery be swallowed, immediately consult a doctor.
•Wipe the battery with a dry cloth to assure a good
contact.
• Be sure to observe the correct polarity when
installing the battery.
• Do not hold the battery with metallic tweezers,
otherwise a short-circuit may occur.
CAUTION
Danger of explosion if battery is incorrectly replaced.
Replace only with the same or equivalent type
recommended by the equipment manufacturer.
Setting the Clock
for the first time
This unit is preset to the current EST (Eastern
Standard Time) at the factory, and is powered by the
back up battery. All you need to do the first time is
just plug it in, select your time zone, and activate the
DST/Summer time if necessary.
1 Plug in the unit.
The current EST (Eastern Standard Time) appears
on the display.
2 Press and hold TIME ZONE.
“TIME ZONE” and area number “2” appear on
the display.
If you live in the Eastern Time Zone, you don’t
need to adjust the area setting.
Area number Time zone
1 Atlantic Standard Time
2 Eastern Standard Time
(default)
3 Central Standard Time
4 Mountain Standard Time
5 Pacific Standard Time
6 Yukon Standard Time
7 Hawaiian Standard Time
3 Press + or – repeatedly until the desired
number appears.
4 Release TIME ZONE to confirm.
Note
• Configured time at the factory is not daylight saving
time (summer time). If you are on daylight saving
time, refer to “To change the display to the daylight
saving time (summer time) indication” to active the
summer time function.
• During the shipment and your first use, a clock error
may occur. In this case, refer to “Setting the Clock”
to set the correct time.
Setting the Clock
Set the clock according to the following steps.
1 Press DST/CLOCK for a few seconds
until a beep sounds.
The hour starts to flash on the display.
2 Press + or – until the correct hour appears.
To set the current time rapidly, hold down + or –.
3 Press DST/CLOCK once.
4 Repeat steps 2 and 3 to set the minute.
Two short beeps sound, “:” starts flashing, and the
clock starts from 0 seconds.
• While setting the clock, you must perform each step
within 65 seconds, or the clock setting mode will be
cancelled.
•To set the current time from zero seconds, press
DST/CLOCK at the correct second in step 4.
To change the display to the
daylight saving time (summer
time) indication
Press DST/CLOCK.
“ ” appears and the time indication changes to
summer time.
To deactivate the summer time function, press DST/
CLOCK again.
Setting the
brightness of the
backlight
Select BRIGHTNESS to HIGH or LOW for the
display, according to your preference.
Playing the Radio
1 Press RADIO ON to turn on the radio.
2 Adjust volume using VOLUME.
3 Select BAND.
4 Tune in to a station using TUNING.
To turn off the radio
Press RADIO OFF / ALARM RESET.
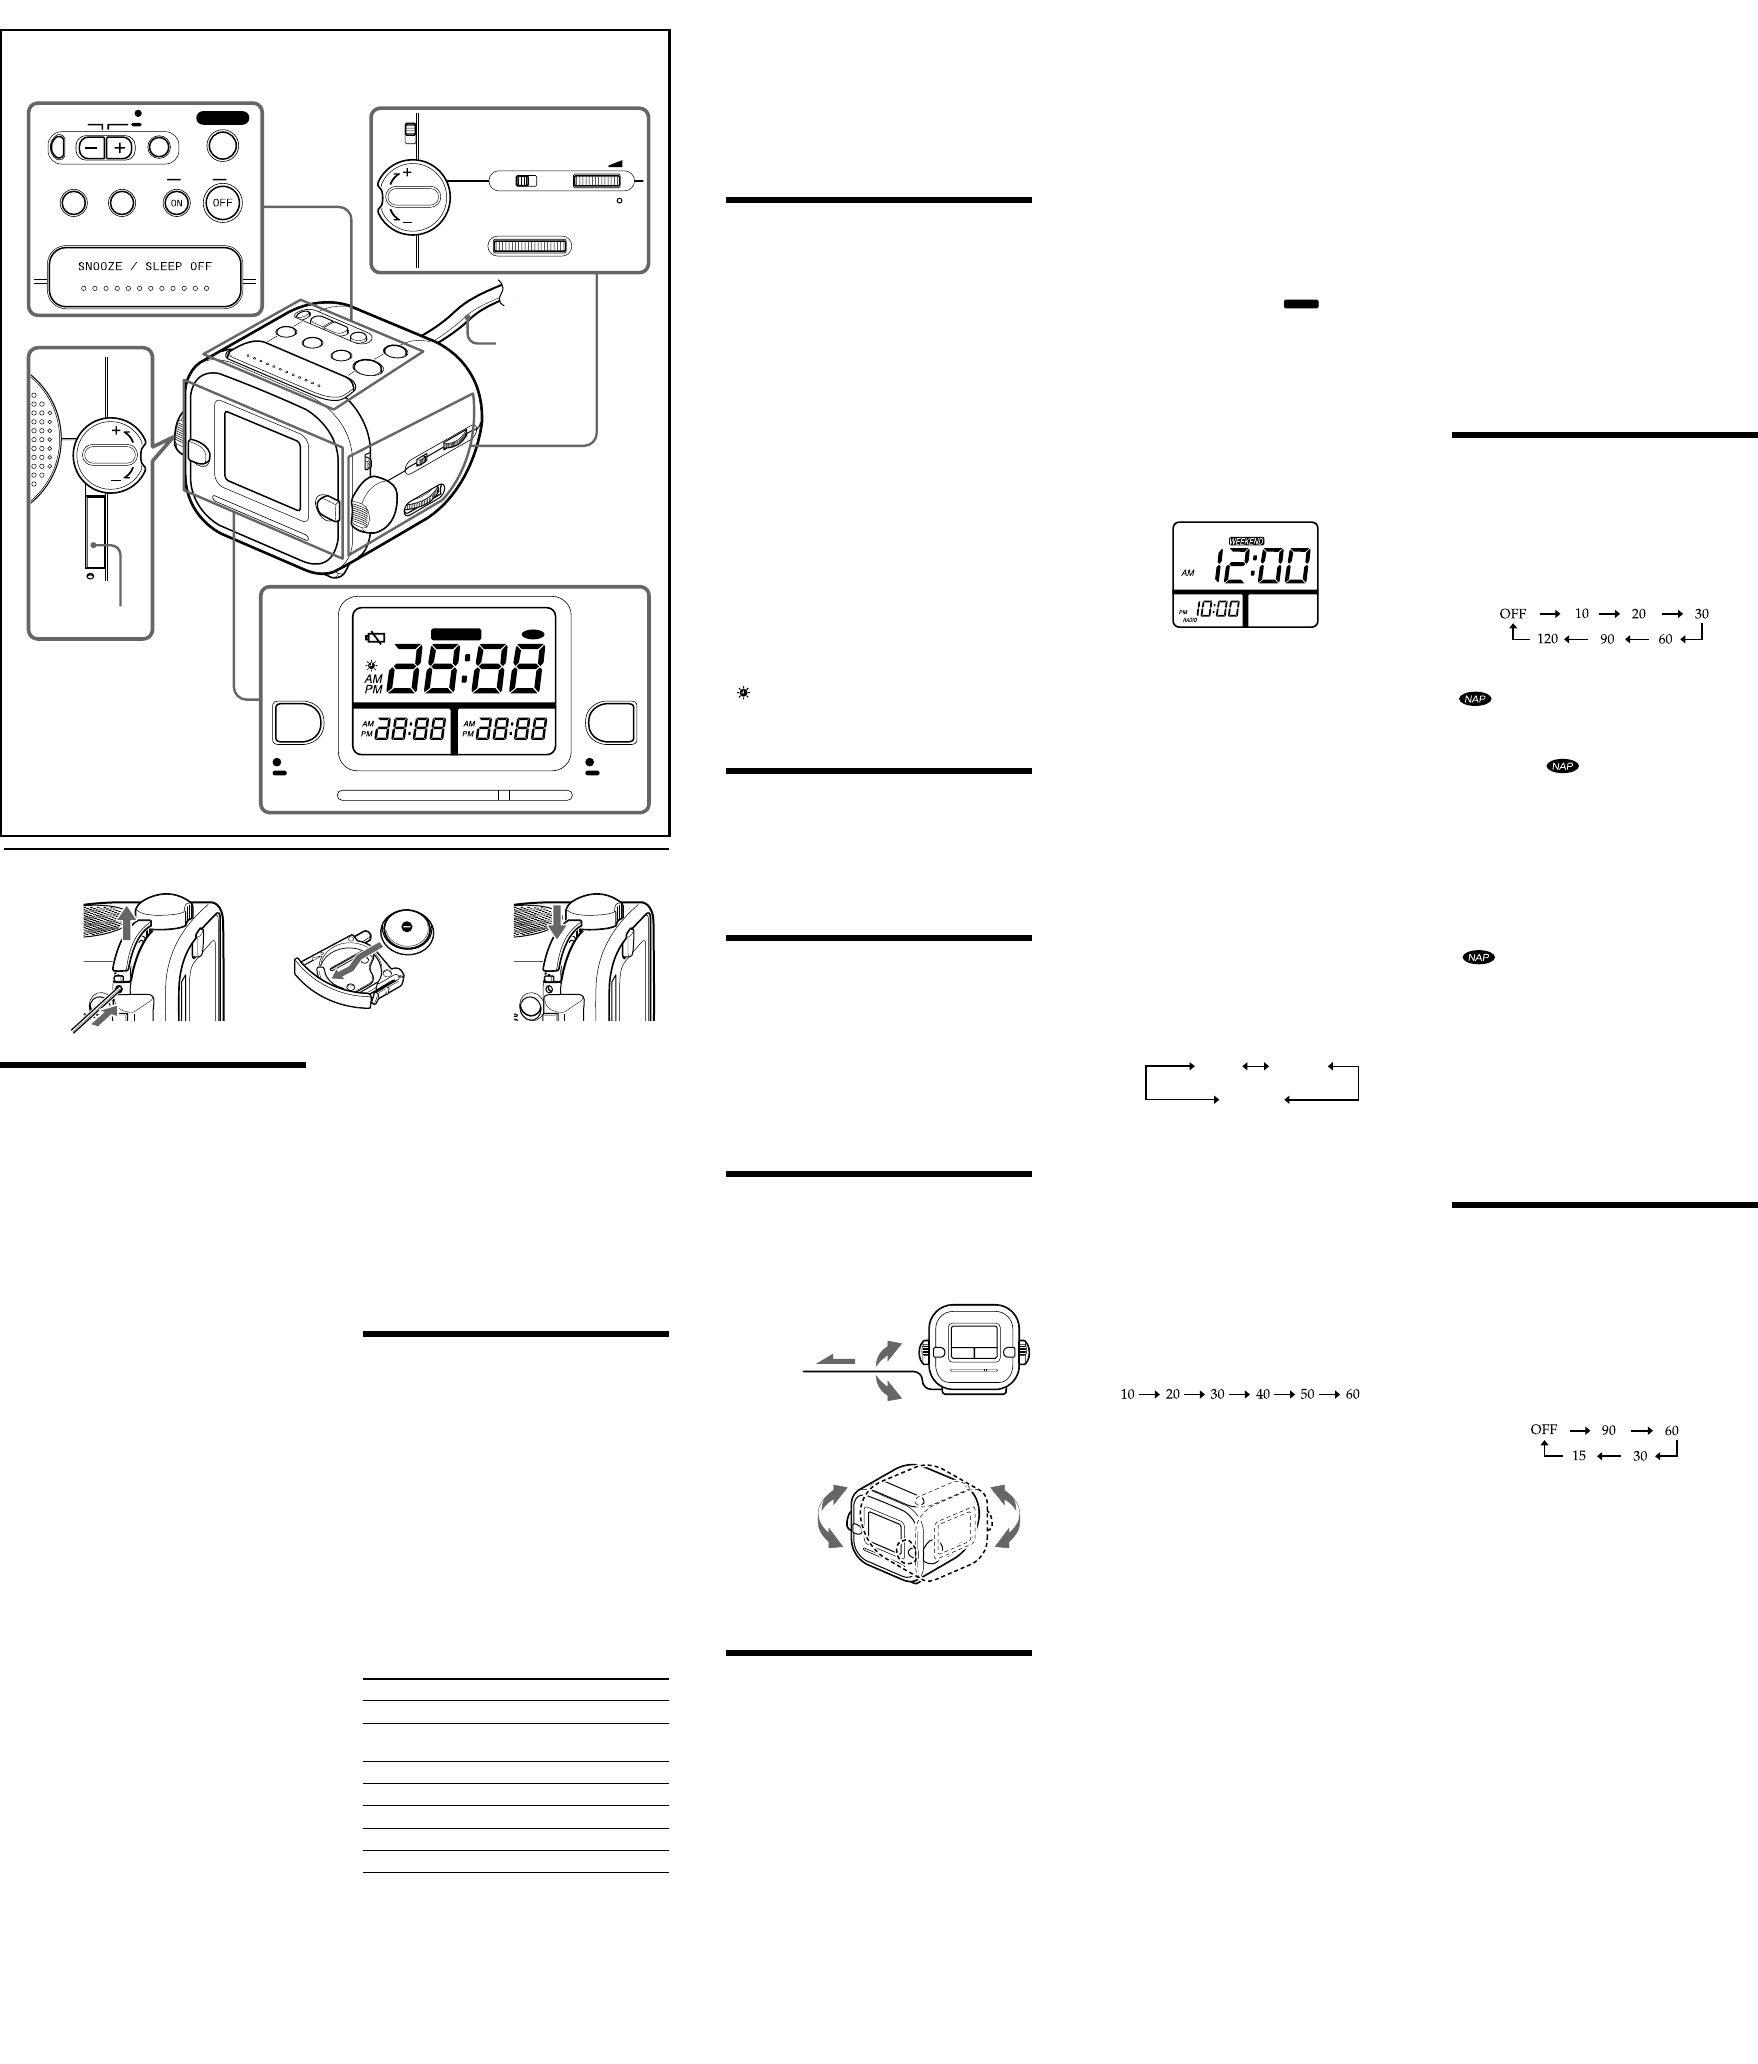
Improving the
reception
FM: The AC power cord functions as an FM
antenna. Extend the AC power cord fully to
increase reception sensitivity.
AM: Rotate the unit horizontally for optimum
reception. A ferrite bar AM antenna is built-in
to the unit.
Do not operate the unit over a steel desk or metal
surface, as this may lead to interference of reception.
Setting the Alarm
This unit is equipped with a dual alarm function, so
you can set the alarm time for two different occasions
— ALARM A and ALARM B.
Furthermore, you can also set an additional two times
for weekends.
When you select Weekend mode, the set alarms for
weekend are activated automatically, and the display
color of the alarm window turns green. (Liv: amber)
This unit is also equipped with 3 alarm sounds—
radio, buzzer, and melody*.
* Melody:
Weekday mode— “Morning” from “Peer Gynt,” by
Griegsuite No.1, Op.46
Weekend mode— “Four seasons: Spring” by
Antonio Lucio Vivaldi
Notes
• Before setting the alarm, make sure to set the clock
(see “Setting the Clock” ).
•The factory setting alarm time is “PM 12:00” .
•To set the radio alarm, first tune in to a station and
adjust the volume (see “Playing the Radio” ).
•The volume of the buzzer and melody cannot be
adjusted.
To set the alarm mode
(weekday/weekend)
You can select the alarm mode to either weekday or
weekend.
Press WEEKEND repeatedly until the desired alarm
mode is selected.
If you select the Weekend mode, “
WEEKEND
” appears on
the display.
To set the alarm time
1 Press WEEKEND to select the desired
alarm mode.
2 Press ALARM SET A or ALARM SET
B.
Alarm time appears on the desired display.
Example: Display window when you set weekend
and alarm A.
3 Turn ALARM TIME SET + or – to set
the desired time.
Each turn of ALARM TIME SET + or – changes
the indication by 1 minute. If you turn and hold
ALARM TIME SET + or – , the alarm time goes
forward (or backward) by 1 minute up to 10
minutes, and then by 10 minutes increments.
•To change the alarm time when the alarm is already
set, perform step 3 only.
• If the same alarm time is set for both alarm (alarm A
and B), the alarm A takes priority.
To set the alarm sound
1 Keep pressing ALARM SET A or
ALARM SET B for a few seconds until a
beep sounds.
The alarm time appears and alarm icon flashes on
the display.
2 Each turn of ALARM TIME SET + or –
changes the indication on the display as
follows:
3 Press ALARM SET A or
ALARM SET B again.
Two beeps sound to confirm the setting.
Note
While setting the alarm sound, you must perform each
step within 65 seconds, or the alarm setting mode will
be cancelled.
To doze for a few more minutes
Press SNOOZE/SLEEP OFF.
The sound turns off but will automatically come on
again after about 10 minutes. Each time you press
SNOOZE/SLEEP OFF, the snooze time changes as
follows:
The maximum length of the snooze time is 60
minutes.
The display shows the snooze time for about 4
seconds and returns to show the current time. When
you press SNOOZE/SLEEP OFF after the current
time appears, the snooze time starts from 10 minutes
again.
To stop the alarm
Press RADIO OFF/ALARM RESET to
turn off the alarm.
The alarm will come on again at the same time the
next day.
If RADIO OFF/ALARM RESET is not pressed, the
alarm sounds continuously for about 60 minutes, and
then it will be stop automatically.
To deactivate the alarm
Press ALARM SET A or ALARM SET B.
Alarm time display disappears.
*There is a tactile dot beside
VOLUME to show the direction to
turn up the volume.
A
RADIO BUZZER
MELODY
Note on alarm in the event of a power
interruption
In the event of a power interruption, alarm functions
work until the battery is empty. But following
functions are different:
• Backlight will not light up.
• When the alarm sound is set as RADIO, it will
change to BUZZER automatically.
• If the power source returns while the alarm sounds,
the alarm sounds continuously for about 60 minutes
when the power source returns.
• If RADIO OFF/ALARM RESET is not pressed,
the alarm sounds for about 1 minute. If the power
interruption continues, the alarm sounds for about 1
minute and stops for 5 minutes and repeats at 5
times.
If the power source returns within 60 minutes of the
set alarm time, the alarm sounds. (If the alarm
repeats 5 times, the alarm sounds up to 30 minutes.)
• If “E” appears on the display, the alarm will not
work in the event of power interruption. Replace the
battery if “E” appears.
Using the NAP timer
(count down timer)
The NAP timer sounds the buzzer after a preset time
duration.
Press NAP repeatedly until the desired minute
appears.
Each press changes the display as follows:
Two short beeps sound when the display returns to
“10” .
“ ” and the NAP time appear for about 4
seconds.
NAP timer starts counting down the NAP time.
When the selected NAP time occurs, the buzzer
comes on, and “ ” on the display flashes.
The buzzer is turned off automatically after about
60 minutes.
To stop the NAP timer
Press NAP or RADIO OFF/ALARM
RESET to turn off the buzzer.
To deactive the NAP timer
Press NAP.
“ ” disappears from the display.
Note on NAP time in the event of a power
interruption
When in the event of a power interruption, NAP time
work until the battery is empty. But the following
functions are different:
•BUZZER will stop automatically after 1 minute.
• If the event of a power interruption happens when
the BUZZER sounds, it will stop automatically.
• If “E” appears on the display, BUZZER will not
work in the event of power interruption. Replace the
battery if “E” appears.
Setting the Sleep
timer
You can fall asleep to the radio using the built-in
sleep timer that turns off the radio automatically after
a preset duration.
Press SLEEP.
The radio turns on. You can set the sleep timer to
durations of 90, 60, 30, or 15 minutes. Each press
changes the display as follows:
Two short beeps sound when the display returns to
“90”.
“SLEEP” will appear in the display when the
durations time are set.
The radio will play for the duration you set, then shut
off.
To turn off the radio before the
preset time
Press RADIO OFF/ALARM RESET or
SNOOZE/SLEEP OFF.
To use both Sleep timer and
alarm
You can fall asleep to the radio and also be awakened
by the radio, buzzer or melody alarm at the preset
time.
1 Set the alarm. (See “Setting the Alarm”.)
2 Set the sleep timer. (See “Setting the Sleep
timer”.)
PUSH
123
PUSH