A
Power Sources
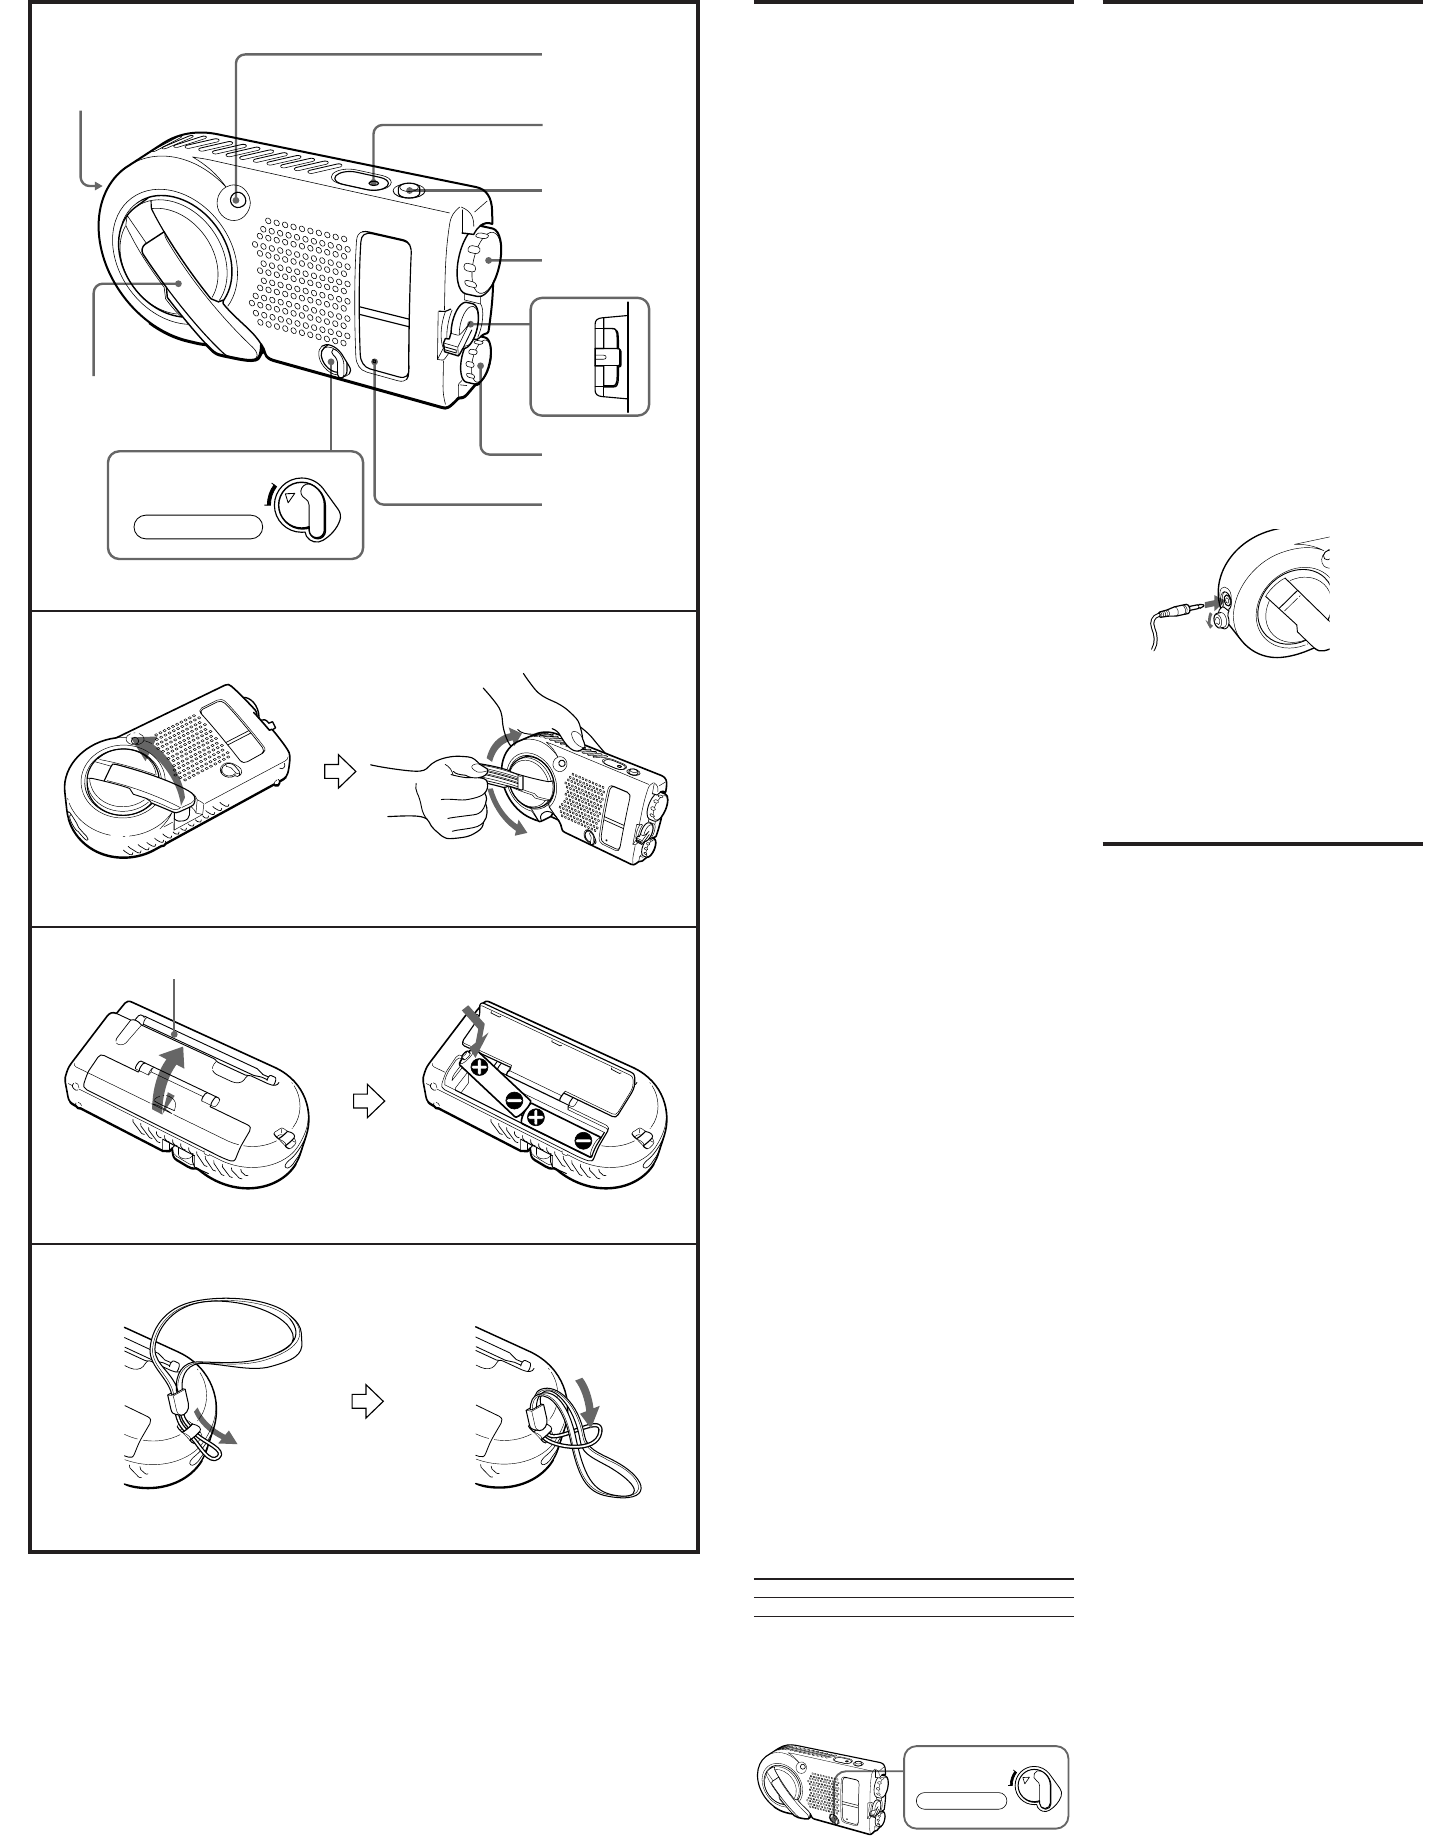
Using the installed
rechargeable battery
(see fig. A)
You may charge the built-in rechargeable battery
and listen to the radio.
1 Pull out the handle of the POWER
GENERATOR.
2 To charge, turn the handle one way to
either direction.
Turn the handle slowly in the beginning, and
speed up the turning little by little. Then, keep
turning the handle continuously at the speed
that lights the OPTIMUM CHARGE indicator.
Notes
•When you turn the handle, be careful not to put
your finger into the groove for the knob of the
handle. You may pinch your finger.
•Be sure to fold in the telescopic antenna when
charging. If you leave the telescopic antenna
unfolded, the telescopic antenna may hit the
surroundings and it is dangerous.
•When you charge, the built-in rechargeable
battery will be charged regardless of the setting
of the BATT SELECTOR switch.
•If you turn the handle of the POWER
GENERATOR while listening to the radio, there
may be a noise interference. In this case, turn off
the radio and then charge the battery.
On charging
When you turn the handle, the power generation
starts and charges the built-in rechargeable battery.
The generation capacity may vary depending on
the speed.
At first, turn the handle slowly and then speed up
the turning little by little and the OPTIMUM
CHARGE indicator will light up. Keep on turning
the handle for about a minute at the speed that
lights the OPTIMUM CHARGE indicator, which
will be about 30 minutes* of listening to the radio.
Use this as an charging standard.
Even when you turn the handle at the speed that
the OPTIMUM CHARGE indicator does not light,
it will charge the built-in rechargeable battery and
you may listen to the radio. The OPTIMUM
CHARGE indicator is not an indicator for
charging capacity.
* The listening time may defer depending on the
operation of the unit.
When the rechargeable battery become
exhausted.
The sound will become weak and distorted.
If this occurs, turn the handle of the power
generator to charge the rechargeable battery.
Notes
•When you use the rechargeable battery for the
first time, after a long period of time of disuse,
leaving the power on for a long time or the
rechargeable battery is exhausted, the battery life
may be short even after charging it.
In this case, charge (for more than a minute) and
discharge the battery several times. The battery
life will be restored.
•If the rechargeable battery capacity becomes half
the normal life, please consult the nearest Sony
dealer.
Installing the dry
batteries (see fig. B)
Insert two size AA (R6) batteries (not supplied).
1 Open the lid as illustrated.
2 Insert two size AA (R6) batteries with
correct polarity.
3 Close the lid of the battery compartment.
Replacing dry batteries
When the dry batteries become weak, the sound
will become weak and distorted. Replace both dry
batteries with new ones.
Battery Life (Approx. hours)
FM AM
Sony size AA (R6) batteries 37 44
Choosing the power source
Set the BATT SELECTOR switch to the source you
want to use.
Nickel-cadmium battery: “GENERATED BATT”
Size AA (R6) dry batteries: “BATT”
Check the rechargeable battery and the dry
batteries once a year.
Rechargeable battery:turn the handle of the
POWER GENERATOR to
charge, then confirm that you
can listen to the radio.
Dry batteries: turn on the radio to confirm
if the sound is not weak or distorted.
Playing the Radio
1 Set the BATT SELECTOR switch to
choose the power source.
2 Turn on the radio and select FM or AM
with POWER.
3 Tune in to a station with TUNING.
When the station is tuned in, the TUNE
indicator lights up.
4 Adjust volume using VOL.
To turn off the radio
Set POWER to OFF.
To improve radio reception
FM: Extend the telescopic antenna and adjust the
length, angle and direction to obtain optimum
reception.
AM: Rotate the unit horizontally for optimum
reception. A ferrite bar antenna is built in the
unit.
When using the earphone
Connect the earphone (not supplied) to @
(earphone) jack.
When the earphone is connected, the speaker will
not emit sound.
Notes
• Do not sound the alarm when using the
earphone. The volume for the alarm cannot be
adjusted.
• When the earphone is not connected to the @
(earphone) jack, be sure to close the earphone
cover. If you do not close the earphone cover, the
unit will not be water-resistant.
Useful functions
Using the Audio Beacon
Press the AUDIO BEACON button. Regardless of
the POWER switch, the alarm will sound while the
AUDIO BEACON button is depressed. To stop the
alarm, press the AUDIO BEACON button again.
On the alarm sound
The alarm sound or the volume defers depending
on the power source, the capacity of the power
source and when the power source become weak or
exhausted.
Alarm Sound Level:
Output SPL @ 12 in (30 cm) approx. 75dB
Notes
•The built-in Audio Beacon is intended as a
general purpose signaling device and is not
intended for long distance signaling or signaling
of an emergency or safety nature.
•The alarm volume cannot be adjusted. Since the
volume is very loud, be careful on regular basis.
•Depending on the surrounding noise, the alarm
may not be heard.
Using the LIGHT
Press the LIGHT button, the dial light will be lit
while this button is pressed.
Attaching the hand strap
(see Fig. C)
Attach the supplied hand strap to the strap hole at
the side of the unit.
B
C
Size AA (R6) X 2
GENERATED BATT
BATT
BATT SELECTOR
Telescopic antenna
GENERATED BATT
BATT
BATT SELECTOR
FM
AM
OFF
POWER
@ (earphone) jack
VOL (volume)
POWER GENERATOR
TUNING
TUNE indicator
AUDIO BEACON
ON/OFF
OPTIMUM
CHARGE indicator
LIGHT


