


D-FJ041. US. 2-319-004-11(1)
Power Sources
To use the batteries (not supplied)
1 Slide OPEN to open the player lid and open the battery
compartment lid inside the CD player.
2 Insert two LR6 (size AA) alkaline batteries by matching
the to the diagram inside the CD player and close the
lid until it clicks into place. Insert the end first (for
both batteries).
Battery life* (approx. hours)
(When the CD player is used on a flat and stable place.)
Playing time varies depending on how the CD player is used.
G-PROTECTION G-on G-off RADIO
ON
Two Sony alkaline batteries LR6
(SG) (produced in Japan)
16 11 35
* Measured value by the standard of JEITA (Japan
Electronics and Information Technology Industries
Association).
• The indicator sections of roughly show the
remaining battery power. One section does not always
indicate one-fourth of the battery power.
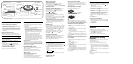
To use the AC power adaptor
Connect the AC power adaptor as illustrated.
Playing a CD
1 Slide OPEN to open the lid and fit the CD to the pivot,
then close the lid.
2 Press .
To play from the first track, press for 2 seconds or
more while the CD player is stopped.
• This CD player can play CD-Rs/CD-RWs recorded in
the Compact Disc Digital Audio (Audio CD) format,
but playback capability may vary depending on the
quality of the disc and the condition of the recording
device.
• This product is designed to play back discs that
conform to the Compact Disc (CD) standard.
Recently, various music discs encoded with copyright
protection technologies are marketed by some record
companies. Please be aware that among those discs,
there are some that do not conform to the CD standard
and may not be playable by this product.
Note on DualDiscs
A DualDisc is a two sided disc product which mates DVD
recorded material on one side with digital audio material on
the other side. However, since the audio material side does
not conform to the Compact Disc (CD) standard, playback
on this product is not guaranteed.
Digital MEGA BASS function
During play, press SOUND/AVLS repeatedly to select
“SND 1” or “SND 2.”
If the sound is distorted, turn down the volume.
While listening to the radio, this function is disabled.
AVLS* function
*Automatic Volume Limiter System
Press and hold SOUND/AVLS.
If “AVLS” flashes three times, the function is enabled.
If “AVLS” flashes once, the function is disabled.
You can also use this function while listening to the radio.
AMS* / search function
*Automatic Music Sensor
To find the beginning of the previous/current/next/
succeeding track(s): Press / repeatedly.
To go backward/forward quickly: Press and hold /.
Play mode function
During play, press P MODE/ repeatedly:
No indication (normal play) “1”(single track play)
“SHUF”(shuffle play) “ ”(Bookmark play)
To repeat the play mode you selected, press and hold
P MODE/ until “ ” appears.
G-PROTECTION function
The function provides protection against sound skipping
during many active uses.*
The default setting is “G-on.” To select “G-off,” press
while you keep pressing during stop. To enjoy high
quality CD sound, select “G-off”.
* Sound may skip: if the CD player receives stronger
continuous shock than expected / if a dirty or scratched
CD is played / when using poor-quality CD-Rs/CD-RWs
or if there is a problem with the recording device or
application software.
Bookmark play
If you add Bookmarks to your favorite tracks, you can listen
to these tracks only from the track with the lowest number.
1 During playback of the track where you want to add a
Bookmark, press and hold until “ (Bookmark)”
flashes on the display.
2
Repeat step 1 to add Bookmarks to the tracks you want.
3 Press P MODE/ repeatedly until “ ” flashes.
4 Press .
To remove the Bookmarks
During playback of the track with a Bookmark, press and
hold until “ ” disappears from the display.
If you change CDs and start playing, all the Bookmarks
added for the previous CD will be erased.
Listening to the Radio
1 Press RADIO ON/BAND to turn on the radio.
If “PRESET” appears on the display, press P MODE/
to make “PRESET” disappear from the display.
2 Press RADIO ON/BAND until the band you want
appears.
Each time you press the button, the display changes as
follows:
FM AM
3 Press TUNE + or – to tune in the station you want and
adjust the volume.
Turning off the radio
Press
•
RADIO OFF.
Tuning in the station quickly
Press and hold TUNE + or – in step 3 until the frequency
digits begin to change on the display. The CD player
automatically scans the radio frequencies and stops when it
finds a clear station.
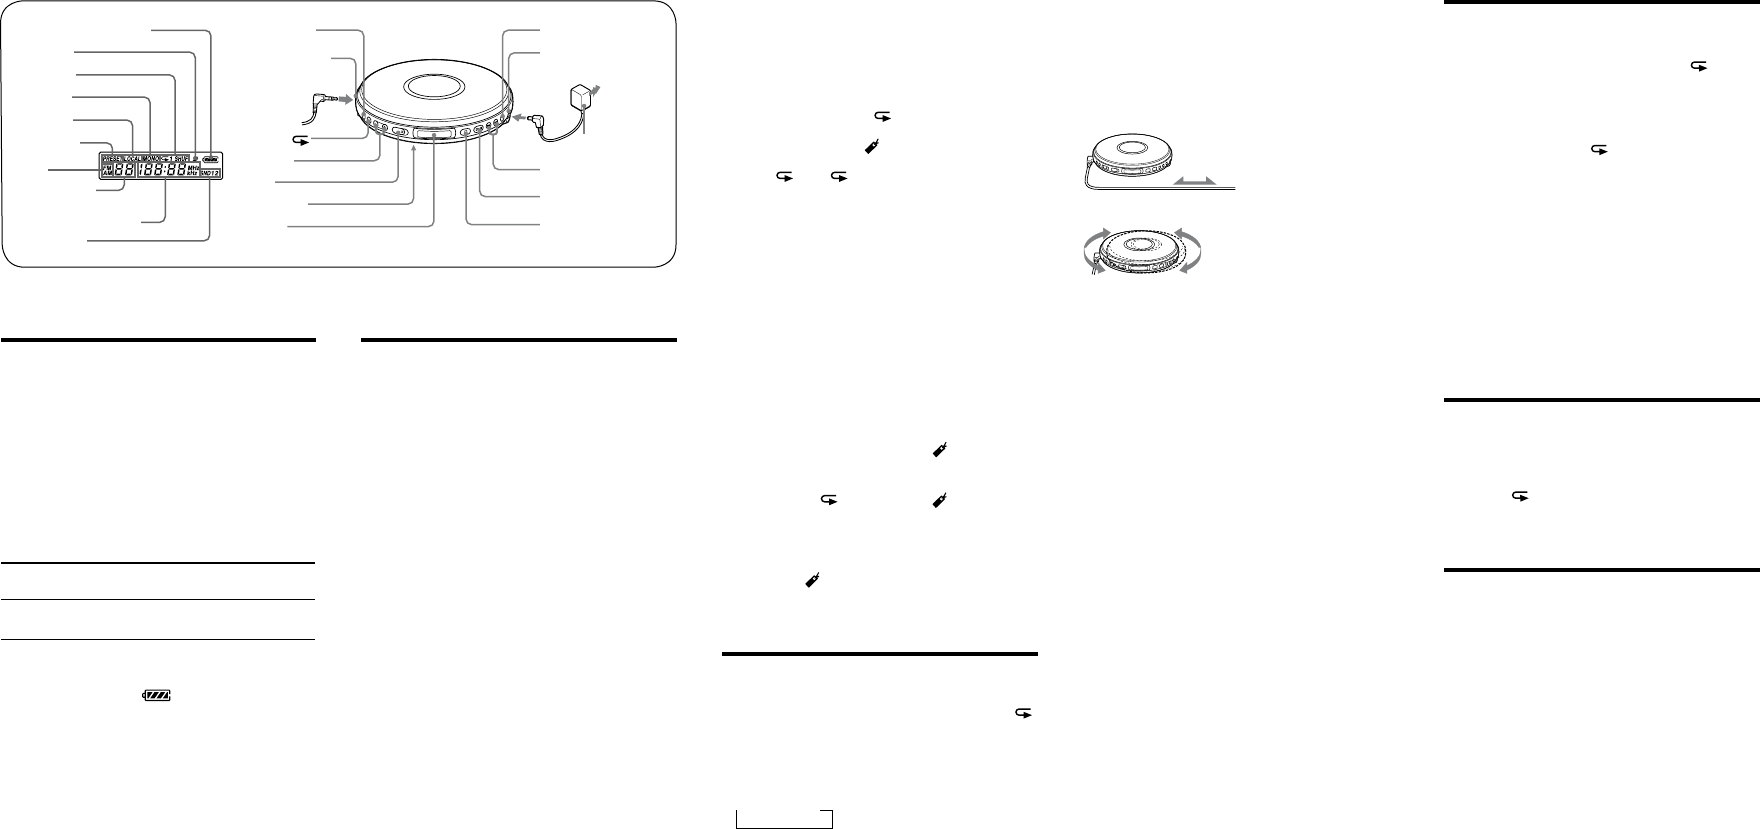
Improving broadcast reception
For FM, extend the headphones cord.
Headphones
For AM, reorient the CD player itself.
Note
Keep the headphones connected to the jack of the CD
player. The headphones cord works as the FM antenna.
If it is hard to hear the FM broadcast due to
interference from strong radio waves
1 While listening to the FM broadcast, press SOUND/
AVLS.
“LOCAL” flashes.
2 Press /ENTER within 10 seconds after you finished
the previous operation.*
“LOCAL” stops flashing.
* If “LOCAL” disappears from the display, start from
Step 1.
To cancel the LOCAL setting, press SOUND/AVLS, and
then press /ENTER so that “LOCAL” disappears from
the display.
If it is hard to hear the FM broadcast due to
poor reception
1 While listening to the FM broadcast, press SOUND/
AVLS.
“LOCAL” flashes.
2 Press SOUND/AVLS again.
“MONO” flashes.
3 Press /ENTER within 10 seconds after you finished
the previous operation.*
“MONO” stops flashing.
* If “MONO” disappears from the display, start from Step 1.
To cancel the MONO setting, press SOUND/AVLS twice,
and then press /ENTER so that “MONO” disappears
from the display.
Presetting Radio Stations
You can preset up to 30 stations: 20 for FM and 10 for AM.
1 While listening to the radio, press P MODE/ to enter
the preset mode.
“PRESET” appears on the display.
2 Press TUNE + or – repeatedly until the preset number
you want appears on the display.
3 Press and hold P MODE/ until “PRESET” flashes on
the display.
From this step on, start the next operation within 30
seconds after you finished the previous operation. If
“PRESET” stops flashing, start from step 3.
4 Press TUNE + or – repeatedly to tune in the station you
want.
5 Press /ENTER.
To cancel all preset stations
1 While the radio is turned off and CD play is stopped,
press RADIO ON/BAND while you are pressing .
“CLEAr” flashes.
2 Press /ENTER.
Playing Preset Radio
Stations
1 Press RADIO ON/BAND to select the band.
2 When “PRESET” does not appear on the display, press
P MODE/ to enter the preset mode.
“PRESET” appears on the display.
3 Press TUNE + or – to tune in a stored station.
Changing the Tuning
Interval
When using the CD player abroad, change the AM tuning
interval, if necessary.
9 kHz area: Asia and Europe
10 kHz area: the U.S.A., Canada and Latin America
1 While the radio is turned off and CD play is stopped,
press RADIO ON/BAND while you are pressing .
If the current setting is “9 kHz,” “10 kHz” flashes on the
display.
If the current setting is “10 kHz,” “9 kHz” flashes on the
display.
2 Press /ENTER.
Note
After changing the tuning interval, you need to preset radio
stations again.
Display
* The button has a tactile dot.
RADIO ON/ BAND
*(play/pause)/
ENTER
DC IN 4.5 V
(headphones)
jack
(stop) • RADIO OFF
HOLD (rear)
VOL –/+*
to an AC outlet
AC power adaptor
Headphones
SOUND/AVLS
/ • TUNE –/+
P MODE/
OPEN
Remaining battery power
Bookmark
MONO
LOCAL
PRESET
Band
Track number/
Preset number
Playing time/Frequency
Sound mode
Play mode