


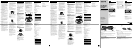
Location of controls/Ubicación de los controles
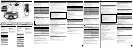
Total track number
Número total de pistas
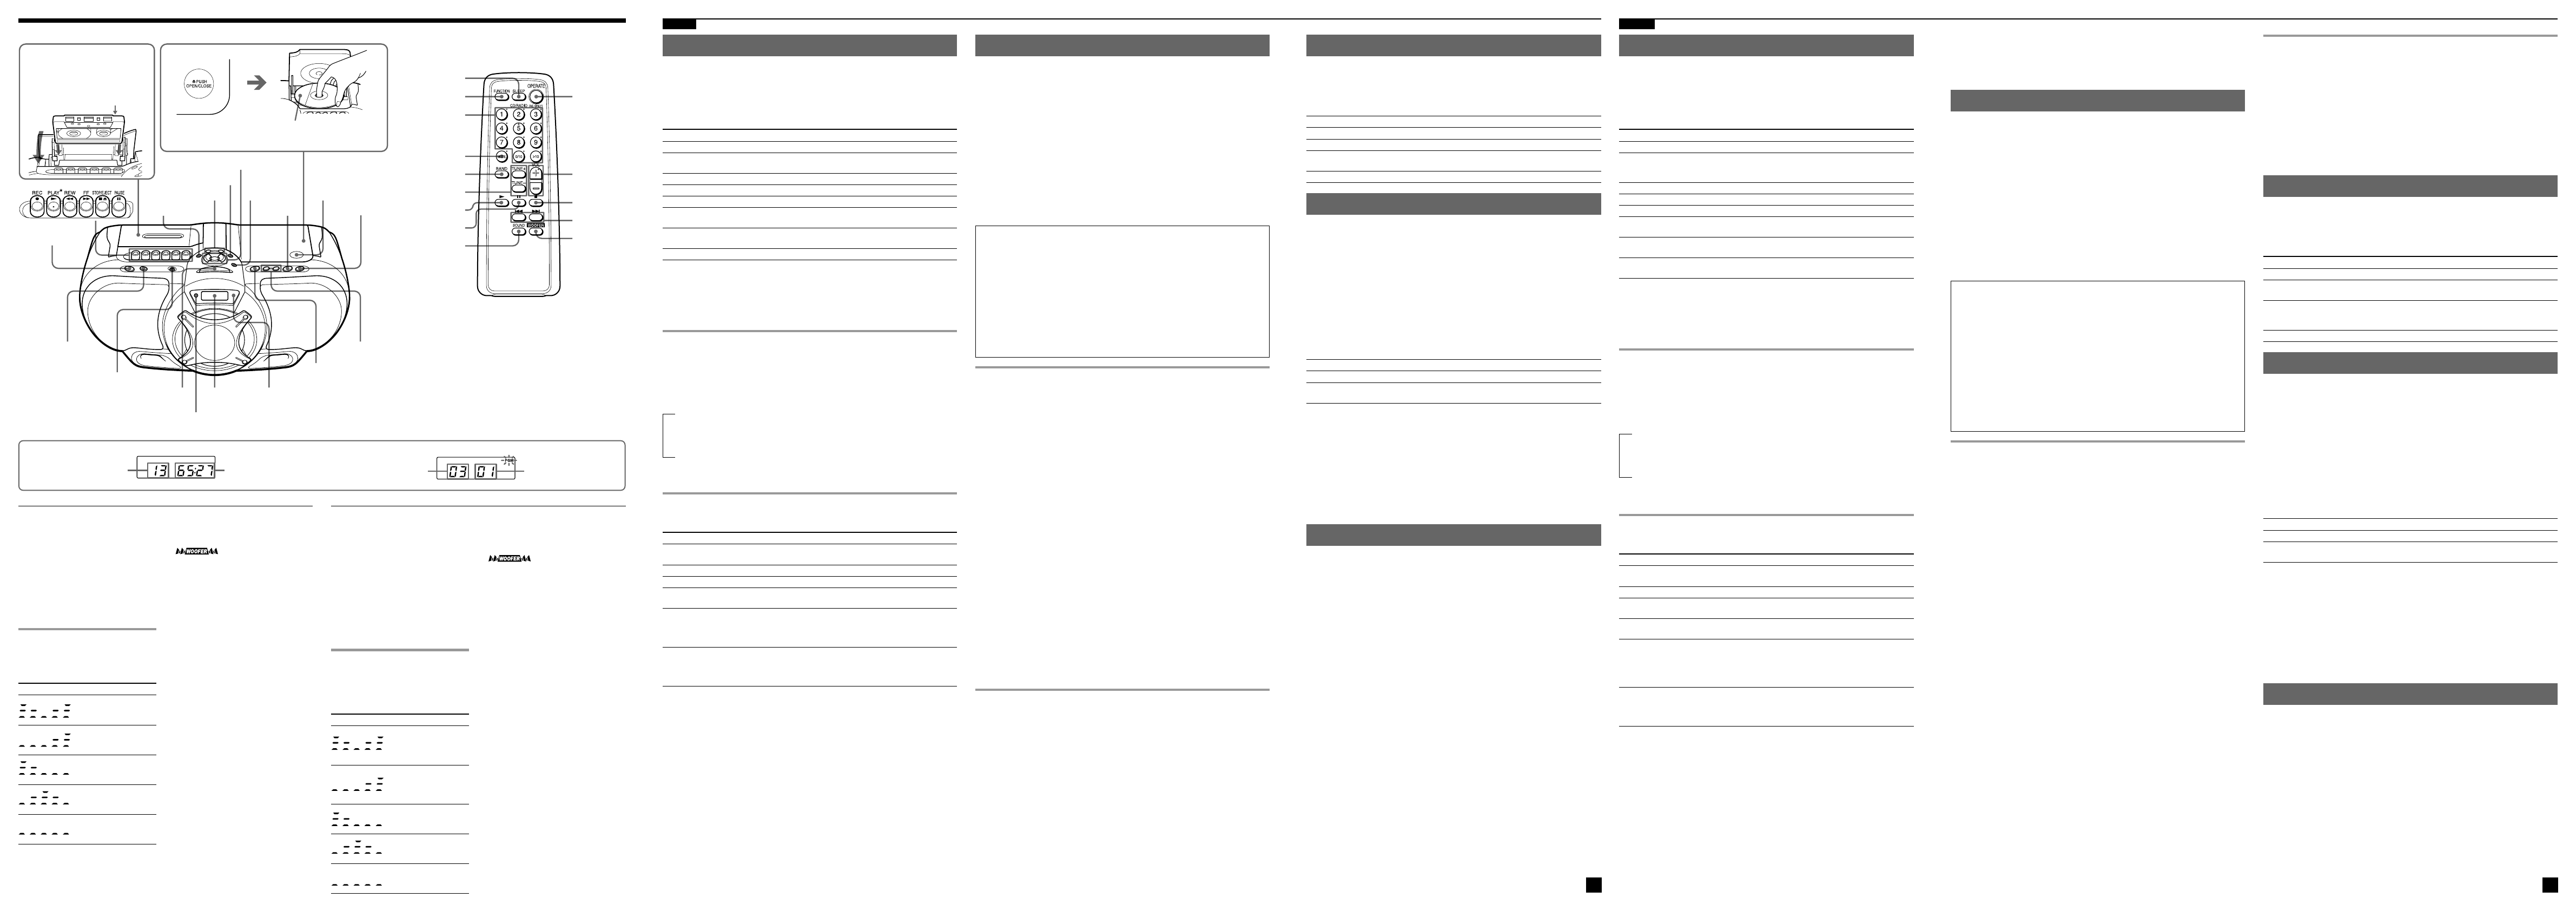
Programmed track
Pista programada
Playing order
Orden de reproducción
DE
Total playing time
Tiempo total de reproducción
Display/Visor
Remote Control
Mando a distancia
FUNCTION
BAND
OPERATE
(POWER)
VOL +*, –
x
.,>
Z PUSH
OPEN/CLOSE
VOLUME –, +*
TUNE –, +
DISPLAY
ENTER
MEMORY
MODE
i
Number buttons
Botones
numéricoss
xu*
SLEEP
OPR/BATT
Loading a CD
Carga de un CD
With the labeled side up
Con la cara etiquetada hacia arriba
Inserting a cassette
Inserción de casetes
With the side you want to play
facing upward
Con la cara que desee reproducir
mirando hacia arriba
BAND
AUTO PRESET
SOUND
Display
Visor
Remote sensor
Sensor de control remoto
*The button has a tactile dot.
*El botón tiene un punto táctil.
POWER DRIVE
WOOFER
., >
PRESET –, +
N
X
SLEEP
MODE
TUNE+, –
WOOFER
SOUND
DE
To turn on/off the power
CFD-EX35L: Press OPERATE.
CFD-G35: Press POWER or OPERATE.
To adjust the volume
Press VOLUME +, – (VOL +, – on the
remote).
To listen through headphones
Connect the headphones to the i
(headphones) jack.
Adjusting the audio emphasis
To select the sound characteristic
Press SOUND repeatedly to select the audio
emphasis you want.
Choose To get
powerful, clean sounds,
emphasizing low and
high range audio
light, bright sounds
emphasizing high and
middle range audio
percussive sounds,
emphasizing bass audio
the presence of vocals,
stressing middle range
audio
the whole dynamic range
for music such as
classical music
To reinforce the bass sound
Press POWER DRIVE WOOFER
(WOOFER on the remote).
appears in the display. When
POWER DRIVE WOOFER function works,
the button lights up.
To return to normal sound, press the button
until the indication disappears from the
display .
Notes
• While the sleeping timer is on, the POWER
DRIVE WOOFER button does not light, even
if the WOOFER function works.
• When using the headphones, the WOOFER
function does not work.
Para activar/desactivar la
alimentación
CFD-EX35L: Pulse OPERATE.
CFD-G35: Pulse POWER u OPERATE.
Para ajustar el volumen
Pulse VOLUME +, – (VOL +, – en el mando
a distancia).
Para escuchar el sonido mediante
auriculares
Conecte los auriculares a la toma i
(auriculares).
Ajuste del énfasis de sonido
Para seleccionar las características
del sonido
Pulse SOUND varias veces para seleccionar
el énfasis de audio que desee.
Elija Para obtener
sonidos potentes y nítidos
con enfatización de las
gamas baja y alta de
audio
sonidos brillantes y
ligeros con enfatización
de las gamas alta y media
de audio
sonidos de percusión con
énfasis en los graves
sonidos vocales con
enfatización de la gama
media de audio
la gama dinámica
completa de música,
como música clásica
Para potenciar los graves
Pulse POWER DRIVE WOOFER
(WOOFER en el mando a distancia).
Asegúrese de que la indicación
aparece en el visor. Si la
función POWER DRIVE WOOFER se
activa, el botón se iluminará.
Para recuperar el sonido normal, pulse el
botón hasta que la indicación desaparezca del
visor.
Notas
• Mientras el temporizador de desactivación se
encuentre en funcionamiento, el botón
POWER DRIVE WOOFER no se iluminará,
aunque la función WOOFER esté activada.
• Si utiliza los auriculares, la función WOOFER
no funcionará.
Listening to the radio
1 Press OPERATE (or POWER) to turn on the player.
2 Press BAND•AUTO PRESET until the band you want appears in the display.
Each time you press the button, the indication changes as follows:
CFD-G35: “FM” t “AM”
CFD-EX35L: “FM” t “MW” t “LW”.
3 Hold down TUNE + or – until the frequency digits begin to change in the
display.
The player automatically scans the radio frequencies and stops when it finds a
clear station.
If you can't tune in a station, press the button repeatedly to change the frequency
step by step.
Tip
If the FM broadcast is noisy, press MODE until "Mono" appears in the display and the radio will play in
monaural.
Changing the AM/MW tuning interval (excluding for Australian model)
The AM/MW tuning interval is preset as follows at the factory:
Argentine model: 10 kHz
Other models: 9 kHz
If you need to change the AM/MW tuning interval, do the following:
1 Press BAND•AUTO PRESET until “AM” or “MW” is displayed.
2 Press DISPLAY•ENTER•MEMORY for 2 seconds.
3 Press BAND•AUTO PRESET for 2 seconds.
“AM 9” “MW 9” or “AM 10” “MW 10” appears.
4 Press TUNE + or – to select “AM 9” “MW 9” for 9 kHz interval or “AM 10” “MW 10”
for 10 kHz interval.
5 Press DISPLAY•ENTER•MEMORY.
After changing the tuning interval, you need to reset your preset AM/MW radio stations.
Presetting radio stations
You can store radio stations into the player’s memory. You can preset up to 30 radio stations
(CFD-G35), 20 for FM and 10 for AM in any order, or 40 radio stations (CFD-EX35L), 20 for
FM and 10 for MW and LW in any order.
1 Press OPERATE (or POWER) to turn on the player.
2 Press BAND•AUTO PRESET to select the band.
3 Hold down BAND•AUTO PRESET for 2 seconds until “AUTO” flashes in the
display.
4 Press DISPLAY•ENTER•MEMORY.
The stations are stored in memory from the lower frequencies to the higher ones.
If a station cannot be preset automatically
You need to preset a station with a weak signal manually.
1 Press OPERATE (or POWER) to turn on the player.
2 Press BAND•AUTO PRESET to select the band.
3 Tune in a station you want.
4 Hold down DISPLAY• ENTER•MEMORY for 2 seconds until the preset number flashes in
the display.
5 Press PRESET + or – until the preset number you want for the station flashes in the display.
6 Press DISPLAY•ENTER•MEMORY.
The new station replaces the old one.
On the remote
1 Press BAND until the band you want appears in the display.
2 Tune in a station you want.
3 Hold down the number buttons that you want to preset the new station on for about 2 seconds.
To select the preset number over 10, press >10 first, then the corresponding number buttons.
You need to hold down the last number button to enter for about 2 seconds.
(Example: To select 12, press >10 and 1 first, then hold down 2 for about 2 seconds.)
Playing preset radio stations
1 Press OPERATE (or POWER) to turn on the player.
2 Press BAND•AUTO PRESET to select the band.
3 Press PRESET + or – to tune in the stored station.
On the remote
1 Press BAND.
2 Press the number buttons to tune in the stored station.
To tune in a preset station over 10, press >10 first, then corresponding number buttons.
(Example: To tune in a preset station 12, press >10 and 1 first, and then press 2.)
Press
x
u (X on the remote)
Press the button again to resume play after pause.
>
.
Z PUSH OPEN/CLOSE
> (forward) or . (backward) while playing until you
find the point
> (forward) or . (backward) in pause until you find
the point
a number button of the track on the remote
Playing a tape
1 Press OPERATE (or POWER) to turn on the player.
2 Press xZ to open the tape compartment and insert a recorded tape. Close the
compartment. Use TYPE I (normal) tape only.
3 Press N.
To
stop playback
fast-forward or rewind the tape
pause playback
eject the cassette
Recording
1 Press OPERATE (or POWER) to turn on the player.
2 Press xZ to open the tape compartment and insert a blank tape. Use TYPE I
(normal) tape only.
3 Select the program source you want to record.
To record from the CD player
Press x and load a CD (See “Playing a CD”).
To record from the radio
Press BAND•AUTO PRESET and tune in the station you want (See “Listening
to the radio”).
4 Press z to start recording.
(N is depressed automatically.)
To Press
stop recording xZ
pause recording X
Press the button again to resume recording.
Tips
• Adjusting the volume or the audio emphasis will not affect the recording level.
• CFD-EX35L only: If the MW/LW programme makes a whistling sound after you've pressed z in
step 4, press MODE to select the position of ISS (Interference Suppress Switch) that most decreases
the noise.
• For the best results, use the AC power as a power source for recording.
• To erase a recording, proceed as follows:
1 Insert a tape with the recording you want to erase.
2 Press X.
3 Press N.
4 Press z.
5 Press X.
Falling asleep to music
1 Play the music source you want.
2 Press SLEEP.
3 Press SLEEP to select the minutes until the player goes off automatically.
Each time you press the button, the indication changes as follows: “60” t
“90” t “120” t “OFF” t “10” t “20” t “30”.
To cancel the sleep function
Press OPERATE (or POWER) to turn off the power.
Note
When you are playing a tape using this function: If the tape length of one side is longer than the set
time, the player will not go off until the tape reaches the end.
Press
xZ
M or m
X
Press the button again to resume play after pause.
xZ
English
Playing a CD
1 Press OPERATE (or POWER) to turn on the player.
2 Load a CD in the CD compartment.
3 Press Z PUSH OPEN/CLOSE to close the CD compartment.
4 Press u (N on the remote).
The player plays all the tracks once.
To
stop playback
pause playback
go to the next track
go back to the previous track
remove the CD
locate a point while listening
to the sound
locate a point while observing
the display
locate a specific track directly*
* You cannot locate a specific track if "SHUF" or "PGM" is lit in the display. Turn off the indication by
pressing x.
Tip
To locate a track numbered over 10, press >10 first, then the corresponding number buttons on the
remote.
Example:To play track number 23, press >10 first, then 2 and 3.
Using the display
To check the total track number and playing time
Press DISPLAY•ENTER•MEMORY in stop mode (see fig. D).
To check the remaining time
Press DISPLAY•ENTER•MEMORY repeatedly while playing a CD. The display changes as
follows:
t the current track number and playing time
r
the current track number and the remaining time on the current track*
r
the number of tracks left and remaining time on the CD
* For a track whose number is more than 20, the remaining time appears as “- -:- -” in the display.
Selecting the play mode
Press MODE until “REP 1” “REP ALL” “SHUF” “SHUF REP” “PGM” “PGM REP” appears in
the display. Then proceed as follows:
To Select
repeat a single track “REP 1”
repeat all tracks “REP ALL”
shuffle play “SHUF”
repeat tracks “SHUF REP”
in random order
programme play “PGM”
repeat programmed tracks “PGM REP”
On the remote
When you’ve selected “PGM” or “PGM REP”, press the number buttons for the track you want
up to 20 tracks, then press N.
To cancel selected play mode
Press MODE until the selected mode disappears from the display.
To check the programmed track and playing order in the display
To check the order of tracks before play, press DISPLAY•ENTER•MEMORY.
Every time you press the button, the track number appears in the programmed order.
To change the current programme
Press x once if the CD is stopped and twice if the CD is playing. The current programme will be
erased. Then create a new programme following the programming procedure.
Tips
• You can play the same programme again, since the programme is saved until you open the CD
compartment.
• You can record your own programme. After you’ve created the programme, insert a blank tape and
press z to start recording.
Sugerencias
• Es posible volver a reproducir el mismo programa, ya que éste queda almacenado hasta que abra el
compartimiento de CD.
• Es posible grabar su propio programa. Tras crear el programa, inserte una cinta virgen y pulse z para
iniciar la grabación.
Recepción de la radio
1 Pulse OPERATE (o POWER) para conectar el reproductor.
2 Pulse BAND•AUTO PRESET hasta que el visor muestre la banda que desee.
Cada vez que pulse el botón, la indicación cambiará de la siguiente forma:
CFD-G35: “FM” t “AM”
CFD-EX35L: “FM” t “MW” t “LW”.
3 Mantenga pulsado TUNE + o – hasta que los dígitos de frecuencia comiencen a
cambiar en el visor.
El reproductor explora automáticamente las frecuencias de radio y se detiene
cuando encuentra una emisora de señal nítida.
Si no puede sintonizar alguna emisora, pulse el botón varias veces para que la
frecuencia cambie intervalo a intervalo.
Sugerencia
Si la emisión de FM se oye con interferencias, pulse MODE hasta que “Mono” aparezca en el visor. La
radio se oirá en monofónico.
Cambio del intervalo de sintonización de AM/MW (excepto para el modelo de
Australia)
El intervalo de sintonización de AM/MW se presintoniza en fábrica de la siguiente forma:
Modelo para Argentina: 10 kHz
Otros modelos: 9 kHz
Si es preciso cambiar el intervalo de sintonización de AM/MW, realice lo siguiente:
1 Pulse BAND•AUTO PRESET hasta que aparezca “AM” o “MW”.
2 Pulse DISPLAY•ENTER• MEMORY durante 2 segundos.
3 Pulse BAND•AUTO PRESET durante 2 segundos.
Aparecerá “AM 9” “MW 9” o “AM 10” “MW 10”.
4 Pulse TUNE + or – para seleccionar “AM 9” “MW 9” para el intervalo de 9 kHz o
“AM 10” “MW 10” para el de 10 kHz.
5 Pulse DISPLAY•ENTER• MEMORY.
Tras cambiar el intervalo de sintonización, deberá reajustar las emisoras de radio de
AM/MW memorizadas.
Memorización de emisoras de radio
Puede almacenar emisoras de radio en la memoria del reproductor. Puede memorizar hasta 30
emisoras de radio (CFD-G35), 20 para FM y 10 para AM en cualquier orden, o 40 emisoras
(CFD-EX35L), 20 para FM y 10 para MW y LW en el orden que prefiera.
1 Pulse OPERATE (o POWER) para conectar el reproductor.
2 Pulse BAND•AUTO PRESET para seleccionar la banda.
3 Mantenga pulsado BAND•AUTO PRESET durante 2 segundos hasta que
“AUTO” parpadee en el visor.
4 Pulse DISPLAY•ENTER•MEMORY.
Las emisoras se almacenan en la memoria desde las frecuencias inferiores hasta
las superiores.
Si no es posible memorizar una emisora automáticamente
Deberá memorizar manualmente la emisora de señal débil.
1 Pulse OPERATE (o POWER) para conectar el reproductor.
2 Pulse BAND•AUTO PRESET para seleccionar la banda.
3 Sintonice la emisora que desee.
4 Mantenga pulsado DISPLAY•ENTER•MEMORY durante 2 segundos hasta que un número
de memorización parpadee en el visor.
5 Pulse PRESET + o – hasta que el número de memorización que desee asignar a la emisora
parpadee en el visor.
6 Pulse DISPLAY•ENTER•MEMORY.
La nueva emisora sustituye a la antigua.
En el mando a distancia
1 Pulse BAND hasta que la banda que desea predefinir aparezca en el visor.
2 Sintonice la emisora deseada.
3 Mantenga pulsados los botones numéricos en los que desee predefinir la nueva emisora
durante 2 segundos.
Para seleccionar un número de memorización superior a 10, pulse >10 primero y, a
continuación, los botones numéricos correspondientes.
Es preciso mantener pulsado durante unos 2 segundos el botón del último número.
(Ejemplo: Para seleccionar 12, pulse >10 y 1 primero y, a continuación, mantenga pulsado 2
durante unos 2 segundos.)
Sintonización de emisoras memorizadas
1 Pulse OPERATE (o POWER) para conectar el reproductor.
2 Pulse BAND•AUTO PRESET para seleccionar la banda.
3 Pulse PRESET + o – para sintonizar una emisora almacenada.
En el mando a distancia
1 Pulse BAND.
2 Pulse los botones numéricos para sintonizar una emisora almacenada.
Para seleccionar un número de memorización superior a 10, pulse >10 primero y, a
continuación, los botones numéricos correspondientes.
(Ejemplo: Para seleccionar 12, pulse >10 y 1 primero y, a continuación, mantenga pulsado 2 )
Reproducción de cintas
1 Pulse OPERATE (o POWER) para conectar el reproductor.
2 Pulse xZ para abrir el compartimiento de cintas e inserte una cinta grabada.
Cierre el compartimiento. Utilice solamente cintas TYPE I (normales).
3 Pulse N.
Para
detener la reproducción
avanzar rápidamente la cinta
o rebobinarla
introducir pausas durante la
reproducción
expulsar el casete
Grabación
1 Pulse OPERATE (o POWER) para conectar el reproductor.
2 Pulse xZ para abrir el compartimiento de cintas e inserte una cinta virgen.
Utilice solamente cintas TYPE I (normales).
3 Seleccione la fuente de programa que desee grabar.
Para grabar del reproductor de CD
Pulse x y coloque un CD (consulte “Reproducción de discos compactos”).
Para grabar de la radio
Pulse BAND•AUTO PRESET y sintonice la emisora que desee (consulte
“Recepción de la radio”).
4 Pulse z para iniciar la grabación.
(N se pulsa de forma automática.)
Para Pulse
detener la grabación xZ
introducir pausas durante la grabación X
Vuelva a pulsar el botón para reanudar la grabación.
Sugerencias
• El ajuste del volumen o del énfasis de sonido no afectará al nivel de grabación.
• Sólo CFD-EX35L: Si el programa de MW/LW emite un sonido silbante después de pulsar z en el
paso 4, pulse MODE para seleccionar la posición de ISS (interruptor de supresión de interferencias)
que más reduzca el ruido.
• Para obtener resultados óptimos, utilice CA como fuente de alimentación para grabar.
• Para borrar grabaciones, realice lo siguiente:
1 Inserte la cinta cuya grabación desee borrar.
2 Pulse X.
3 Pulse N.
4 Pulse z.
5 Pulse X.
Desactivación automática del sistema
1 Reproduzca la fuente de música que desee.
2 Pulse SLEEP.
3
Pulse SLEEP para seleccionar los minutos tras los cuales el reproductor se apagará
automáticamente.
Cada vez que pulse el botón,el visor cambiará de la siguiente forma: “60” t
“90” t “120” t “OFF” t “10” t “20” t “30”.
Para cancelar la función de desactivación
Pulse
OPERATE (o POWER)
para desactivar la alimentación.
Nota
Cuando reproduzca una cinta utilizando esta función:
Si la longitud de una cara de la cinta es superior al tiempo ajustado, el reproductor no se apagará hasta
que la cinta llegue al final.
Pulse
xZ
M o m
X
Vuelva a pulsar el botón para reanudar la reproducción tras
la pausa.
xZ
Después realice esta operación
Pulse . o > para seleccionar la pistas que
desee repetir, después pulse u.
Pulse u.
Pulse u.
Pulse u.
Pulse . o >, después pulse DISPLAY•
ENTER•MEMORY de las pistas que desee
programar en el orden deseado (máximo de 20
pistas) (consulte la ilustración E). Después pulse
u.
Pulse . o >, después pulse DISPLAY•
ENTER•MEMORY de las pistas que desee
programar en el orden deseado (máximo de 20
pistas). Después pulse u.
Pulse
x
u (X en el mando a distancia)
Vuelva a pulsar el botón para reanudar la reproducción tras
la pausa.
>
.
Z PUSH OPEN/CLOSE
> (avance) o . (retroceso) durante la reproducción
hasta que lo encuentre
> (avance) o . (retroceso) durante la pausa hasta
que lo encuentre
el botón numérico de la pista en el mando a distancia
Español
Reproducción de discos compactos
1 Pulse OPERATE (o POWER) para conectar el reproductor.
2 Coloque un CD en el compartimiento de CD.
3 Pulse Z PUSH OPEN/CLOSE para cerrar el compartimiento de CD.
4 Pulse u (N en el mando a distancia).
El reproductor reproduce todas las pistas una vez.
Para
detener la reproducción
introducir pausas durante la
reproducción
pasar a la pista siguiente
retroceder a la pista anterior
extraer el CD
localizar un punto mientras
escucha el sonido
localizar un punto mientras
se observa el visor
localizar una pista específica
directamente*
* No será posible localizar pistas específicas si “SHUF” o “PGM” está iluminado en el visor. Desactive
la indicación pulsando x.
Sugerencia
Para localizar una pista de número superior a 10, pulse >10 primero y, a continuación, los botones
numéricos correspondientes en el mando a distancia.
Ejemplo: Para reproducir la pista número 23, pulse >10 primero y, a continuación, 2 y 3.
Uso del visor
Para comprobar el número total de pistas y el tiempo de reproducción
Pulse DISPLAY•ENTER•MEMORY en el modo de parada (consulte la ilustración D).
Para comprobar el tiempo restante
Pulse DISPLAY•ENTER•MEMORY varias veces mientras se reproduce el CD. El visor cambia
de la siguiente forma:
t el número de pista actual y tiempo de reproducción
r
el número de pista actual y el tiempo restante de ésta*
r
el número de pistas y tiempo del disco restantes
* Para las pistas con un número superior a 20, el tiempo restante aparece como “- -:- -” en el visor.
Selección del modo de reproducción
Pulse MODE hasta que “REP 1” “REP ALL” “SHUF” “SHUF REP” “PGM” “PGM REP”
aparezca en el visor. A continuación, realice lo siguiente:
Para Seleccione
repetir una pista “REP 1”
repetir todas las pistas “REP ALL”
realizar la reproducción “SHUF”
aleatoria
repetir pistas en orden “SHUF REP”
aleatorio
realizar la reproducción “PGM”
de programa
repetir pistas programadas “PGM REP”
En el mando a distancia
Si ha seleccionado “PGM” o “PGM REP”, pulse los botones numéricos para las pistas que desee
programar en el orden que desee (máximo de 20 pistas), después pulse N.
Para cancelar el modo de reproducción seleccionado
Pulse MODE hasta que el modo seleccionado desaparezca del visor.
Para comprobar las pistas programadas y el orden de reproducción en el visor
Pulse DISPLAY
•
ENTER•MEMORY para comprobar el orden de las pistas antes de la
reproducción.
Cada vez que pulse el botón, el número de la pista aparecerá en el orden programado.
Para cambiar el programa actual
Pulse x una vez si el CD está parado y dos si está reproduciéndose. El programa actual se borrará.
A continuación, cree un programa nuevo. Para ello, realice el procedimiento de programación.
OPERATE
(POWER)
Then do this
Press . or > to select the track that you
want to repeat, then press u.
Press u.
Press u.
Press u.
Press . or > then press DISPLAY•ENTER•
MEMORY for the tracks you want to programme
in the order you want up to 20 tracks (see fig. E).
Then press u.
Press . or > then press DISPLAY•ENTER•
MEMORY for the tracks you want to programme
in the order you want up to 20 tracks. Then press
u.