RDP-X80iP_4-182-698-82(2)_CEK
Operations
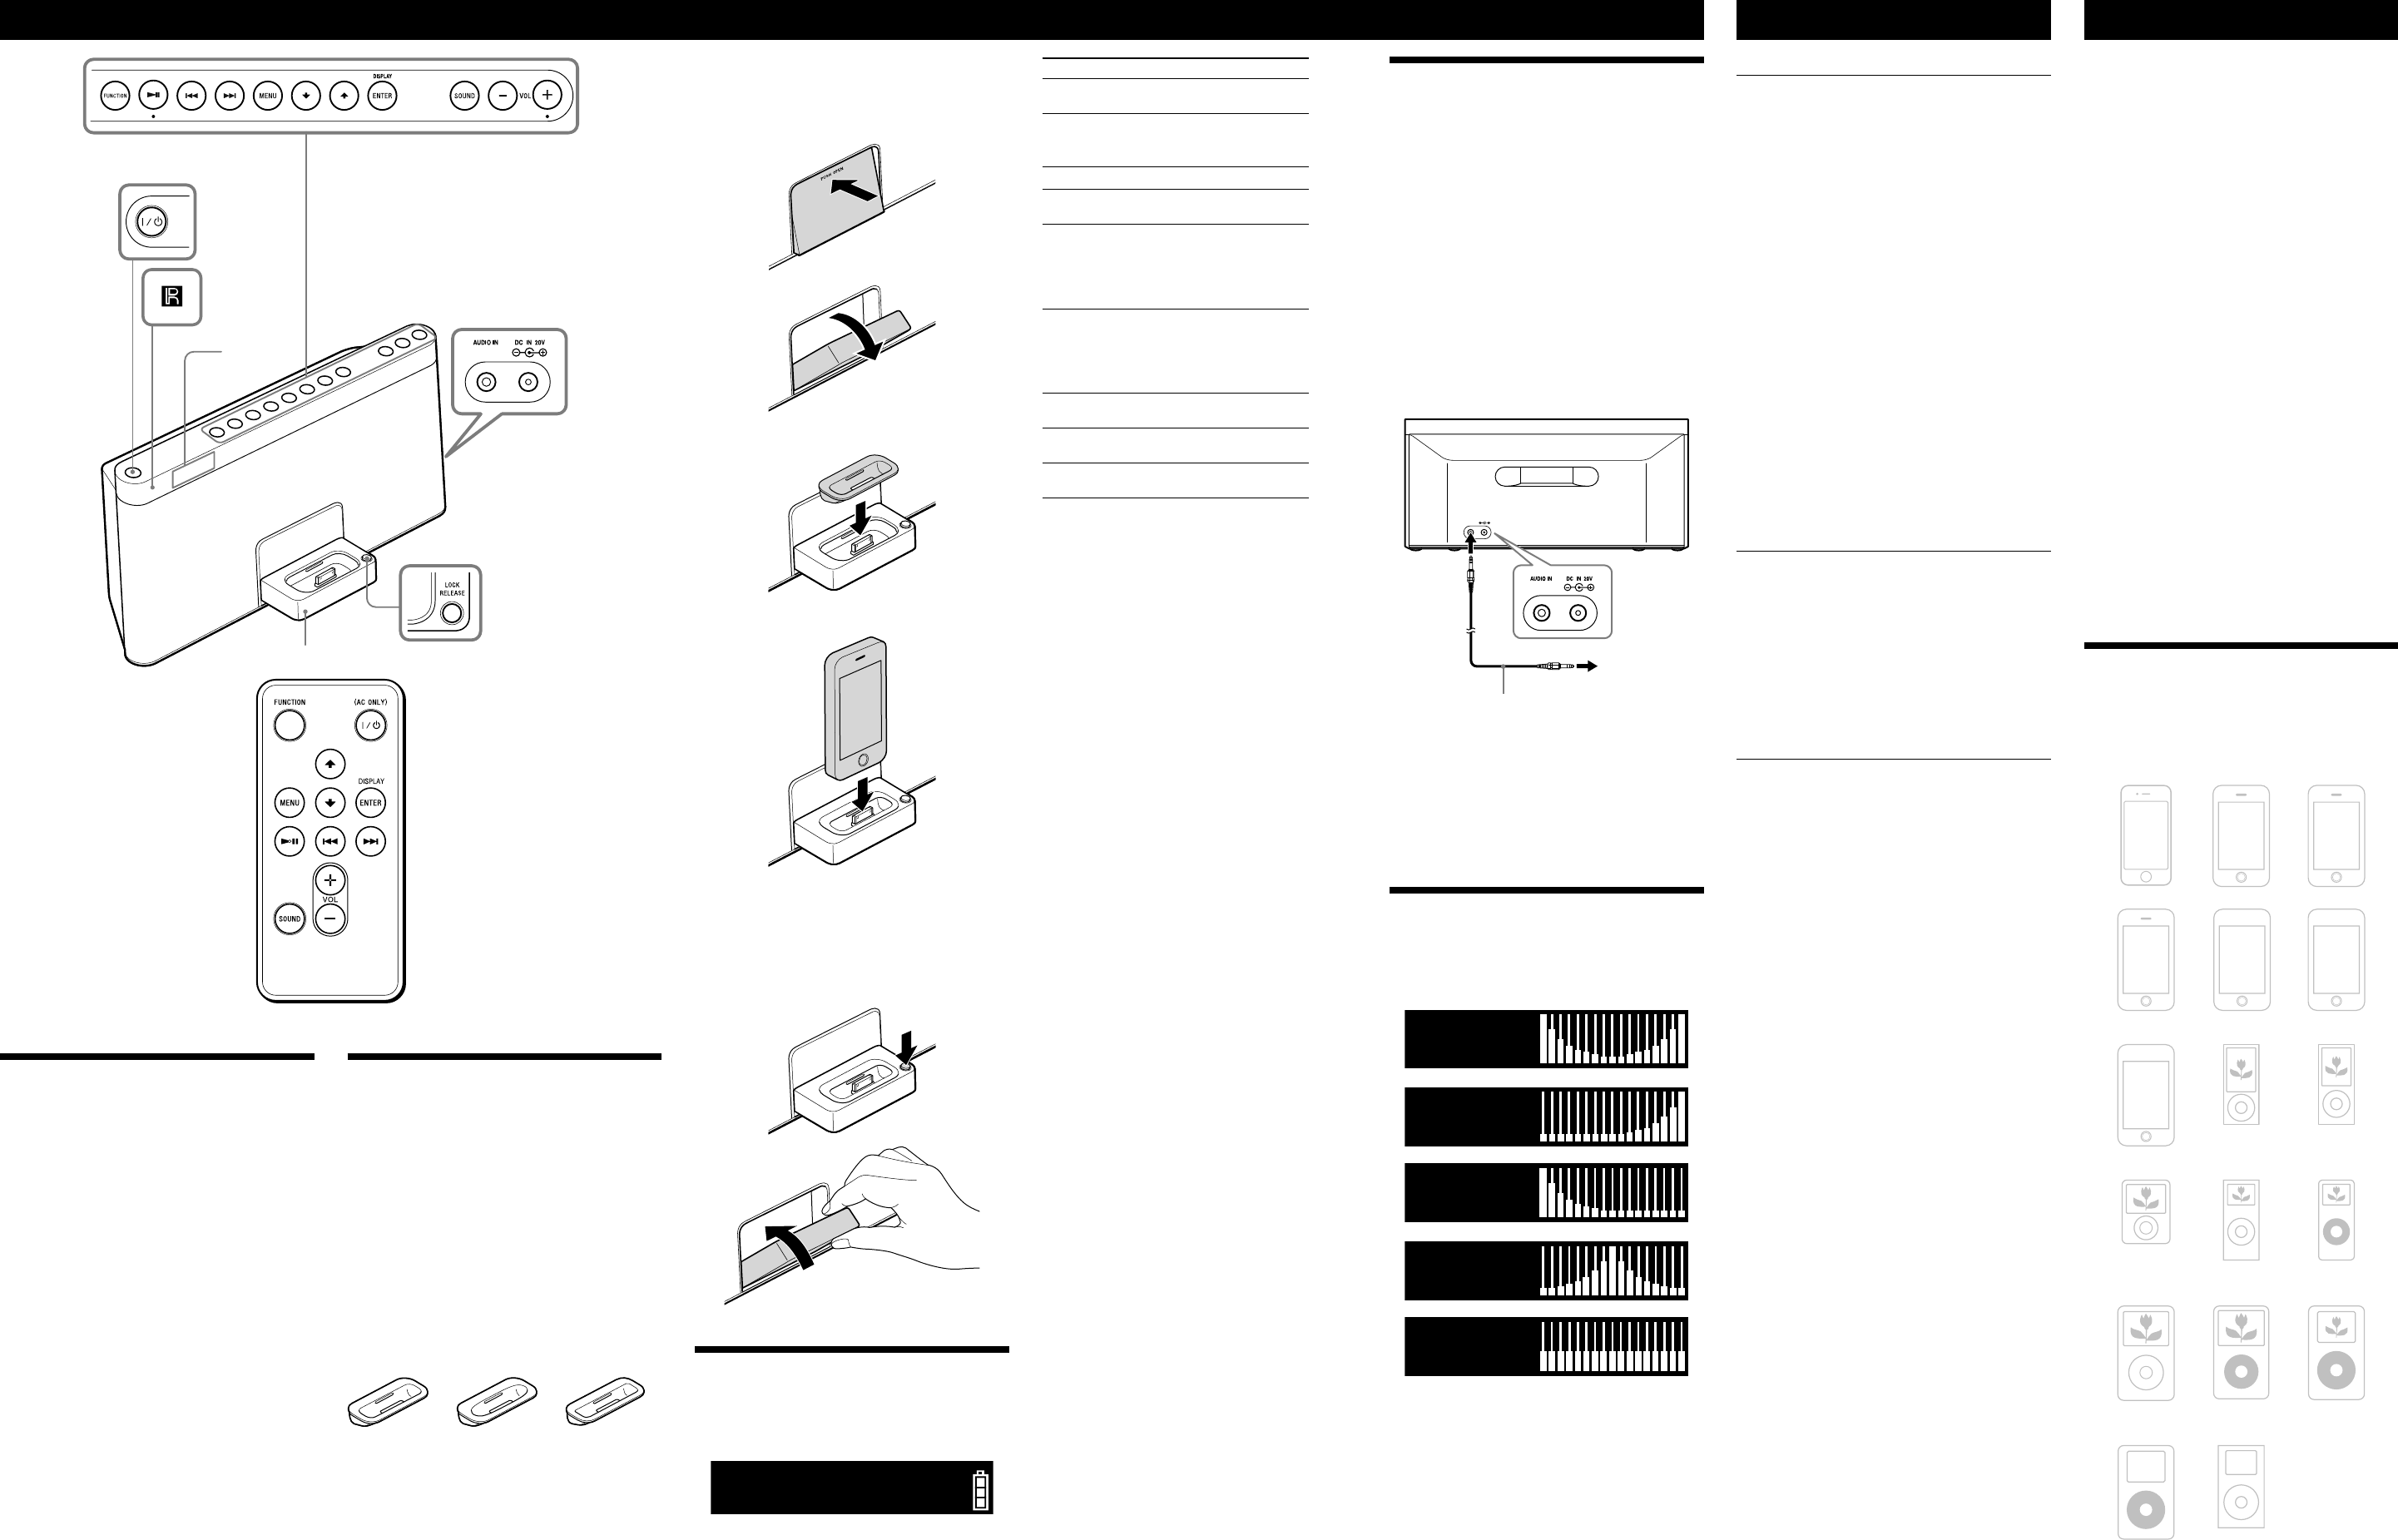
Display
Remote sensor
Docking Tray
VOL + and on the unit and the remote commander have a tactile dot.
Before using the unit
To turn on/off the power
Press (power).
(power) button indicator will light up in green when
the unit is turned on.
To adjust the volume
Press VOL +/−.
Note
• While the unit is turned off, only the (power) button will
function.
Power management system
After playback of the iPod (or component connected to
AUDIO IN jack) has finished, if no operation is
performed for about 20 minutes, the unit will
automatically turn off.
Notes
• While the unit is turned on, if no operation is performed for more
than about 30 seconds, the display turns off. In this case, press
DISPLAY to turn on the display again.
• The unit cannot be turned on with the remote commander when the
AC power adaptor is disconnected.
Power off hold function
You can set the power off hold function in order to avoid
unintentional powering on while carrying the unit.
To set the power off hold function
Press and hold (power) when the AC power adaptor
is disconnected.
“HOLD” flashes 2 times and the display turns off. The
unit cannot be turned on by pressing (power) while
the power off hold function is set.
To cancel the power off hold function
Press and hold (power).
“RELEASE” flashes 2 times and the power off hold
function is canceled. The unit will turn on automatically.
Tip
• The power off hold function will be canceled if you connect the AC
power adaptor to the unit.
To Press
Turn off the iPod Press and hold
.
Pause playback
To resume play,
press again.
Go to the next track
(forward)
Go back to the previous
track
(backward)*
Locate a point while
listening to the sound
(forward) or
(backward)
while playing and
hold until you
find the point.
Locate a point while
observing the display on
iPod
(forward) or
(backward)
in pause and hold
until you find the
point.
Go back to the previous
menu
MENU
Select a menu item or a
track for playback
(up)/ (down)
Execute the selected menu
item or begin playback
ENTER
* During playback, this operation returns you to the
beginning of the current track. To go back to the
previous track, press twice.
Notes
• When placing or removing the iPod, hold the iPod at the same angle
as that of the connector on this unit, and do not twist or bend the
iPod as connector damage may result.
• Do not carry the unit with an iPod set on the connector. Doing so
may cause a malfunction.
• When placing or removing the iPod, hold the Docking Tray
securely.
• Before disconnecting the iPod, pause playback.
On copyrights
iPhone, iPod, iPod classic, iPod nano, and iPod touch are
trademarks of Apple Inc., registered in the U.S. and other
countries.
“Made for iPod,” and “Made for iPhone” mean that an
electronic accessory has been designed to connect
specifically to iPod or iPhone, respectively, and has been
certified by the developer to meet Apple performance
standards. Apple is not responsible for the operation of
this device or its compliance with safety and regulatory
standards. Please note that the use of this accessory with
iPod or iPhone may affect wireless performance.
To use this unit as a battery charger for
your iPod
You can use the unit as a battery charger for your iPod.
Charge your iPod when the AC power adaptor is
connected.
The charging status appears in the display of iPod. For
details, see the user’s guide of your iPod.
Tip
• You can also charge your iPod without the AC power adaptor by
pressing FUNCTION to select “iPod” when the battery indicator
shows Level 1 or Level 2.
To set the iPod
1 Press PUSH OPEN on the Docking Tray at the front
of this unit to open.
The tray clicks to lock at the open position.
2 Attach the adapter for your iPod/iPhone.
3 Set your iPod/iPhone in the tray.
Tip
• Remove the case or cover from your iPod before setting it in the tray
to ensure a stable connection.
To close the Docking Tray
Press and hold LOCK RELEASE on the corner of the
Docking Tray and close the tray.
Operating an iPod
1 Press (power).
2 Press FUNCTION repeatedly until “iPod” appears in
the display.
3 Press .
The iPod begins to play back.
You can operate the connected iPod by this unit or the
buttons on iPod.
Opening/closing the Docking
Tray
You can enjoy audio from iPod by setting it in the
Docking Tray of this unit.
When setting an iPod in the unit, be sure to use the
supplied universal dock adapter with your iPod or
commercially available products from Apple Inc.
If you are using an iPhone, iPhone 3G, iPhone 3GS or
iPhone 4, attach the supplied universal dock adapter for
iPhone, iPhone 3G, iPhone 3GS or iPhone 4 before
connecting.
The adapter number, , or , is shown on the
underside of the supplied universal dock adapters. is
for the iPhone, is for the iPhone 3G & iPhone 3GS
and is for the iPhone 4. Check the adapter number
before use.
Universal Dock Adapter
Notes
• To use an iPod, refer to the user’s guide of your iPod.
• The connector of the unit is exclusively for use with an iPod. If you
use a device that does not match the connector, connect it to the
AUDIO IN jack of this unit with the supplied audio connecting
cable.
• Sony cannot accept responsibility in the event that data recorded on
an iPod is lost or damaged when using an iPod connected to this
unit.
• For details of environmental conditions for operating your iPod,
check the website of Apple Inc.
Connecting optional
components
You can enjoy the sound from an optional component
such as a portable digital music player through the
speakers of this unit. Be sure to turn off the power of
each component before making any connections. For
details, refer to the instruction manual of the component
to be connected.
1 Connect the AUDIO IN jack on the back of the unit
to the line output jack of the portable digital music
player or other component using an audio connecting
cable.
2 Press (power) to turn on the unit.
3 Turn the connected component on.
4 Press FUNCTION repeatedly until “AUDIO IN”
appears in the display.
The sound from the connected component is output
from the speakers of this unit.
Audio connecting
cable (supplied)
To external
equipment
Notes
• Refer also to the connected equipment’s manual.
• The supplied audio connecting cable may not be usable with some
external equipment. In this case, use a cord suitable for the external
equipment you are using.
• If you listen to the radio with external equipment connected, turn
off the connected equipment to prevent noise. If noise occurs, even
when the equipment is turned off, disconnect and place the external
equipment away from the unit.
Selecting audio emphasis
(equalization)
You can adjust the emphasis of the sound.
Press SOUND repeatedly to select the desired audio
emphasis.
Troubleshooting
General
The power will not turn on when the AC power
adaptor is connected.
• Make sure the AC power adaptor is connected to the wall outlet
firmly.
The power will not turn on when the AC power
adaptor is disconnected.
• The power off hold function may be set. In this case, cancel the
power off hold function. (See “Power off hold function.”)
• The rechargeable battery may be depleted. In this case, connect to
the AC power adaptor to charge the battery. (See “Preparing a power
source.”)
The buttons on the unit do not function.
• When the unit is turned off, only the (power) button functions.
Turn on the unit before operation.
The rechargeable battery is depleted.
• Connect to the AC power adaptor to charge the battery.
There is no audio.
• Adjust the VOL +/−.
Noise is heard.
• Ensure that the unit is not in the vicinity of in-use portable phones,
etc.
The display turns off.
• If no operation is performed for more than 30 seconds, the display
turns off. Press DISPLAY to turn on the display again.
“ERROR” appears in the display and the unit turns off
automatically.
• If this symptom occurs frequently, consult your nearest Sony dealer.
iPod
There is no audio.
• Make sure the iPod is connected firmly.
Operation is not performed.
• Make sure the iPod is connected firmly.
The iPod cannot be charged when the AC power
adaptor is disconnected.
• You cannot charge the iPod when the battery power of the unit is
low.
The Docking Tray cannot be closed.
• Press and hold the LOCK RELEASE while closing the Docking Tray.
Remote
The remote does not function.
• The unit cannot be turned on with the remote commander when the
AC power adaptor is disconnected. In this case, press
(power) on the unit to turn on.
• Replace the battery in the remote commander with a new one if it is
weak.
• Make sure that you are pointing the remote at the remote sensor on
the unit.
• Remove any obstacles in the path of the remote and the unit.
• Make sure the remote sensor is not exposed to strong light such as
direct sunlight or fluorescent lamp light.
• Move closer to the unit when using the remote.
If the problem persists, consult your nearest Sony dealer.
Specifications
Section for iPod
DC out: 5V
MAX: 500mA
General
Speaker
Approx. 7.6 cm dia. 4 Ω
Input
AUDIO IN jack (ø 3.5 mm stereo minijack)
Power output
20 W + 20 W (at 1% harmonic distortion)
(With the AC power adaptor)
Power requirements
Rechargeable battery pack:
NH - 2000 RDP
Battery life
See “Battery life” of “Using the rechargeable battery” for
details.
External power source
DC IN 20V
Dimensions
Approx. 356.0 mm × 162.8 mm × 119.7 mm (w/h/d)
Mass
Approx. 1.9 kg
Supplied accessories
Remote commander (1)
AC power adaptor (1)
AC power cord (1)
Audio connecting cable (1)
Universal Dock Adapter for iPhone (1)
Universal Dock Adapter for iPhone 3G & iPhone 3GS (1)
Universal Dock Adapter for iPhone 4 (1)
Design and specifications are subject to change without
notice.
Compatible iPod/iPhone
models
Compatible iPod/iPhone models are as follows. Update
your iPod/iPhone to use the latest software before you
use it.
iPod touch
3rd generation
iPhone 3GS
iPod
5th generation
(video)
iPod nano
2nd generation
(aluminum)
iPod mini
iPod nano
5th generation
(video camera)
iPhone
iPhone 4
iPod classic
iPod nano
3rd generation
(video)
iPod
4th generation
iPod touch
1st generation
iPod touch
2nd generation
iPhone 3G
iPod
4th generation
(color display)
iPod nano
1st generation
iPod nano
4th generation
(video)
Notes
• In these Operating Instructions, “iPod” is used as a general reference
to iPod functions on an iPod or iPhone, unless otherwise specified
by the text or illustrations.
• The connector of the unit is solely for use with an iPod. If you use
devices that do not have the same connector, connect to the AUDIO
IN jack of this unit with the supplied audio connecting cable.
• Sony cannot accept responsibility in the event that data recorded to
an iPod is lost or damaged when using an iPod connected to this
unit.


