811-837191W080
Symptom Cause (and remedy)
• EnsuretheACpoweradapterisconnected.
• Theunitisnotturnedon.
• MakesurethatyouselectONmode.
• Thesystemisinpausemode.Pressthe
PLAYbuttontoreturntonormalplaymode.
• Theunitisinfast-forwardorfast-reversemode.Pressthe
PLAYbuttontoreturnto
normal play mode.
• MakesuretheAUDIO/VIDEOoutputconnectionsarecorrect.
• TheDTSDVDdisccannotbedecodedtohavespeakeroutput.
• Theunitistoohot;shutotheunitfor30minutestocoolitdown.
• Theregionnumberofthediscdoesn'tmatchtheregionnumberofthisunit.
• Cleanthedisc.
• Thediscisscratched.
• PleaseadjusttheLCD'sbrightnessandcontrastusingtheSETUP button on the panel.
• Theplugsandjacksaredirty.Wipethemwithaclothslightlymoistenedwithalcohol.
• Cleanthedisc.
• Thereisnodiscinside.(“NoDisc”appearsonthescreen).
• Insertthedisccorrectlywiththeplaybacksidefacingdown.
• Cleanthedisc.
• Theunitanddiscregionnumberareincompatible.
• Condensationmayhaveformedinsidetheunitduetoasuddenchangeintemperature.
Wait about an hour for it to clear and try again.
No power.
No sound or only
a very low-level
sound is heard.
No picture.
The picture is not
clear.
Severe hum or
noise is heard.
The disc does
not play.
System setup
1. Press the SETUP button in stop mode.
2. Press the
button to select System Page.
3. Press the / buttontoselecttheoption(TV
Display or Default), then press the
/ button to adjust the settings, then
press the
PLAYbuttontoconrm.
5. Repeat steps 3 and 4 to adjust other options. Press
the button to return to the previous menu.
6. Press the SETUP button to exit the menu.
Default
Ittakes3-5secondstoresettheDVDsettingstothefactorydefault.
TV Display
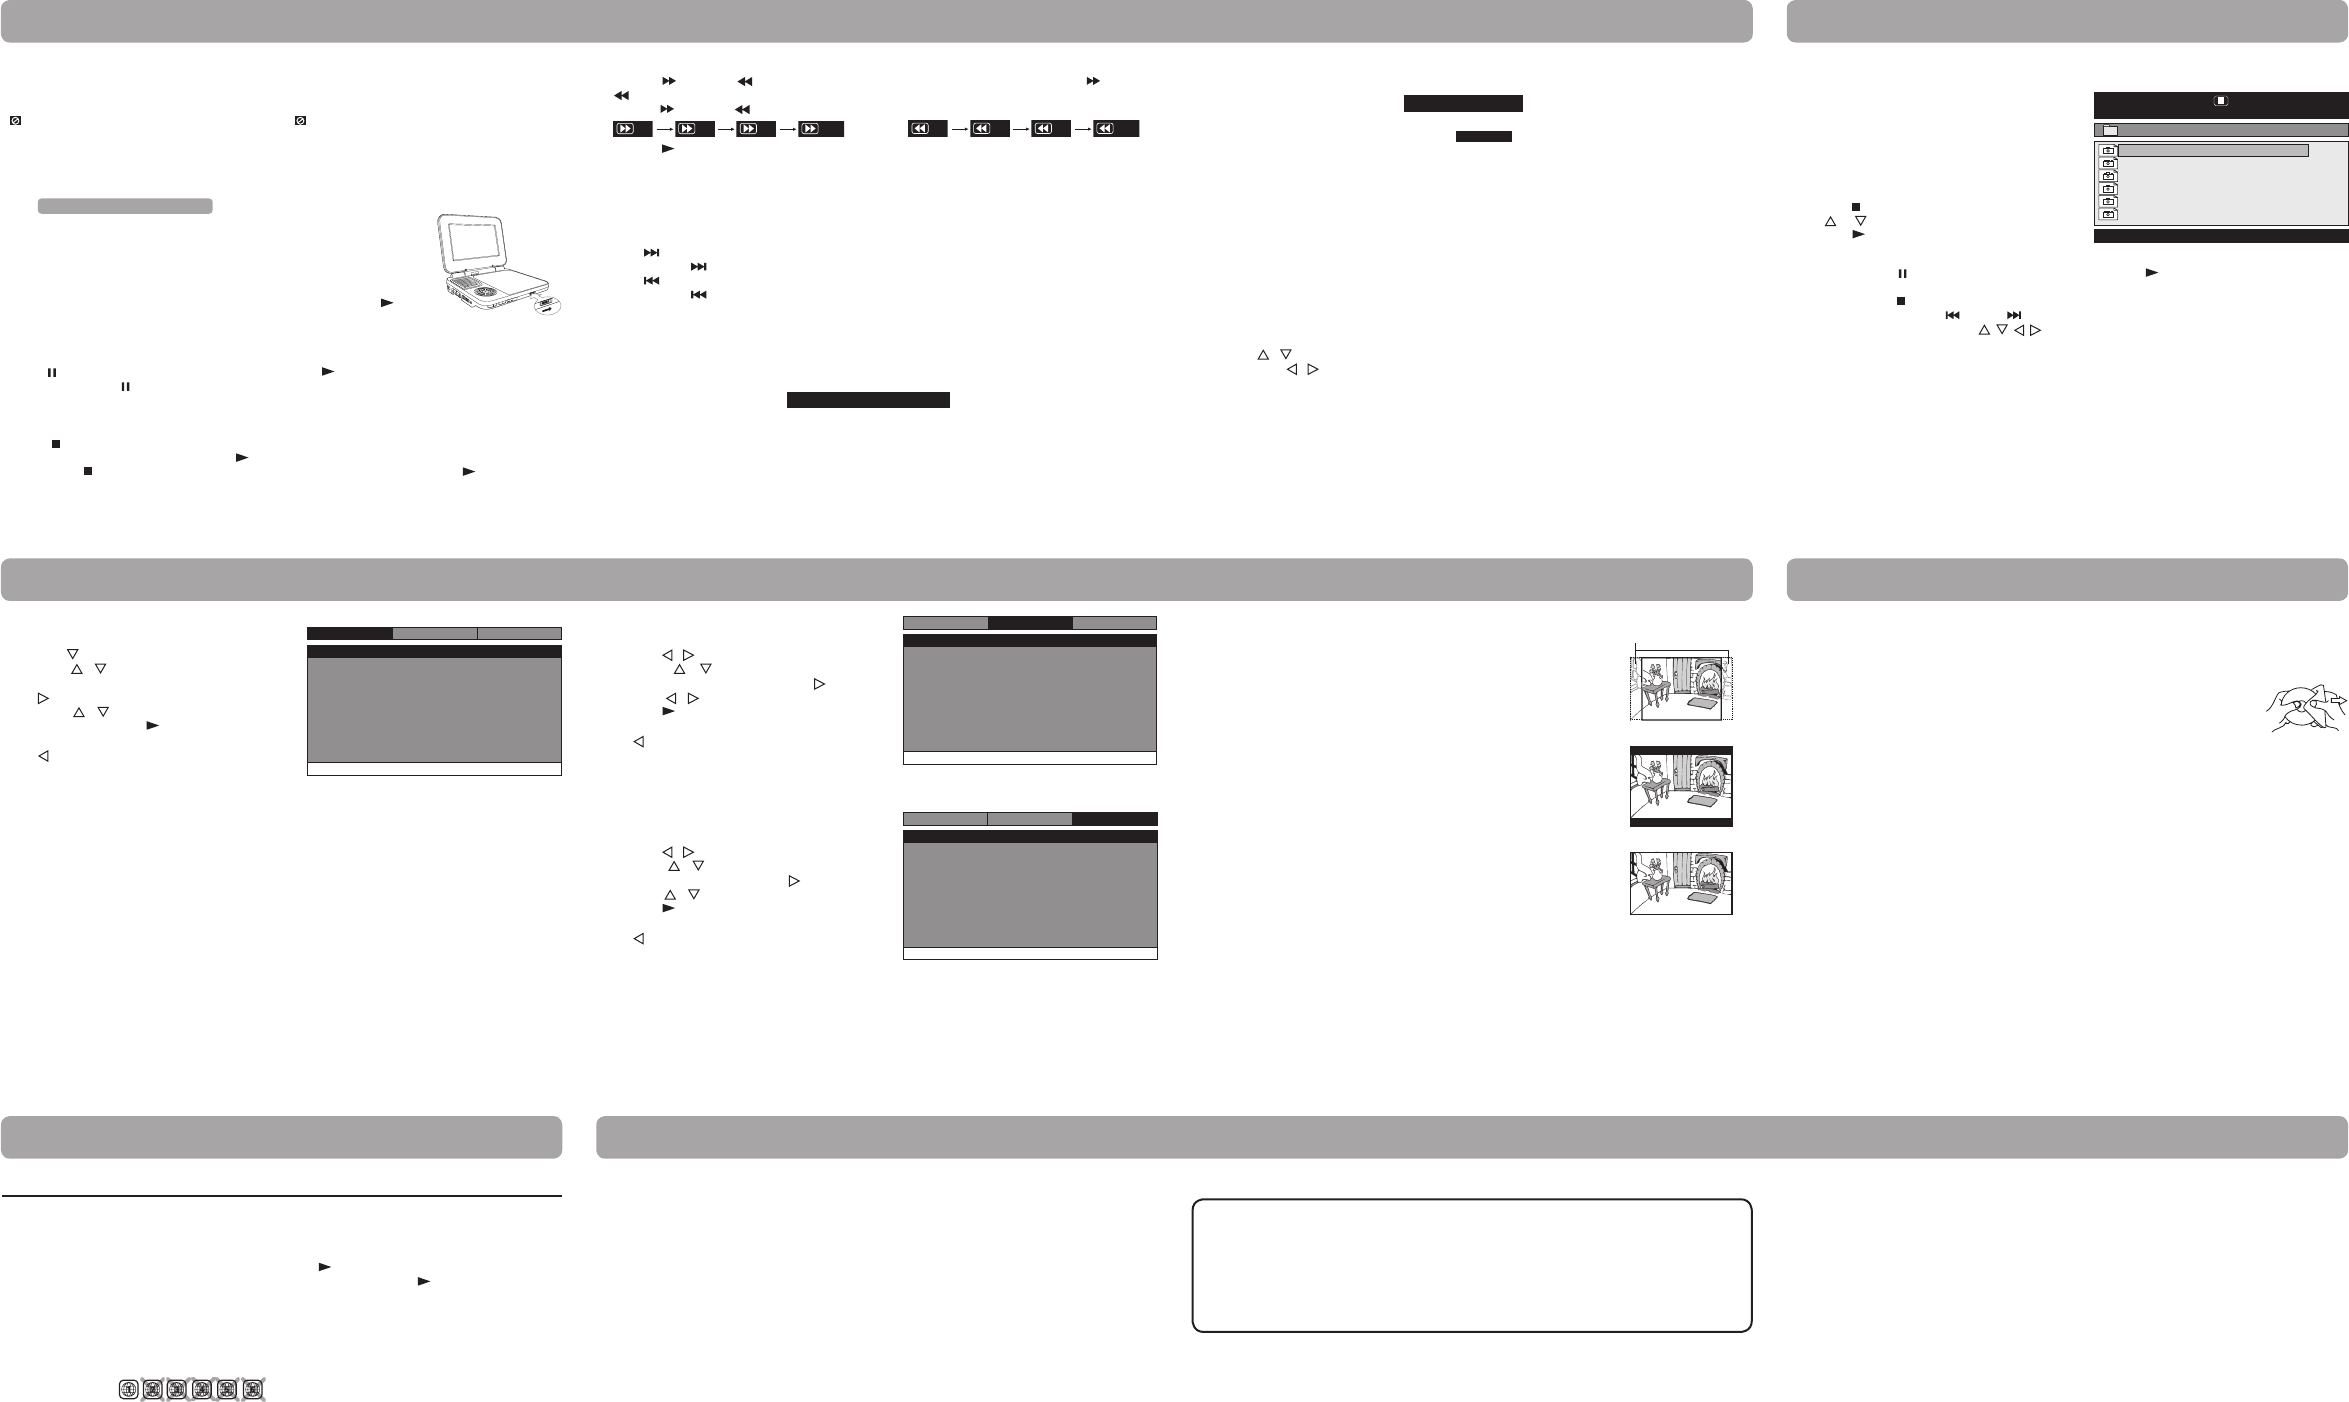
Pan Scan
• Whenwide-screenvideoisplayed,thismodeclipstherightandleftsides
of the image so that it can be viewed on a conventional screen.
• Somewide-screenDVDsthatdonotpermitPanScanmodeplaybackare
automatically played in letterbox mode (black bands that appear at the top
and bottom of the screen).
LetterBox
• Whenwide-screenvideoisplayedinthismodeonaconventionalscreen,
black bands appear at the top and bottom of the screen.
Wide Screen
• Thisisthecorrectmodeforplayingwide-screenvideosontheunitscreen
or other external wide-screens.
Notes:
• ThedisplayablepicturesizeispresetontheDVD.Thereforetheplayback
pictureofsomeDVDsmaynotconformtothepicturesizeselected.
• WhenyouplayDVDsrecordedinthe4:3aspectratio,theplaybackpicture
willalwaysappearinthe4:3aspectratioregardlessoftheTVdisplay
setting.
• SelectWideScreentoconformtheLCDscreenontheunit.Alwaysbesure
thatyourTVdisplayconformstotheactualTVinuseifyouconnectthe
unittoaTV.
Wide Screen
LetterBox
Cut off when a wide-screen
video image is played.
Pan Scan
Tv Display
Default
Wide
No
Go To SystemPage
--SystemPage --
System
Language
Video
Languagesetup
1. Press the SETUP button in stop mode.
2. Press the
buttontoselectLanguageSetupPage.
3. Press the
button to select the option (OSD
Language,Audio,SubtitleorDiscMenu),thenpress
the
button.
4. Press the / button to select your preferred
language, then press the PLAYbuttontoconrm.
5. Repeat steps 3 and 4 to adjust other options. Press
the
button to return to the previous menu.
6. Press the SETUP button to exit the menu.
Notes:
• SomeDVDsmaynotplayintheaudiolanguageyouselected.Apriorlanguagemaybeprogrammedon
the disc.
• SomeDVDsmaybesettodisplaysubtitlesinalanguageotherthantheoneyouselected.Apriorsubtitle
language may be programmed on the disc.
• SomeDVDsallowyoutochangesubtitleselectionsusingthediscmenuonly.Ifthisisthecase,pressthe
MENU button and choose the appropriate subtitle language from the selection on the disc menu.
• SomeDVDsmaynotincludeyourpre-selectedlanguage.Inthiscase,theDVDplayerautomaticallydisplays
disc menus consistent with the disc's initial language setting.
Videosetup
1. Press the SETUP button in stop mode.
2. Press the
buttontoselectVideoSetupPage.
3. Press the
button to select the option
(Brightness or Contrast), then press the
button to adjust the setting, then
press the
PLAYbuttontoconrm.
5. Repeat steps 3 and 4 to adjust other options. Press
the
button to return to the previous menu.
6. Press the SETUP button to exit the menu.
Go To Language Setup Page
--Language Setup Page --
System
Language
Video
OSDLanguage
Audio
Subtitle
Disc Menu
Eng
Eng
Off
Eng
Brightness
Contrast
Go To Video Setup Page
--Video Setup Page --
Language
00
00
System
Video
This owner’s manual explains the basic instructions for operating this unit. Some DVDs are produced in
a manner that allows specic or limited operation during playback. Therefore, this unit may not respond
to all operating commands. THIS IS NOT A DEFECT. Please refer to the instructions accompanying the
specic DVD in question for more information about the options available on that DVD.
“ ” may appear on the screen during operation. A “ ” means the desired operation is not permitted
by the unit or disc.
Playing a disc (basic playback)
Troubleshooting guide
Maintenance
Customizing the function settings
ViewingJPEGles
Cleaning the disc
A defective or soiled disc inserted into the unit can cause sound to drop out during playback.
Handle the disc by holding its inner and outer edges.
• DoNOTtouchthesurfaceoftheunlabeledsideofthedisc.
• DoNOTstickpaperortapeonthesurface.
• DoNOTexposethedisctodirectsunlightorexcessiveheat.
• Cleanthediscbeforeplayback.Wipethediscfromthecenteroutwardwithacleaning
cloth.
• NEVERusesolventssuchasbenzineoralcoholtocleanthedisc.
• DoNOTuseirregularshapeddiscs(example:heartshaped,octagonal,etc.).Theymaycausemalfunctions.
Cleaning the unit
• BesuretoturntheunitoanddisconnecttheACpoweradapterbeforecleaningtheunit.
• Wipetheunitwithadrysoftcloth.Ifthesurfacesareextremelydirty,wipecleanwithacloththathas
been dipped in a weak soap-and-water solution and wrung out thoroughly, then wipe with a dry cloth.
• Neverusealcohol,benzine,thinner,cleaningfluidorotherchemicals.DoNOTusecompressedairto
remove dust.
Important note
• Beforetransportingtheunit,removethediscfromthedisccompartment.
ThisunitcanplayJPEGlesrecordedonaCD-RorCD-ROMdisc(CD-RWisnotrecommended).
ViewingJPEGles
1. Slide the open knob rightwards to open the disc
door.
2. HoldaJPEGlediscbyitsedgesandgentlypushit
onto the spindle with the label side facing up until
youheara“click”.
3. Closethediscdoor.TheJPEGlesonthediscwillbe
displayed automatically or a folder list appears.
4. Press the
STOP button to display a folder list. Press
the or
buttontohighlightaJPEGletoplay.
Press the PLAY button to start playback.
Notes:
• Youcanpressthe PAUSEbuttontofreezethepicture.Pressthe PLAYbuttontoresumepictureslide
show.
• Youcanpressthe STOP buttontoquitplayback.
• Youcanpressandholdthe PREV or NEXT button to change the picture.
• YoucanpresstheCursorbuttons(
) to rotate direction of the picture by 90
o
.
• Somediscsmaynotpermitthisoperation.
00:00 00:00
001/035
\
DSCN0281
DSCN0282
DSCN0283
DSCN0284
DSCN0285
DSCN0286
Pausing playback (still mode)
Press the PAUSEbutton.Toresumenormalplayback,pressthe PLAYbutton.
Eachtimeyoupressthe PAUSEbutton,thepictureadvancesoneframeonaDVD.
Skip (forward / reverse)
Press the
NEXTbuttontoadvancechaptersonaDVD.
Press and hold the
NEXTbuttontoskiptothenexttracksonanAudioCD.
Press the
PREVbuttontogobacktothepreviouschaptersonaDVD.
Press and hold the
PREVbuttontoskiptotheprevioustracksonanAudioCD.
Stopping playback
Press the STOP button at the location where you want to interrupt playback. To resume playback at the
position where the disc was stopped, press the PLAY button.
If you press the STOP button twice, the unit’s memory will be cleared and pressing the PLAY button will
resettheDVDtothebeginning.
Playing a disc
1. Slide the CHARGE / STANDBY / ON switch on the left side of the unit to the ON position.
See Customizing the function settings before proceeding to step 2.
2. Slide the open knob rightwards to open the disc door.
3. Hold the disc by its sides and carefully place it onto the spindle with the label
sidefacingup,pushinggentlyuntilyouheara“click”.
4. Gentlypushthediscdoorclosed.Ittakesashortwhileforyourunittoload
thedisc.Afterloading,formostDVDs,theunitwillautomaticallystartplaying
or take you to the main menu.
5. IftheunitdoesnotautomaticallystartplayingtheDVD,pressthe PLAY
button.
AdjusttheLCDscreen
YoucanadjusttheBrightness,PanelDisplayorContrastoftheLCDscreeninplaybackmode.
1. Press the SETUP button in playback mode.
2. Press the
button to select Brightness, Panel Display or Contrast.
3. Then press the
/ button to change the setting.
4. Press the SETUP button to exit the menu.
Subtitle selection
1. WhileaDVDisplaying,presstheSUBTITLE button to display the current language setting, as shown in the
example.
2. Press the SUBTITLE button repeatedly to select the desired subtitle language. You can turn subtitles o by
pressing the SUBTITLEbuttonrepeatedlyuntil“
”isdisplayed.
Notes:
• SomeDVDsaresettodisplaysubtitlesautomatically,andyoucannotturnthemoffevenifyousetthe
subtitle function to o.
• Duringsomescenes,thesubtitlesmaynotappearimmediatelyafteryouselectyourdesiredscene.
• Thenumberofsubtitlelanguagesrecordeddiersdependingonthedisc.Ifonlyonelanguageisrecorded,
the language does not change.
• Thisfunctioncanonlybeusedfordiscsonwhichsubtitleshavebeenrecordedinmultiplelanguages.
• SomeDVDsallowyoutochangesubtitlesviathediscmenuonly.Ifthisisthecase,presstheMENU button
and choose the appropriate subtitle on the disc menu.
Fast forward / Fast reverse
1. Press the
SEARCHbuttonwhenaDVDisplaying.Eachtimeyoupressthe
SEARCHbutton,theplaybackspeedchangesinthefollowingsequence:(ForanAudioCD,pressand
hold the
SEARCHbuttontoperformfastforward/reverse.)
2. Press the
PLAYbuttonwhenyoureachthedesiredpointtoresumenormalplayback.
Notes:
• TheDVDplayermutessoundandsubtitlesduringreverseandforwardscanofDVDs.
• Thefastplaybackspeedmaydierdependingonthedisc.
Audio selection
OnsomeDVDs,thesoundisrecordedintwoormoreformats.Followthedirectionsbelowtoselectthepreferred
language and sound system.
1. While a disc is playing, press the AUDIO button to show the current audio format number.
2. Press the AUDIO button repeatedly to select the desired audio format.
Notes:
• IfonlyoneaudioformatisrecordedontheDVD,thenumberdoesnotchange.
• SomeDVDsallowyoutochangeaudioselectionsviathediscmenuonly.Ifthisisthecase,presstheMENU
button and choose the appropriate language on the disc menu.
• Youcanselectdierentaudiochannels(Stereo,MonoLeft,MonoRightorMix-Mono)onanAudioCDby
pressing the AUDIO button repeatedly.
Audio1/3:DolbyD2ch EnglishAudio1/3:DolbyD2ch English
Subtitle 02/03:SpanishSubtitle 02/03:Spanish
Printed in China
Limitedwarranty
AVC MULTIMEDIA (“AVC”) makes the following limited warranty. This limited warranty extend to the original
consumer purchaser and is limited to non-commercial use of the product.
One Year Parts & Labor Warranty
AVC products purchased in the United States or Canada are warranted to be free from defects in materials or
workmanship for a period of one year from the date of their original retail purchase. If the unit fails to conform to
this warranty, we will service the product using new or refurbished parts and products, at AVC’s sole discretion.
During a period of one year from the eective warranty date, AVC will provide, when needed, service labor to
repair a manufacturing defect at its designated Service Center. To obtain warranty service in the United States or
Canada, you must rst call our Customer Support Center at 1-800-506-5746 or 1-877-252-6873, during the
hours listed in the box on the right. The determination of service will be made by AVC Customer Support. PLEASE
DO NOT RETURN YOUR UNIT TO AVC WITHOUT PRIOR AUTHORIZATION. New or remanufactured replacements
for defective parts or products will be used for repairs by AVC at its designated Service Center for one year from the
eective warranty date. Such replacement parts or products are warranted for an additional one year from the date
ofrepairorreplacement.TheCustomerwillberequiredtoshiptheunittotheServiceCenterindicatedatthetime
Customer Support is contacted to make the necessary repairs. The customer is responsible for all transportation
charges to the service facility.
Packaging and Shipping Instruction
When you send the product to the AVC service facility you must use the original carton box and packing material or an
equivalentasdesignatedbyAVC.
LIMITEDWARRANTY
Your Responsibility
1) You must retain the original sale receipt to provide proof of purchase.
2) These warranties are eective only if the product is purchased and operated in the United States or Canada.
3) Warranties extend only to defects in material or workmanship, and do not extend to any product or parts which
have been lost or discarded, or damage to product or parts caused by misuse, accident, improper operation or
maintenance, or use in violation of instructions provided with the product, or to product which has been altered or
modied without authorization of AVC, or to products or parts thereof which have had the serial number removed
or changed.
Out of Warranty
All warranties implied by state law, including the implied warranties of merchantability and tness for a particular
purpose, are expressly limited to the duration of the limited warranties set forth above. With the exception of
any warranties implied by state law as hereby limited, the foregoing warranty is exclusive and in lieu of all other
warranties, guarantees, agreements and similar obligations of manufacturer or seller with respect to the repair or
replacement of any parts. In no event shall AVCbeliableforconsequentialorincidentaldamages.
No person, agent, distributor, dealer or company is authorized to change, modify or extend the terms of these
warranties in any manner whatsoever. The time within action must be commenced to enforce any obligation of
AVC arising under the warranty or under any statute, or law of the United States or Canada or any state thereof, is
hereby limited to one year from the date of purchase. This limitation does not apply to implied warranties arising
under state law.
This warranty gives you specic legal rights and you may also have other rights, which may vary, from state to state.
Some states do not allow limitation on how long an implied warranty lasts, when an action may be brought, or the
exclusionorlimitationofincidentalorconsequentialdamages,sotheaboveprovisionsmaynotapplytoyou.
For more information on other products and services, please visit our web site at
www.RCAav.com
Important:
Alsokeepyour"BillofSale"asproofofpurchase.
Modelno......................................................................Productname .......................................................................
Type of set .......................................................................... Serial no.. .................................................................................
Invoice no. .......................................................................... Date purchased. ....................................................................
Dealer name ......................................................................
FORSERVICEANDREPAIR,PLEASEVISIT
www.RCAav.com
Specifications and external appearance are subject to change without notice.
©2009AVCMULTIMEDIA
Intheeventyourproductrequiresrepairafterthelimitedwarrantyperiodhasexpired,pleasecontactour
Customer Support Center at 1-800-506-5746, 1-877-252-6873 or
www.RCAav.com
Hours: Monday–Thursday: 9am–7pm, Friday: 9am–5pm, Saturday: 9am–NOON Eastern time.
Important:
You are responsible for any transportation, shipping or insurance relative to the return of product to our
Product Returns Center.


