


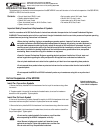

3
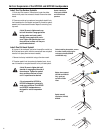
Horizontal Suspension of the HPR122i
The pull-back bar must be installed when suspending the HPR122i
in a horizontal position. Additionally, the eyebolts must be installed
in the side panel locations that will be the "top" of the enclosure.
Note that the HPR122i can be suspended horizontally with the high
frequency device on the right side or the left.
Pull-back bar below (preferred)
The preferred installation location for the pull-back bar is on the bot-
tom of the horizontally oriented enclosure (opposite the eyebolt
side). This location yields the maximum range of tilt.
Pull-back bar above (alternate)
Alternately, the pull-back bar can be installed on the top of the
enclosure (same side of the enclosure as the eyebolts). This may
help to hide the hardware from sight for appearance reasons, but
the range of tilt is limited.
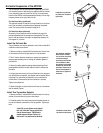
Install the Pull-back Bar
The pull-back bar must only be attached to one of the two side M10
installation locations, as shown.
1- Remove the factory installed M10 flat-head screw from the side
of the enclosure to which the pull-back bar is to be attached.
2- Test fit the pull-back bar, attachment, washers, and gaskets to
ensure proper assembly prior to sticking self-adhesive gasket to
pull-back bar.
3- Attach the rubber gasket by peeling adhesive backing off and
pressing adhesive side to the pull-back bar where it contacts the
enclosure.
4- Using a 6mm hex wrench, bolt the pull-back bar to the enclosure
with the M10 button-head bolt, lock washer, and flat washer. Before
tightening fully, ensure the pull-back bar’s cut-out matches the
curved corner of the enclosure (switch orientation if required).
Tighten button-head bolt.
5- Attach the eyebolt to the pull-back bar with hex nut, lock washer,
and flat washer. Tighten.
Install Two Top-surface Eyebolts
1- Remove the factory installed M10 flat-head screws from the top
surface of the enclosure using a 6mm hex wrench.
2- Thread an eyebolt into each the enclosure’s threaded inserts; do
not use flat washers or standoffs on the top eyebolts. Tighten eye-
bolts.
•Note! Be sure to tighten each eyebolt
bolt until shoulder is snug against the
side of the enclosure. Tighten each
eyebolt down and then continue to
rotate until it is positioned as desired.
Installation of pull-back
bar below the enclosure
(preferred).
Installation of pull-back
bar above the enclosure.
Pull-back bar assembly-
Note location of offset
cut-out on bar and orient
to enclosure shape
according to which side
it is mounted on. Adhe-
sive gasket is to be used
between the bar and the
enclosure. Ensure use of
flat and lock washers in
order shown. Tighten all
hardware.