


14
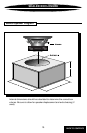
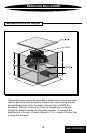
SEALED ENCLOSURE
Building a Sealed Enclosure:
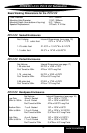
1. Build a sealed enclosure with internal L x W x D as specified for
your woofer (See recommended enclosures for your woofer). Use
3/4” thick MDF for the enclosure. Be sure to use wood glue and
silicone to ensure your enclosure is sealed properly, as air leaks
will affect the performance of your subwoofer.
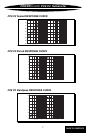
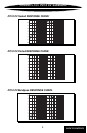
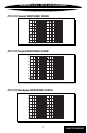
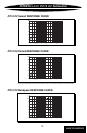
2. Using the supplied template, trace the appropriate circle and
mounting hole pattern for your PowerClass C2 subwoofer on the
baffle board. (See diagram)
3. Cut the speaker hole from the baffle board with a router,
using a guide or template whenever possible. Use a jig saw only
if a router is not available.
4. Place the woofer in the opening which you have cut in the
baffle to check the fit.
5. Run an appropriate length of wire into the enclosure, leaving
enough length to comfortably install the wires to the terminals on
the woofer before placing the speaker into its mounting hole. Use
a terminal cup whenever possible.
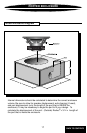
6. Vacuum out any wood shavings and dust from the inside of the
enclosure. (Failure to do so may void your warranty.) Loosely
fill the box half way with polyester fiberfill.
7. Connect the wires to the woofer observing the proper polarity,
positive and negative terminals. Strip away the insulation of
the wire about 1/4" and install the wires into the terminal posts.
8. Install the woofer into the enclosure using #8 or larger wood
screws (not supplied)
9. Once the enclosure is complete, it is time to connect the speaker
wire coming from the subwoofer enclosure to your amplifier.
Check that you use the proper wire for consistent polarity,
positive and negative. (Refer to your amplifier owner’s manual.)
10. Finally, sit back and enjoy the incredible enhancement
your new PowerClass C2 subwoofer brings to your audio
system.
BACK TO CONTENTS