


BACK TO CONTENTS
13
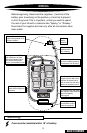
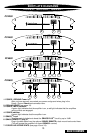
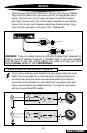
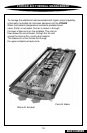
ENDPLATE DIAGRAM
6600
SUB WOOFER
L- L + REM R + R-
REAR
L- L + R+ R-
REAR INPUTS
L / R
FRONT INPUTS
L / R
FRONT
GAIN
REAR
GAIN
-12dB
SUB
GAIN
COMBINE
XOVER FREQ.
QBASS
FRONT
REAR
1
2
FRONT
L- L + R+ R-
Q SELECT 4/2
1
2
345
6
7
8
9101112
13
14
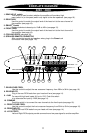
1. FRONT GAIN
Use this control to match the output level of the head unit to the front channel of
the amplifier (see page 18).
2. REAR GAIN
Use this control to match the output level of the head unit to the rear channel of
the amplifier (see page 18).
3. SUB GAIN
Use this control to match the output level of the head unit to the sub channel of
the amplifier (see page 18).
4. COOLING VENTS (see page 18).
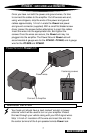
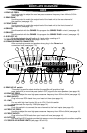
5. SPEAKER/REMOTE CONNECTOR
After connecting remote and speaker wires, plug in the
PowerLock
connectors here with the screws facing up (see pages 7-9).
6. COMBINE
Push this switch in to connect the rear channels to the front inputs (see page 18).
7. Q SELECT 4/2
Push this button in for a Q setting of 4 and out for a setting of 2 (see page 15).
8. QBASS 1
Use this switch with the QBASS 2 to program the
Q
BASS PLUS
™
circuit. (see page 15).
9. QBASS 2
Use this switch with the QBASS 1 to program the
Q
BASS PLUS
™
circuit. (see page 15).
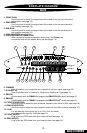
10. FRONT XOVER FREQ.
Use this control to adjust the front crossover frequency from 20Hz to 5kHz (see page 16).
11. REAR XOVER FREQ.
Use this control to adjust the rear crossover frequency from 20Hz to 5kHz (see page 16).
12. -12dB
For use with high level inputs (4V up to 12V). Push this switch
in to attenuate the input by 12dB (see page 14).
13. FRONT INPUTS
Plug in the front RCA leads from your head unit here (see page 14).
14. REAR INPUTS
Plug in the rear RCA leads from your head unit here (see page 14).