


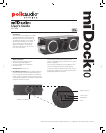

2. Dock Your iPod. With your miDock
™
10 turned off, slide the Slide Connector to the left
for iPod nano or to the standard position (right) for all other models.
Flip the flat-plate adapter to accommodate changes in depth between the Video iPods
and the other iPods that share slots in the docking cradle.
Slide the supplied adapter that matches your iPod into your
miDock
™
10 docking cradle.
For best sound performance, turn off the iPod EQ settings. Follow the instructions for
EQ settings that were supplied with your iPod.
Insert your iPod into the docking cradle and push down gently but firmly to ensure that
the docking connector is fully seated and your iPod is securely held in the cradle.
Caution—Listen To This!
Slots for your miDock
™
10 adapters are clearly marked inside the docking cradle. Use
the slot that matches your iPod to ensure a proper fit for your iPod and to prevent
connector damage.
3. Turn It Up! Your
miDock
™
10 turns on automatically when you insert
your iPod. To play music, press play on your iPod or remote control.
Caution—Listen To This!
Set your miDock
™
10 volume at a safe level before playing music.
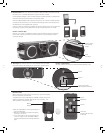
Remote Control
Before using the remote control for the first time, pull out the plastic
tab from the battery compartment.
To replace the remote control battery (CR2025), carefully insert a thin
object into the battery release, slide the tab over and hold it. Then
slide the battery compartment open.
Battery
Release
Power
Volume
Track Skip (Hold for
Fast-Forward or Rewind)
Power
Volume
Track Skip
(Hold for Fast-Forward
or Rewind)
Play/Pause
Press to Open
the Docking
Cradle
Slide
Connector
• Use only fresh battery of the required size and
recommended type.
• Dispose of old battery promptly and properly.
Do not burn or bury it.
• If you do not plan to use the miDock™10 for a
month or longer, remove the battery. Battery
can leak chemicals that can damage electronic
parts.