


9
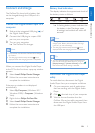
Battery level indication
The display indicates the approximate levels of
the battery status as follows:
100% 75% 50% 25% 0%
A ashing battery screen indicates that »
the battery is low. The player saves
all settings and switches off within 60
seconds.
Note
Rechargeable batteries have a limited number of •
charge cycles. Battery life and number of charge
cycles vary by use and settings.
The charging animation stops and the • icon is
displayed when the charging process is completed.
Tip
You can conserve battery power and increase the •
play time of the Digital Audio Player if you go to <
[Display Settings] < [Screen off timer] and ensure
that the shortest timer setting is selected.
Disconnect the Digital Audio Player
safely
To avoid data loss, disconnect the Digital
Audio Player from your computer as follows:
1 On your computer, exit all applications
that are working with the Digital Audio
Player.
2 Click in the task tray of your computer.
3 Wait for the conrmation that the
GoGear Mix can be safely removed, then
disconnect the Digital Audio Player from
the USB port.
Connect and charge
The GoGear Mix has a built-in battery that
can be charged through the USB port of a
computer.
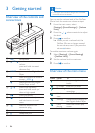
Connect the Digital Audio Player to a
computer
1 Slide out the integrated USB plug ( ) of
the Digital Audio Player.
2 Connect the USB plug to a spare USB
port on your computer.
3 Turn on your computer.
The GoGear Mix charges. »
Note
For rst-time use, allow the GoGear Mix to charge •
for 3 hours.
The charging animation stops and the • icon is
displayed when the charging process is completed.
When you connect the Digital Audio Player
to the PC for the rst time, a pop-up window
appears:
1 Select Install Philips Device Manager.
2 Follow the on-screen instructions to
complete the installation.
If the pop-up window is not displayed
automatically:
1 Select My Computer (Windows XP /
Windows 2000) / Computer (Windows
Vista).
2 Right click on Philips GoGear Mix.
3 Select Install Philips Device Manager.
4 Follow the on-screen instructions to
complete the installation.
Connect and charge
English
EN