


English CONTROLS/POWER SUPPLY
Using AC Mains
1 Check if the power supply, as shown on the type
plate located on the bottom of the set, corre-
sponds to your local power supply. If it does not,
consult your dealer or service centre.
2 Connect the power cord to the wall socket.
3 To disconnect the power supply, unplug the set from
the wall socket.
The type plate is located on the bottom of the set.
Helpful hints:
– To avoid unnecessary energy consumption, always
adjust the source selector to TAPE/OFF after
using the set. Also check that the tape deck keys
are released.
BASIC FUNCTIONS
Switching on and off and selecting function
1 To switch on, adjust the source selector to
CD/MP3, AM, FM or TAPE/OFF as desired.
2 To switch off, adjust the source selector to
TAPE/OFF and check the cassette keys are
released.
Helpful hints:
–To change from TAPE to FM, AM or
CD/MP3
func-
tion, or when you are switching off the set: first,
make sure you press the tape
0 9
key to end play-
back and all the cassette keys are released.
– The tone, sound settings, tuner presets and the vol-
ume level (up to a maximum volume level of 20)
will be retained in the set’s memory.
Adjusting volume and sound
1. Adjust the volume with the
VOL 3, 4controls. (or
VOLUME +, – on the remote control)
™ Display shows and the volume level in
number from 00-32.
2. Press DBB once or more to select dynamic bass
boost on or off.
™ Display: shows when activated.
DIGITAL TUNER
Tuning to radio stations
1 Push the source selector to AM or FM.
– is displayed briefly and then the radio sta-
tion frequency, waveband and, if programmed, a
preset number are shown. (See 2)
2 Press and hold ∞ or § until the frequency in the
display starts running.
™ The radio automatically tunes to a station of suf-
ficient reception. Display shows during
automatic tuning.
3 Repeat step 2 if necessary until you find the desired
station.
•To tune to a weak station, press ∞ or § briefly
and repeatedly until you have found optimal recep-
tion.
To improve radio reception:
• For FM, extend, incline and turn the telescopic aeri-
al. Reduce its length if the signal is too strong.
• For AM, the set uses a built-in aerial. Direct this
aerial by turning the whole set.
Programming radio stations
You can store up to a total of 20 radio stations in the
memory (10 FM and 10AM), manually or automatically
(Autostore).
Manual programming
1 Tune to your desired station (see Tuning to radio
stations).
2 Press PROG to activate programming.
™ Display: PROG flashes.
3 Press
-, +
(on the remote control 3,4) once or more
to allocate a number from 1 to 10.
4 Press PROG to confirm.
5 Repeat steps 1-4 to store other stations.
Helpful hints: You can erase a preset station by
storing another frequency in its place.
Autostore
Autostore automatically starts programming radio sta-
tions from preset 1. Any previous presets e.g. manually
programmed will be erased.
1 Select AM or FM.
2 Press PROG until flashes.
™ Available stations are programmed (AM or FM).
After all stations are stored, the first autostore
preset station will then automatically play.
To listen to a preset or autostore station
Press the ALBUM/PRESET
-, +
(on the remote control
3,4) buttons once or more until the desired preset
station is displayed.
SUPPLIED ACCESSORIES
– AC power cord
– remote control
TOP AND FRONT PANELS (See 1)
1 PUSH TO OPEN - press to open/close CD door
2 PROG -
CD/MP3:
programs tracks and reviews the
program
AM/FM:
programs preset radio stations
3 MODE - selects different play modes: e.g. REP or
SHUF (random order)
4 VOL 3 , 4 - adjusts volume level
ALBUM/PRESET + ,-(up, down) -
MP3 only: selects albums
AM/FM: selects a preset radio station
5 Display - shows the status of the set
6 2; - starts or pauses CD playback.
9 - stops CD playback;
- erases a CD program
∞ , § TUNING DOWN, TUNING UP -
CD/MP3: - searches backward and forward within a
track;
- skips to the beginning of a current track/
previous/ later track
AM/FM: -
tunes to radio stations
7 DBB (DYNAMIC BASS BOOST) -tu
rns the bass
enhancement on / off
8 CASSETTE RECORDER keys:
RECORD 0 - starts recording
PLAY 1 - starts playback
SEARCH 5 / 6 - fast winds/ rewinds tape.
STOP
•
OPEN 0 9 - stops the tape;
- open the cassette
compartment
PAUSE ; - pauses playback or recording
9
Source selector:
CD/MP3,
AM, FM
, TAPE/OFF
–
selects CD/MP3-CD, radio or tape source of
sound;
–
switches off the set
BACK PANEL
0 Telescopic aerial - improves FM reception
! Battery compartment - for 6 batteries, type
R-14, UM2 or C-cells
@ AC MAINS - inlet for power cord
REMOTE CONTROL
1 VOLUME
+, – – adjusts volume level (up, down)
2 SHUFFLE – plays all CD tracks in random order
3 2; – starts/ pauses CD playback
4 SEARCH 5, 6 – searches backwards/ forwards
within a track
5
ALBUM/
PRESET 3,4
MP3 only: selects albums
AM/FM:
selects a preset radio station (up, down)
6 TUNING ∞, § – tunes to tuner stations
7 9 – stops CD playback;
– erases a CD programme
8 ¡, ™ – skips to the beginning of a current track
previous/ subsequent track
9 REPEAT –selects repeat modes
CAUTION
Use of controls or adjustments or performance of
procedures other than herein may result in haz-
ardous radiation exposure or other unsafe opera-
tion.
POWER SUPPLY
Whenever convenient, use the AC power supply to
conserve battery life. Make sure you remove the power
plug from the set and wall socket before inserting
batteries.
Batteries (not included)
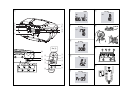
Main set (See 1)
• Insert 6 batteries, type R-14, UM2 or C-cells,
(preferably alkaline) with the correct polarity.
Remote control (See A)
• Insert 2 batteries, type AAA, R03 or UM4 (prefer-
ably alkaline).
Incorrect use of batteries can cause electrolyte leak-
age and will corrode the compartment or cause the
batteries to burst.
• Do not mix battery types: e.g. alkaline with carbon
zinc. Only use batteries of the same type for the set.
• When inserting new batteries, do not try to mix old
batteries with the new ones.
• Batteries contain chemical substances, so
they should be disposed of properly.
POWER SUPPLY/BASIC FUNCTIONS DIGITAL TUNER