


64
Español
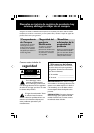
Montaje de la Unidad debajo de un Armario
Preparación
● Pida ayuda a un amigo. Una ayuda extra para
sujetar la unidad hace que el montaje sea más
fácil y rápido.
● Usted puede instalar la unidad en la cocina con o
sin soportes.
a Busque un lugar cerca de un tomacorriente de
pared para el montaje.
b Use la plantilla de montaje para verificar el
diseño y grueso del fondo de su armario de
cocina.
c Decida si desea conectar la unidad a otros
equipos de sonido/vídeo.
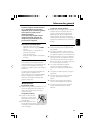
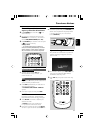
Montaje de la Unidad
Para mayor detalle de como usar el equipo de
montaje, por favor ver las instrucciones impresas
en el Inicio rápido y en la plantilla
¡IMPORTANTE
– Nunca enchufe el cable de corriente
CA en el tomacorriente sin haber
completado la instalación.
– Monte la unidad de forma que el cable
de corriente CA se pueda enchufar
directamente en el tomacorriente de
pared.
– No use un convertidor o cable de
extensión.
-Instale la unidad tan lejos le sea posible
de cualquier fuente de interferencias,
como refrigeradores, microondas,
lámparas fluorescentes, etc.
– Debe haber al menos 2.5" distancia
entre la unidad y la pared.
– Para reducir el riesgo de fuego,
no ponga ningún aparato de calor o
electrodoméstico de cocina debajo de
la unidad, especialmente si la pantalla
LCD esta abierta o en uso.
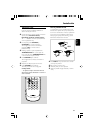
a
Template
b
FRONT
Use 1/4"
drill
Recommended depth of cabinet
at the rear to allow for connections
DC
VIDEO
IN
AUDIO
L
IN
R
TV
ANT
AM
FM
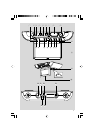
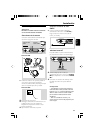
Mount it
Ask a friend to help you mount the unit as it is quite heavy.
A
•
Cut the template to fit inside the cabinet.
•
Align the template border marked "FRONT"
along the front edge of your cabinet.
•
Use adhesive tape to fix the template.
•
Drill 1/4 inch holes (size X.X mm diameter,X
inch),as marked X on the template.
•
Remove the template when you finish drilling.
B
Using the spacers
On the spacers,there are 4 pairs of notch length
options.Depending on the thickness of you cabi-
net bottom (with/ without an overhang),these
notch lengths correspond to the 4 notch height in
the space holders,and allow you to adjust to the
best height to help you mount the unit.
•
Measure the height of the cabinet bottom
and/overhang.
•
Turn the spacer counterclockwise to determine
which of the 4 heights is most suitable:High ••
Low
•
Insert the spacers accordingly.
C
•
Manuallyfasten the 4 screws down into the
spacer holder holes to mount your set.If the
overhang is more than 1 1/4 inch,use longer
screws (not included).
Tip
– Use a nail to start each drill hole.
– Hold your drill firmly at 90o with the cabinet bottom and drill holes at
low speed.
– Clear wood shavings.
Tip
To prevent damage to your set,do not use an electric drill
to secure screws when mounting!
– Hold the unit horizontally when installing it,since the CD tray may
open if the unit is shaken.
– Use the cable manager to manage excess power cord length.
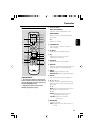
C
Template
A
H
L
Spacer
L (Low)
L••H (4 heights)
Arrow
B
Plantilla