


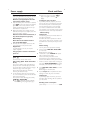


Power supply
Make sure you remove the plug from the set
and wall outlet before inserting batteries.
Batteries (not supplied) for the main
unit and the outdoor sensor
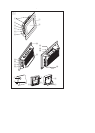
1 Open the battery door and insert 4 batteries,
typed AAA for the main unit, and 2 batteries
typed AA for the sensor, with the correct
polarity as indicated by the "+" and "–" sym-
bols inside the compartment.
2 Replace the battery door, making sure the
batteries are firmly and correctly in place.The
set is now ready to operate.
Batteries contain chemical substances, so
they should be disposed of properly.
Mains Adapter.
Note: Remove the batteries before
you use the AC adapter.
1 Connect the mains adapter to the set's DC
7.5V socket and to the power socket.
Helpful hints:
To avoid damage to the set, use only the
adapter supplied!
The type plate is located on the bottom
of the set.
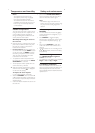
Setting the clock and date
(see 2)
The clock uses 24-hour time format.
Auto setting (RCC - Radio Controlled
Clock)
The set has a built-in radio controlled clock
(RCC).The clock automatically synchronizes
the current time and date when it is brought
within the range of the radio signal
DCF77.5KHz generated from Frankfurt,
Germany, for Central Europe.
1 For the first time when the set is powered
on, or reconnected to power, the set will auto
perform RCC searching.
Or, to perform RCC searching, press briefly
TIME SET / RCC SYNC.
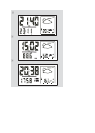
➜ The will display flashing, indicating
RCC searching is in progress (See 3).
➜ When time signal is received, dis-
plays. If no signal is received, will
display
.
To adjust to your local time
• If you didn’t previously adjust to your local
time, or the set is reconnected to power, the
time searched by RCC is Central European
time.To adjust the time to your local time,
you need to calculate the time zone differ-
ence between your local time and the central
European time, and do the steps described in
“ Manual setting ”.
Helpful hints:
– The searching will stop 10 minutes later if no
time signal is received.
– RCC time will auto be updated at 2: 00 am
every day.You don’t need to re-adjust to your
local time if the set already shows your local
time.
Manual setting
You may also set or adjust time manually.
1 Press and hold TIME SET / RCC SYNC
for 2 seconds.
➜ The digits for year flash.
2 Hold down or press TUNING +/- repeat-
edly to adjust the time digits.
• If the set currently shows the central
European time, add or subtract by hour(s)
the time zone difference from your local time.
• When it comes to adjust month and day, you
may press AUTO SCAN/DATE to change
the display order between month and day.
3 Press TIME SET / RCC SYNC to confirm
the setting.
➜ The digits for month flashes.
4 Repeat steps 2-3 to complete all the other
settings for month, day, hour and minute.
Helpful hints:
– If you already adjust the time to your local
time, RCC time searching will auto update to
your local time.
Standby power consumption
(clock mode).........................................................1.5W
Power supply Clock and Date