


nov anov a
nov anov a
Introduction
Safety Guidelines
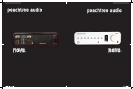
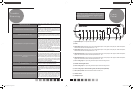
Back Panel Connections
Front Panel
Remote Control
Technical Specications
Product Guarantee and Service
Trouble Shooting
Useful Tips and more...
Connections
• Co Axial Digital Inputs: How to connect units with a digital co-ax output: i.e.
CD players, Logitech Squeeze box, Sonos ZP80/90, Wadia i170 etc.
From Back panel connect the input with a digital coaxial cable (7 or 10) to the
coax output from any of the above products or any product that has this kind
of digital output. Select the corresponding input in the front of the Nova.
• Optical Digital Inputs (sometimes called Toslink): How to connect sources
with a digital optical output: i.e. CD players, Apple TV or Airport express (special
Apple optical cable needed). From Back panel connect the input with an opti-
cal cable (8 or 9) to the optical output from any of the above product or any
product that has this an optical output. Select the corresponding input in the
front of the Nova.
• USB Input for Computer: While both the Nova and your computer are in the off position, connect a USB cable
from your PC to the back of the Nova (6). Turn on the Nova and then boot up your PC. (it doesn’t have to be
done this way….both can be on….but we can leave it I guess)
In the bottom right corner of your screen, you’ll see a speaker icon. RIGHT CLICK this icon and select “Adjust
Audio Properties”. Follow the “Volume” tab.
Beside the speaker icon in the volume tab, use the drop-down tab and select USB Audio DAC.
You are now ready to launch and play your favorite music server program like iTunes or Windows Media although
there are many more to chose from. Be sure you have the USB input selected on your Nova
• USB for Mac: While both your Mac and Nova are in the off position, connect a USB cable from your Mac to
the USB input on the back of the Nova (6). Turn on the Nova and then boot up your Mac. (same thing…both
units can be on….you just can’t have the music server program open before you connect the USB)
In the “Systems Preferences” chose the speaker icon. When the next box appears, switch from “Internal
Speaker” to “USB Audio Device”
You are now ready to launch and play your favorite music server program like iTunes although there are many
more to chose from.
• Analog Hookup: The analog hook ups are for using conventional components like Tuners, Tape Decks,
SACD players etc.
If you plan to use a turntable, you’ll need an external phono preamp to match your cartridge output. Consult your
dealer for recommendations.
• Speaker Output: The Nova is designed to drive one pair of speakers between 4 and 8 ohms. Is is not advisable
to use more than one pair with the power from the Nova
• Pre Out: The Pre out can be used for several operations.
It can rst be used as a subwoofer output. Run a stereo pair of RCA from the pre-out (14) to the subwoofer
line-in. If your subwoofer has only one line-in, you can use a Y Adapter at the Nova (Dual Male to Single Female)
which will give you a summed single output. This single line RCA type plug will then be connected to the single
input on your subwoofer.
• External Amplier: Connect the Stereo RCA type cable from the pre output of the Nova to the stereo inputs
on your external amplier. Connect the speaker wires to the speakers. Turn on the Nova and then the external
amplier. At this point, you’ll be using the Nova as a Digital and Analog Preamp.
• External Amplier and Powered subwoofer: You will need to split the L/R outputs to two L/R outputs. To
do this, you’ll need to purchase
2-Y-Adapters (Single Male to Two Female). Plug the Y Adapters into the pre-out of the Nova. You now have
two outputs for each channel. Connect 1 set of L/R RCA type connectors to the external amp and the other
two outputs to your subwoofer.
• Using Nova as an external DAC: With your existing system, connect the “Fixed” line out from the Nova to
an Aux channel of your receiver or preamp. Hook any Digital inputs to the Nova as described above. Select
the connected digital input on the Nova, then select the input on your Preamp/Receiver that is connected the the
Nova’s line output.
WARNING: DO NOT CONNECT THE NOVA “FIXED” LINE TO A PHONO INPUT. THIS WILL OVERDRIVE YOUR
PREAMP AND YOU HAVE A GOOD CHANCE OF DAMAGING YOUR PREAMP/RECEIVER AND OR SPEAKERS.
The USB connections are repeated in the Useful Tips pages
Connections
Nova_Spread2-2 new pages.indd 3 7/13/09 2:55:11 PM