To start play
To stop play
To turn off
the unit
Using the unit with a car audio
system
Use only the specified car stereo cassette adaptor
and car adaptor. Using other adaptors can cause
overheating which can lead to fire.
The part numbers are indicated in parenthesses.
Items to be purchased
For connection to the car audio system
Car stereo cassette adaptor (SH-CDM10A)
Connect the car stereo cassette adaptor to the ear-
phone jack of th remote control and connect it to
the unit’s headphone jack. Set this unit’s volume to
10.
For securing the unit and connecting the power
supply:
≥Car adaptor (SH-CDC9)
≥Car mounting kit (SH-CDF20)
Note when using the car mounting kit (SH-CDF20)
Note!
≥When you switch off the car, volume and sound quality
may return to the original settings and the resume
function may work even if you change the disc.
≥It may not be possible to use the unit with some types
of car stereos owing to restrictions imposed by the
construction of the car stereo cassette adaptor.
For further details, refer to the instructions of the part
concerned.
5
RQT6367
Using the Unit with Optional Accessories
Using the Wired Remote Control
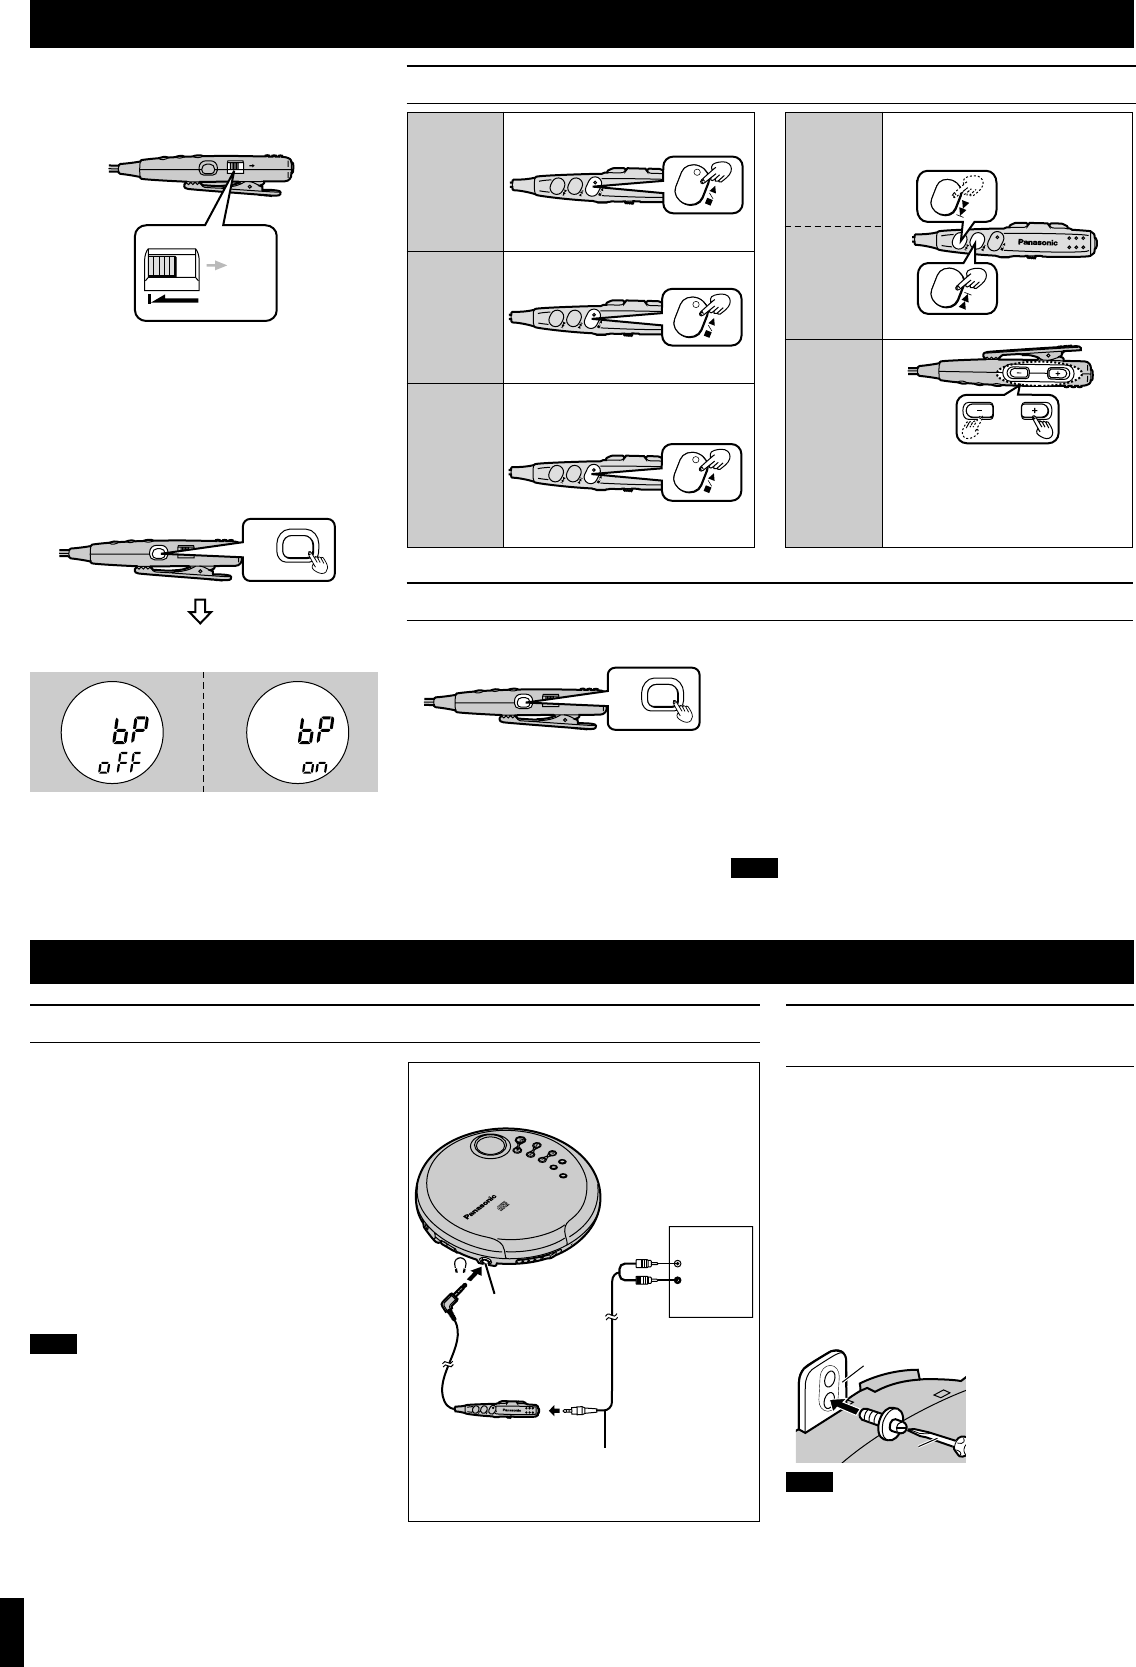
The remote control can be operated regardless of the
HOLD mode of the unit.
Preparation:
Release the remote control from the HOLD mode.
∫ Operation confirmation tones
» When an operation button is pressed, a confirmation
tone sounds. Refer to the parentheses in the illustra-
tion for the different types of confirmation tones.
∫ Turning the operation tones off and on
» While stopped or during play
» Press and hold [EQ] on the remote control for 5 sec-
onds until the unit's display appears. The tone
sounds when the setting is changed.
Basic operation
Skipping
tracks
Searching
through tracks
To adjust the
volume
Press once during off or stop mode.
Press once during play.
Press and hold during play or stop
mode.
EQ
HOLD
HOLD
V
O
L
V
O
L
V
O
L
(Beep)
(Beep...Beep)
(Beep...Bee...p)
Changing the sound quality
Press during play or stop mode.
Press during play.
(Press [:] twice to skip to the be-
ginning of the previous tracks.)
Press and hold during play.
V
O
L
V
O
L
VOL
Forward
(Beep Beep)
Backward
(Beep Beep Beep)
≥The volume range is 0–25. (Press
and hold to change the volume suc-
cessively.)
≥A tone (beep-beep) sounds when
you reach the minimum or maximum
volume.
Decrease
(Beep)
Increase
(Beep)
EQ
HOLD
EQ
The setting switches in the sequence indicated below each time
[EQ] is pressed.
S-XBS>TRAIN>Cancel (no indicator is shown)
^==========b
S-XBS:
Select this setting to boost the low frequency range response.
TRAIN:
Select this setting to avoid annoying other passengers with noise
from your headphones/earphones while riding on the train, or to
reduce fatigue when listening for a long period of time.
Note!
The setting returns to S-XBS when you disconnect the power
source.
To turn the tone off To turn the tone on
EQ
HOLD
EQ
(Beep)
L
R
VOL
VO
L
MEMORY
R
E
C
A
L
L
E
Q
MODE
O
P
E
N
H
OLD
Ë
Headphone jack (Ë)
Other equipment
(White)
(Red)
Stereo connection cable (not included)
To CD or
AUX
terminals
1Remove the screw from
the bracket at the rear
of the car mounting
base.
2
Replace the screw in the
lower hole of the bracket.
Bracket
Screwdriver
Using the unit with an audio system
Turn off this unit and the other equipment before con-
nection.
1 Connect the remote control to [Ë] on the unit.
2 Connect the stereo connection cable to the re-
mote control and the other equipment.
≥The unit may malfunction if you connect directly to
[Ë] on the unit.
≥Do not connect the cable to the PHONO jacks on
the amplifier.
3 Turn the operation tones off (see above) so they
are not heard when you press buttons on the re-
mote control.
4 Set the volume to 10.
Make further volume adjustments with the other
equipment.
Note!
≥Obtain the optional connecting cable if the other
equipment comes with mini-phone jacks.
≥If you connect speakers (active or otherwise) directly to
the unit's headphone jack, ensure they have an imped-
ance of 1 k≠ or less.


